Project Baking: 8 recipes for when you're stuck at home

It seems like most of us will be spending our days at home for the foreseeable future thanks to COVID-19. Martin works in professional soccer and MLS has suspended their season for the next 30 days, so things feel a little up in the air around here. Thankfully, since I work from home, I will still continue to develop and share recipes with you as normal for the next few weeks. I’ve decided, though, that all of this social distancing and self-quarantine is perfect for what I like to call ‘project baking’. These are recipes that you may not turn to for a weeknight dessert; they are little more labor-intensive and need a little more time (which is something we all have). So if you’re home, I encourage you to grab your kiddos or family or quarantine buddy, and hop in the kitchen. Knead some dough, decorate some cakes, and make something beautiful during this time.

BarnSour10.jpg

Classic Sourdough- Where better to start than a good ‘ole loaf of bread. Sourdough is one of my favorite things to make, and it’s made it’s way into my regular rotation. Here you’ll find a step by step guide to starting your very own sourdough journey—everything from creating a culture to the final loaf. I also have a video of the entire baking and shaping process saved to my Instagram highlights to make things a little easier for you.

Baklava2.jpg

Baklava- Sure there is a bit of layering involved in baklava-making, but it is worth it. If you’re looking for a nutty, buttery dessert to share with your loved ones, this is the one for you. Plus, there is nothing more delicious than pouring honey sauce on hot baklava and watching it bubble. As Lizzie McGuire says, “This is what dreams are made of.”

Babka5.jpg

Chocolate Tahini Brioche Babka- This might be my favorite recipe on the blog. It’s definitely in the top ten. Swirls of tahini and dark chocolate are tucked into fluffy brioche and the whole thing sort of melts in your month. Also, shaping babkas are fun and they’re very photogenic.

Bomboloni4.jpg

Bombolonis with Limoncello Cream- Bombolonis are Italian-style yeasted doughnuts. They are fried until they are golden brown, tossed in sugar while warm, and filled with a slightly citrus limoncello cream. Eat them for breakfast, brunch, dessert, lunch, really whenever. Also, if you tackle the Chocolate Tahini Brioche Babka (above), you can use the remaining half of the brioche dough for these doughnuts. See, you can multi-task project baking!

Chamomile Cake with Blood Orange Curd and Swiss Meringue Buttercream- Quarantine is the perfect time to dust up on your cake decorating skills. This chamomile cake feels like spring and it’s filled with a bright, citrusy blood orange curd. You can easily substitute whatever citrus you have on hand to make this cake your own.

HoneyCakeNewEdit.jpg

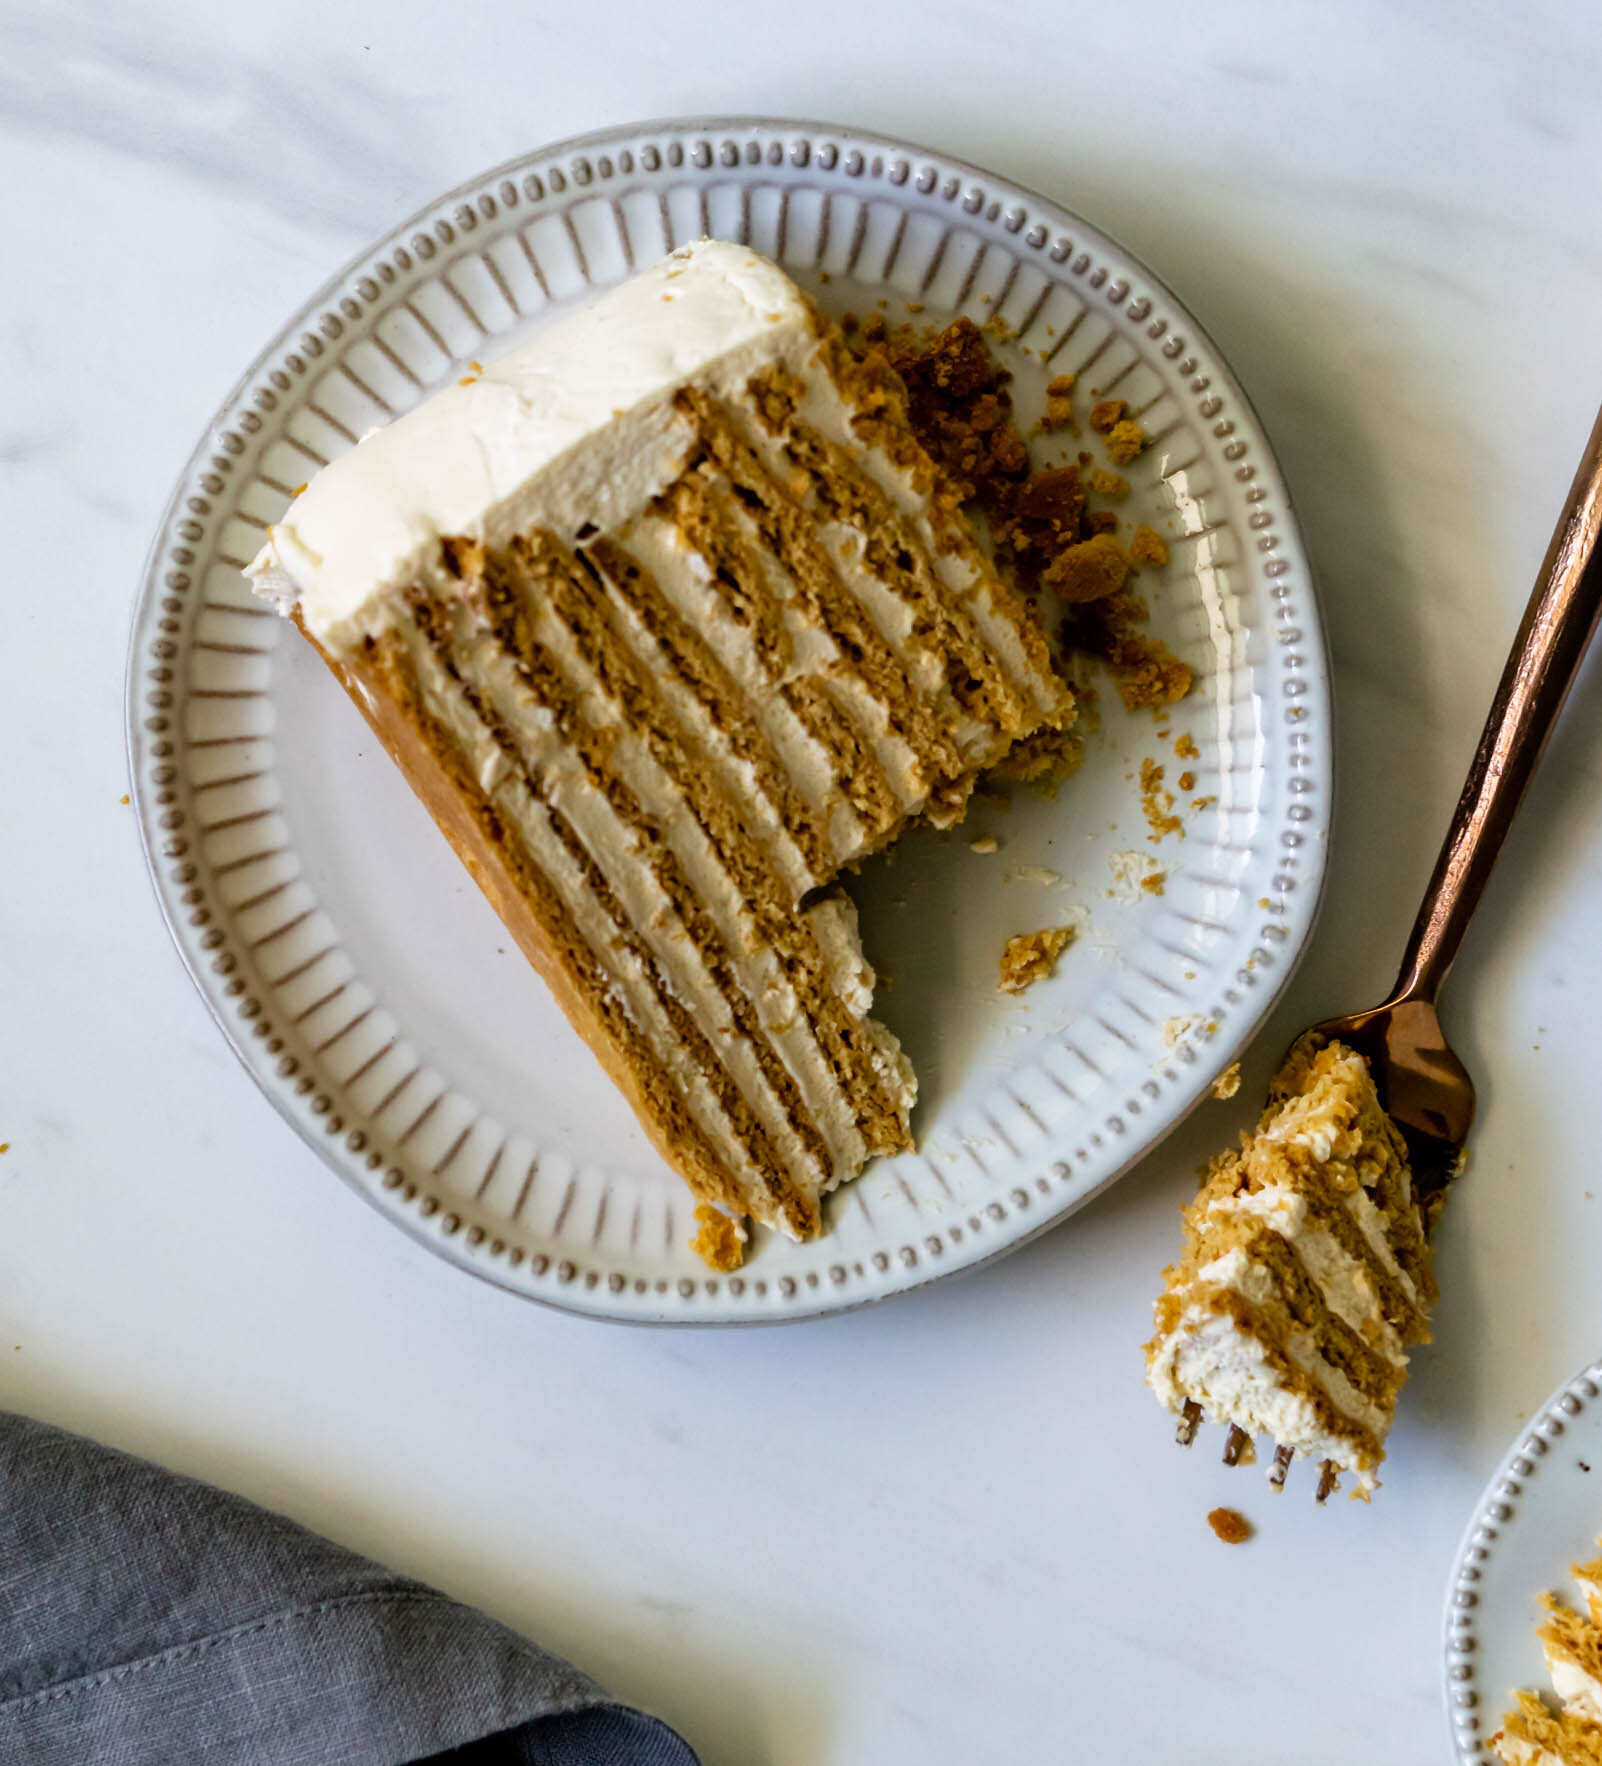
Russian Honey Cake- I first discovered Russian Honey Cake in pastry school. We made it as a project for one of my cake classes and I’ve since added it to my own kitchen repertoire. The cookie layers are similar to graham crackers and they’re sandwiched with a dulce de leche cream that softens the cookies just enough to be able to cut through them. It’s sweet and show-stopping at the same time.

CroissantsBrightEdit.jpg

Classic Croissants- Everyone should make croissants at least once in their lives. If nothing else, you will gain a new appreciation for your local bakery that makes those perfect croissants that flake into a million pieces the second you bite into them. These are classic, but feel free to fill them with chocolate or spinach or ham and cheese—really anything your heart desires!

bagelscc9.jpg

Multigrain Bagels with Quinoa and Arugula Cream Cheese- These bagels are filled with quinoa for a little extra protein and they freeze beautifully— a win-win in my book. Pair them with a bright, herby cream cheese and you’ve got a beautiful brunch pairing.

Mediterranean Month: Baklava

Our family discovered Disney World the first year that we moved to Florida. I was young enough that I don’t even think I knew Disney was a place before moving to the Sunshine State, but that all changed very quickly. For the first few years after moving, we thoroughly embraced the Florida resident lifestyle, got annual passes, and spent all of our free long weekends at the parks. 

The rides and the characters were cool, but my favorite part of Mickey Mouse’s home was late afternoon Epcot wandering. With a history teacher for a mother, we would inevitably end up at Epcot and often, my dad and sister would go back to the hotel for a few hours in the afternoon to rest and recharge before returning to the Disney night scene. During those, often rainy (because…Florida), afternoons, my mom and I would eat our way around the World Showcase. A bite of gelato in Italy, an eggroll in China, an apple danish in Norway, but the highlight of the afternoon- baklava in Morocco. There was something about that sticky, nut filled pastry that spoke to my heart and ever since then, good baklava transports me right back to those 90 degree afternoons spent wandering around the world with my mom. 

I will not lie to you, baklava is a labor of love. But I will also tell you that is worth every ounce of that labor. Making baklava is not a difficult or challenging process, but it is a process none the less. Layering each piece of filo takes time (hint: it moves quicker if you find a friend to help you), but when you bite into your baklava and all of those little layers begin to flake apart, you will be glad you did it. 

Baklava

Ingredients:

For the syrup: 

1 cup sugar

1 cup honey

1 cup water

1 T lemon juice

Orange peel 

Lemon peel

For the filling: 

About 1 lb nuts (I used 8 oz pistachios and 8 oz walnuts), coarsely chopped

4 T sugar

1/2 tsp cinnamon

1/2 tsp cardamom

1/2 tsp nutmeg

1/4 tsp ground cloves

3 T melted butter

1 lb unsalted butter (clarified)

1 16 oz package filo dough, thawed


Procedure:

  1. Thaw filo dough and remove from the package. It is important to keep the pastry covered so that it doesn’t dry out. Right before you begin assembly, unroll filo sheets onto a large sheet pan and cover with a damp towel and a layer of plastic wrap. (Don’t let the filo set out unwrapped too long before you begin working with it!)

  2. In a medium saucepan, combine sugar, water, honey, and stir together to begin dissolving sugar. Add lemon juice, orange peel, and lemon peel and bring syrup to a simmer over medium heat. Let syrup simmer for about 20 minutes, then remove from heat and let cool while you assemble the baklava. 

  3. While the syrup is simmering, clarify the butter. To clarify butter, place it in a small saucepan over medium heat. As the butter begins to melt, the milk solids will float to the top and you can use a spoon to scrape them off so you are just left with clear butter. It is not necessary to be a perfectionist about this and get all of the milk solids out. When researching, many recipes don’t even clarify the butter, just melt it, so just get as much as you can. 

  4. To prepare the filling, place nuts in the bowl of a food processor and pulse until coarsely chopped. Pour nuts into a large bowl and add sugar, cinnamon, cardamom, nutmeg, cloves, and melted butter. Toss together and set aside. 

  5. To assemble the baklava: brush the bottom of a 9x13 pan with a light coat of clarified butter. Place one sheet of filo dough on the bottom of the pan and brush with butter. Repeat layering filo dough until you have 8 pieces stacked, brushing each with butter before adding the next. After 8 sheets of filo, spread 1/3 of the nut mixture evenly over dough. Top with another 8 sheets of filo, each brushed with butter. After the second set of filo, sprinkle another 1/3 of the nut mixture over the dough. Add another set of 8 sheets, each brushed with butter, and then spread the remaining nut mixture over the dough. Top the final nut layer with 8 more sheets of filo, each brushed with butter, making sure to brush the eighth and final filo sheet with butter. 

  6. Before baking, use a very sharp knife to cut the pastry into squares or diamonds. If your knife is sharp and your cuts are firm, the pastry should easily cut into pieces.

  7. Bake the pastry in a 350 degree oven for 45-50 minutes, or until it is golden brown. Remove from oven. 

  8. Right when the pastry comes out of the oven, pour your cooled syrup over the entire pastry making sure that some of the syrup gets in all the corners and crevices. Let the baklava cool completely and then refrigerate it for at least 3 hours, but preferably overnight. 


Notes: If you want to, you can trim the filo dough sheets to fit the size of the pan that you are using. The package of filo that I bought contained 9x14 pieces so I opted not to trim them down and I just folded the extra inch over onto itself to fit the pan.