Everyday Cake with Chocolate Ganache Frosting

Good cake should not be a rarity. Everyday, no matter the challenges and struggles we might face, there are small things that should be celebrated. I think that celebrating the little things helps to keep us grounded and grateful, it helps me not get overwhelmed by the big stuff that I can’t always control. And my favorite way to celebrate is through cake! This “everyday cake” is my take on the classic yellow boxed cake, jazzed up a little.

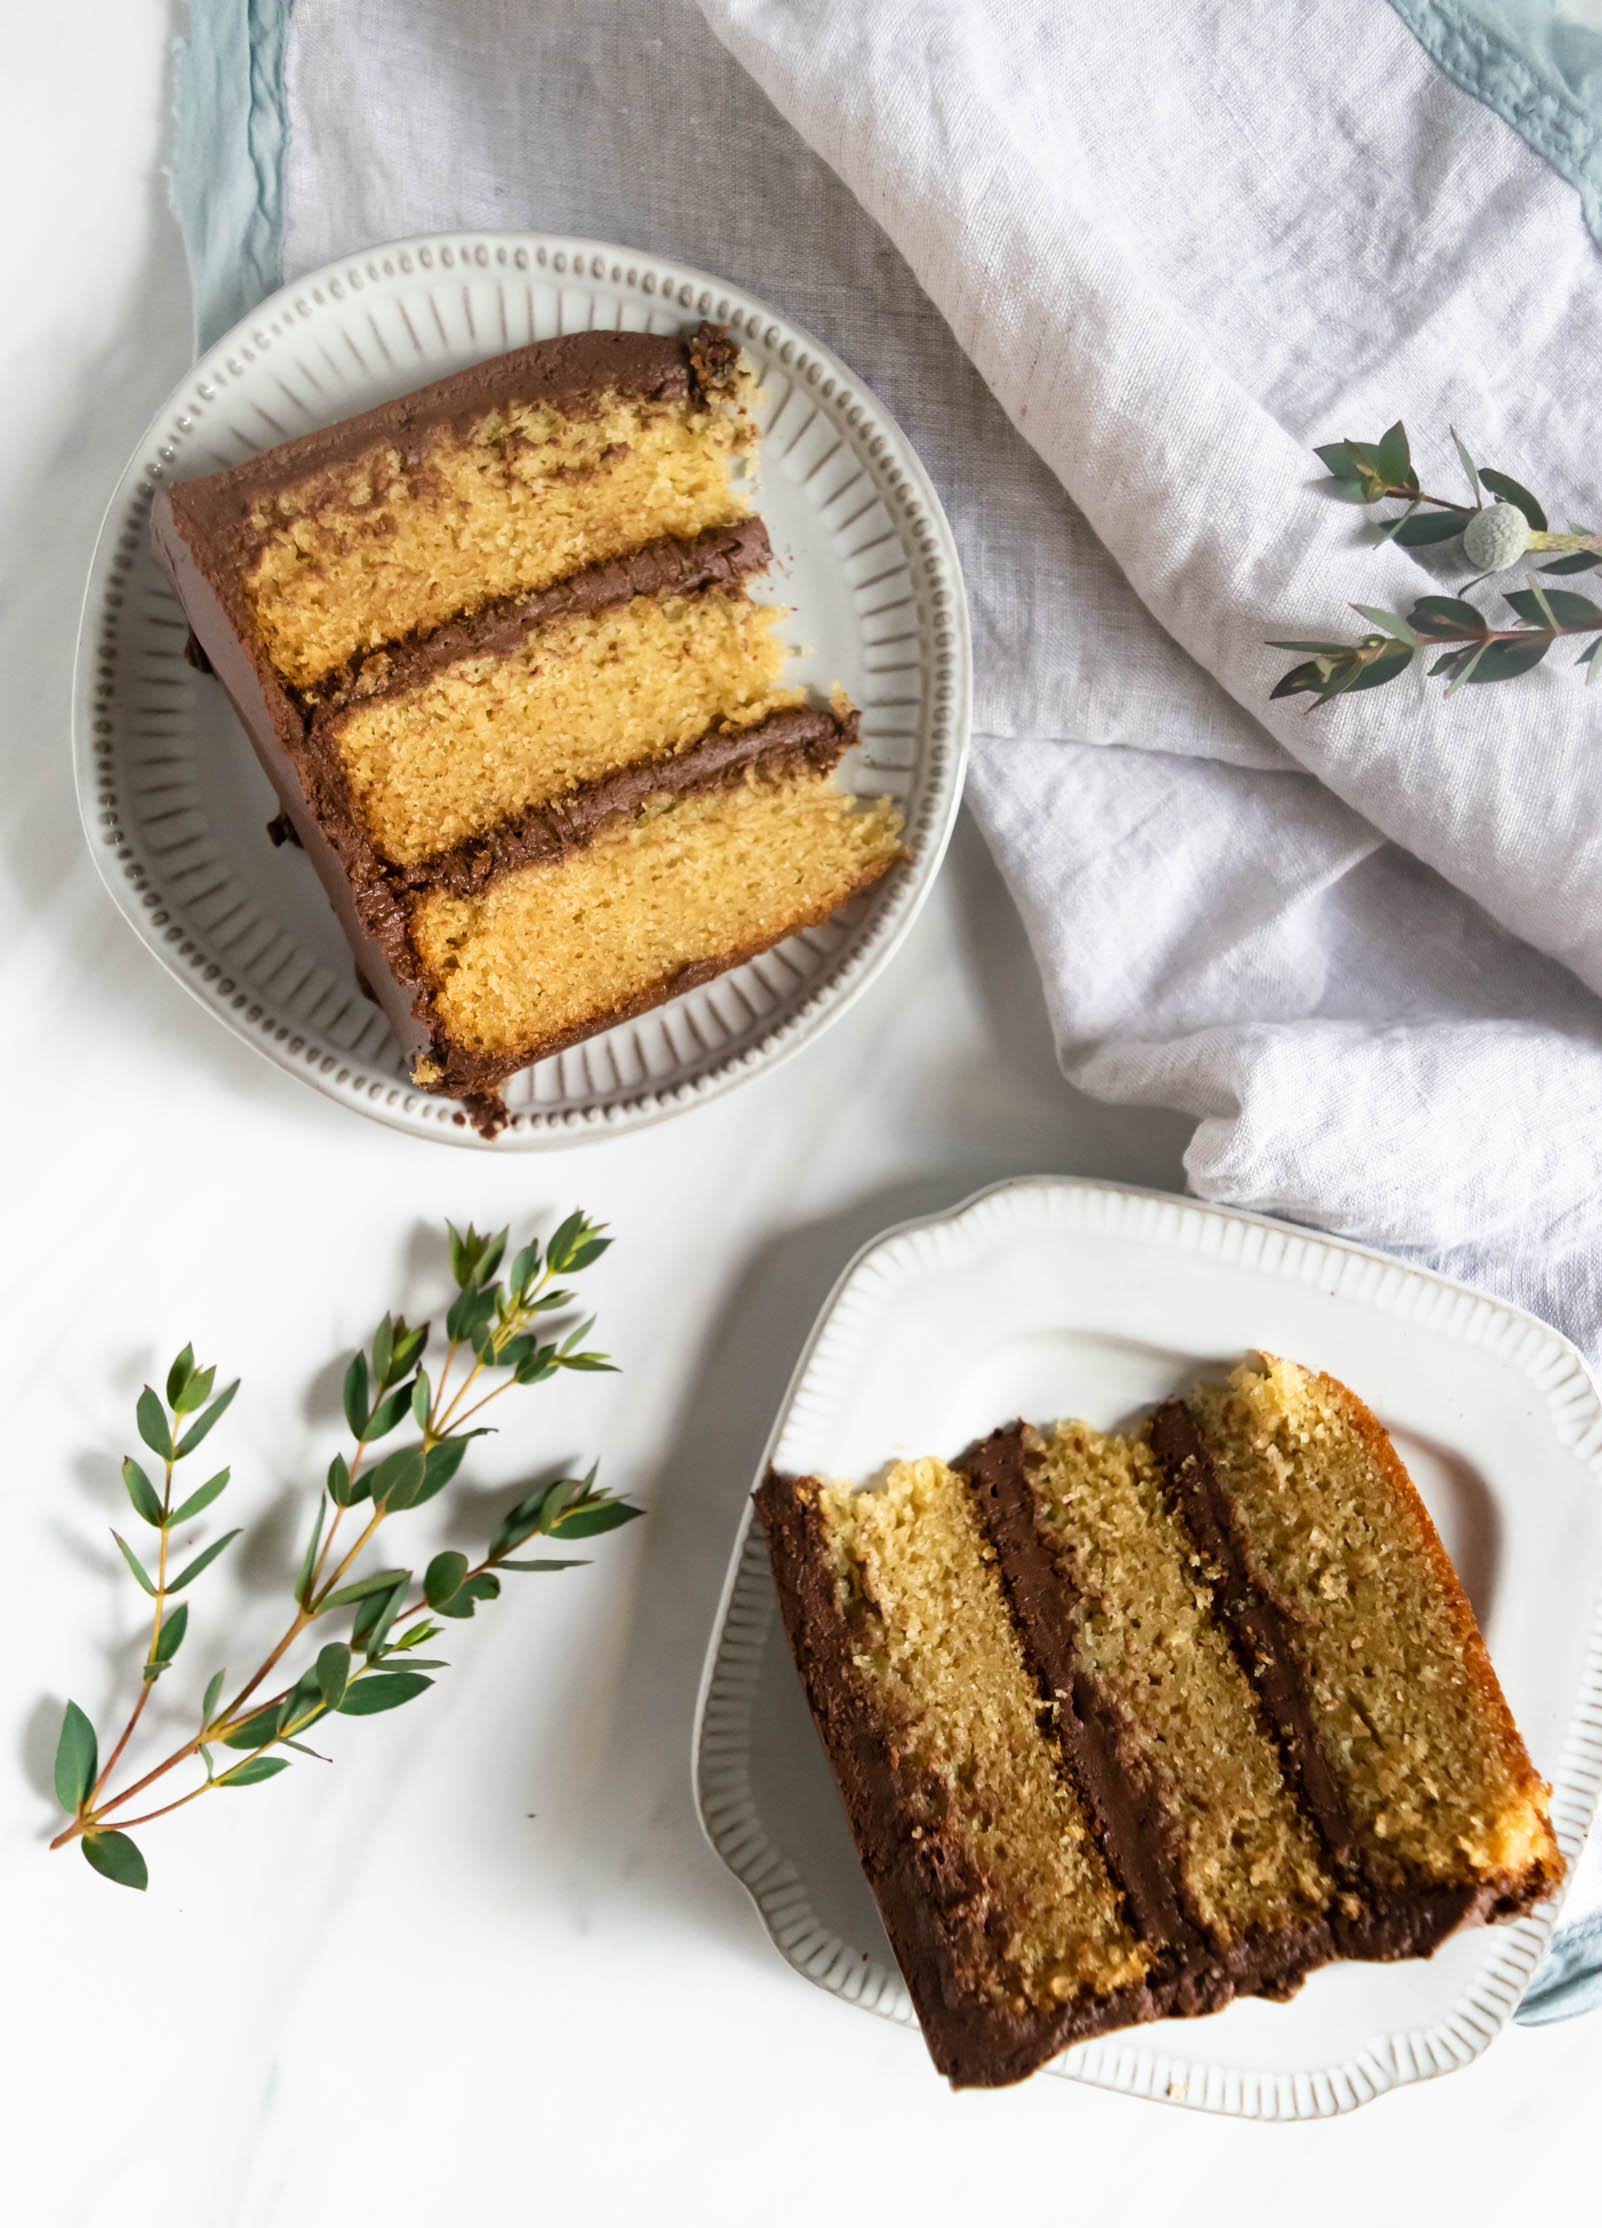
When you think about that quintessential yellow cake, it’s marked by moistness and fluffiness (those are very technical descriptions). In order to create an extra moist cake, I used both butter and oil in this recipe. I chose to use olive oil because I wanted to give a slightly grassy and full flavor, but you can easily substitute another more neutral oil. I used a blend of cake and all purpose flour to create a fluffy cake that would still hold up under the weight of the ganache. Cake flour has a lower protein level than other flours, so it creates less gluten which results in a lighter, fluffier crumb. You could also use all cake flour for the total flour amount, or even all AP flour (just remember your cake will be a little heavier).

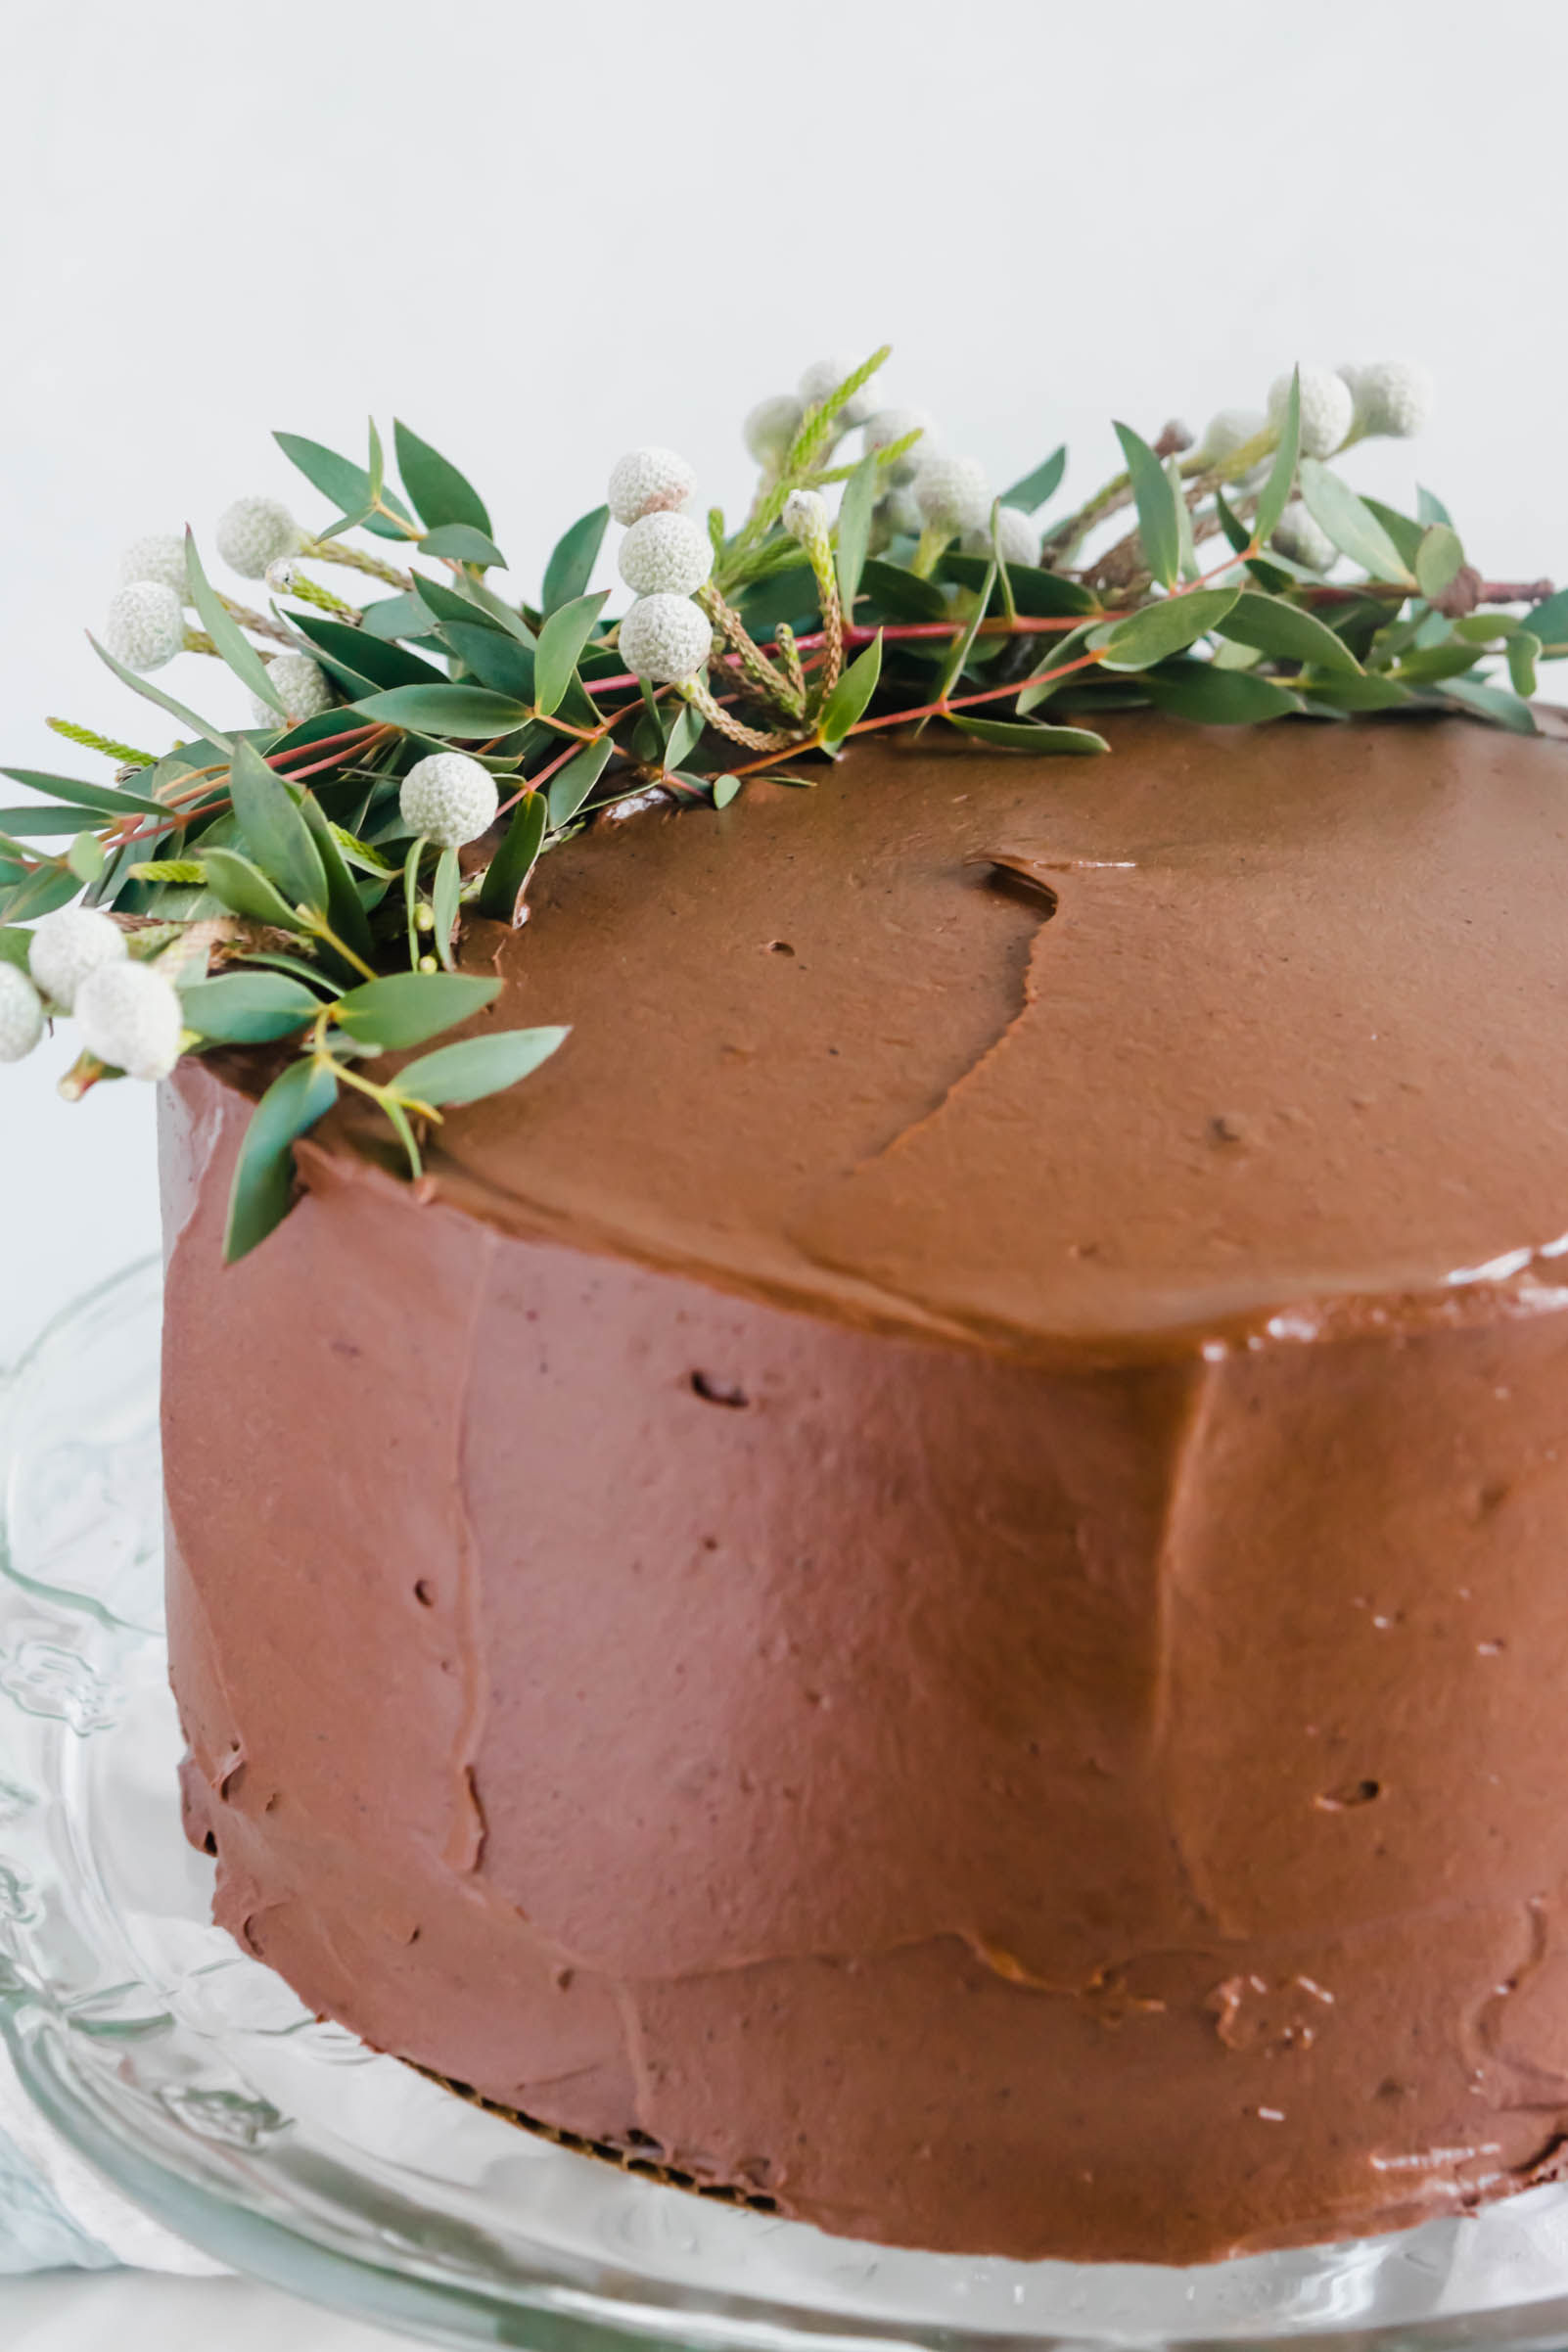
For this frosting, I didn’t want anything cloyingly sweet so I decided to use Rose Levy Beranbaum’s ganache frosting method and it turned out wonderfully and couldn’t be simpler. Using a food processor, pulse your chocolate to create small crumbs. Then heat heavy cream to a scald and pour into the running food processor, processing for about a minute until everything is emulsified. Then, transfer the ganache frosting to a bowl and let it cool until room temperature and slightly set up. This created a frosting that was denser than a traditional chocolate frosting, yet lighter than a ganache. Perfect for this everyday cake for all of your little celebrations!

Everyday Cake with Chocolate Ganache Frosting

Yield: 1 3-layer 8” cake

Ingredients: 

for the cake:

2 1/4 cups cake flour

1 cup all purpose flour

2 tsp baking powder 

1 1/2 tsp salt 

1 1/2 tsp baking soda 

1 1/2 cup sour cream

3/4 cup olive oil 

1 tbsp vanilla extract 

1 cup (2 sticks) unsalted butter, cubed, at room temperature

1 1/2 cup sugar

1/2 cup brown sugar

5 eggs 

3 egg yolks

for the ganache frosting:

16 oz dark chocolate (60% cocoa)

17.6 oz heavy cream


Procedure: 

to make the cake: 

  1. Preheat the oven to 350 degrees. Spray 3 8” cake pans with nonstick spray and line the bottoms with parchment paper rounds. Set aside. 

  2. In a medium bowl, whisk together cake flour, all purpose flour, baking powder, baking soda, and salt. Set aside. 

  3. In a large measuring cup or medium bowl, whisk together olive oil, sour cream, and vanilla extract. Set aside. 

  4. In the bowl of a standing mixer fitted with a paddle attachment, cream together butter and sugar until light and fluffy, about 4 minutes. Scrape down the sides of the bowl. With the mixer on low-medium speed, add eggs, one at time, making sure they are thoroughly combined before adding the next. Remember to scrape down the bottom and sides of the bowl frequently to make sure that everything is being evenly combined. 

  5. Reduce mixer speed to low and add 1/3 of the dry ingredients. Just before it is completely combined, add in half of the sour cream mixture. Alternate with another third of the dry ingredients, followed by the remaining half of the sour cream mixture. Finish by adding the final third of the dry ingredients and mix until everything is well combined. 

  6. Evenly divide batter among the three prepared pans and bake, rotating halfway through if necessary, for 25-30 minutes, until the cake begins to pull away from the sides of the pan springs back when touched. 

  7. Let cool for 5-10 minutes in the pan and then turn them out onto a cooling rack and let rest until complete cooled.

to make the ganache frosting: 

  1. When you are ready to frost the cake, place chocolate pieces in the bowl of a food processor. Pulse until chocolate is broken up into very small pieces. 

  2. Heat the cream in a medium saucepan until just before simmering, and small bubbles begin to appear on the outer edges. Very carefully, pour in the cream into the running food processor through the feed tube and continue processing for about 30 seconds after adding the last of the cream, until everything is combined. Transfer the ganache to a bowl and let sit at room temperature for a couple of hours, until completely cooled and thickened. 

  3. Just before you frost the cake, if you want your ganache a little thicker and fluffier, you can beat it in the stand mixer for a minute or two until it reaches your desired consistency. Be careful not to beat it too much, or too much air will be incorporated and your frosting will have air bubbles and won’t smooth completely when frosting. 


to assemble the cake: 

Classic Croissants

As you grow up, it’s interesting to discover where your characteristics come from. There are some parts of my personality that I can pinpoint to either my mom or dad, and some that are solely mine, but a large amount of my personality traits run to my Aunt Karen. (Fun fact: both my mom and dad have sisters named Karen, so we’ve always just used the terms “mommy’s aunt Karen” or “daddy’s aunt Karen” to distinguish between the two.) Daddy’s Aunt Karen and I not only share a birthday, but we also share a passion for serving for populations on the outskirts of society, a love for really good food, and a knack for great wine. Two years ago, for our joint birthday celebration, my aunt and I spent 10 days in Aix-en-Provence, a small city in Southern France, where I continued to fall more deeply in love with laminated doughs.

I could spend hours and hours reminiscing about the cobblestone streets and remembering the smells and sounds of the daily market, but today I am trying to stay focused on pastries. Croissants specifically. Croissants have always been my favorite pastry, partly because of their flavor, but mostly because of their craftsmanship. Layers and layers of butter are expertly folded into the dough, creating thousands of sheets, swirling through the inside and giving way to a flaky exterior, that shatters under the weight of any pressure. They are a beautiful work of art. Each morning during our time in Aix, someone in our group would rise earlier than the rest of the house, head down to a boulangerie just as the sun was coming up and bring back assorted breads and pastries for breakfast. (And is this not the perfect morning??) Every morning, no matter who went on the breakfast bread run, there was a pain-au-chocolat tucked in amongst the buns, specifically for me.

For me, as a someone who really loves to be successful at everything the very first time I do it, croissants are a reminder to slow down. Like any good artist, practice and repetition are key to creating a masterpiece and croissant making is no exception. As I continue to practice, my hands will learn the motions and the feel of the dough, my layers will get flakier and my crumb more even. Until then, making croissants at home brings me back to a little town in the South of France and reminds to slow down and enjoy each and every part of the journey.

*Some Notes: 1) Because they use bread flour, which has a higher protein level, these croissants are a little more bread-like than others. They are still light and flaky, but they are also able to hold up if you want to split them open and use them to make breakfast sandwiches throughout the week. 2) I put the measurements are in both grams/ounces and cups for ease of use, but I highly recommend you use grams/ounces when making any sort of bread. You can get a cheap-o kitchen scale on amazon and it will quickly become your best friend.

Classic Croissants

Yield: 12 large croissants 

Ingredients: 

for the dough (detrempe): 

5 1/4 cups (690g) bread flour

1 1/4 cup (310g) whole milk

2 eggs

1/3 cup (81g) sugar

2 tsp (13g) salt

2 1/2 tsp (9g) instant yeast

1 tbsp (19g) unsalted butter 

for the butter block: 

3 sticks (330g) unsalted butter, room temp

1 tbsp (9g) flour 

Procedure:

To make the butter block:

  1. In a stand mixer fitted with the paddle attachment, beat butter for 30 seconds. Add flour and mix until butter and flour are completely incorporated.

  2. Fold a piece of 13x18 parchment paper in half, crease and open it up on the table. Place the butter so that it lines up with the crease and fold the remaining three sides of the parchment to create a 6x8 envelope around the butter. 

  3. Roll the butter out towards the edges so that the butter completely fills the envelope. Freeze until solid. 

Making the dough: 

  1. Scale ingredients and bring butter to room temperature. Make sure milk and eggs are at 60 ℉ and hydrate yeast in milk.

  2. Place all ingredients in the bowl of a stand mixer and mix on low speed with a dough hook. When all ingredients are mixed together with gluten development (about 2-4 minutes), increase speed to medium and mix for another 30 seconds. 

  3. Remove dough from mixer and allow to proof at room temperature for 2 hours. 

  4. Loosely shape dough into a rectangle and place on a plastic lined half sheet pan (I used a 12x17 sheet pan). Cover with plastic and refrigerate overnight. (Or proof for 1 1/2 hours and freeze for 30 minutes)

  5. Transfer the dough to the freezer and freeze for 30 minutes. Soften the butter block until it achieves a pliable consistency. 

Laminating the dough:

  1. Roll dough into a 13x9 rectangle. Place butter block in the center of the dough with short ends touching the long edges of the dough. Fold the two edges of the dough in so that they meet in the center and press the seam together with your hands. 

  2. Working on a lightly floured surface, roll the dough lengthwise until it is about 1/2 in thick. Fold dough in a letter fold (trifold). Place in refrigerator for 1 hour.

  3. On a floured surface, place dough in front of you with the short end closest to the edge of the table and roll the dough lengthwise to 1/2 inch. Complete another set of letter folds. (2 folds each time, you should now have folded the dough 4 times.)

  4. Rest dough in freezer for another hour. Roll out and fold again. 

  5. Wrap dough in plastic wrap and rest in freezer for 1 hour. Refrigerate overnight.

Dividing: 

  1. Remove dough from refrigerator. Roll the dough to an 18x11 rectangle. Dough may need to rest for 10 minutes in the freezer in between passes. 

  2. Using a pastry wheel, trim the edges. Use a ruler to mark dough at 3 inch intervals along both long sides of the dough. Lightly join the marks with one long mark. 

  3. Mark the center of each section with a notch on the top and bottom of the dough. 

  4. Use the pastry wheel and ruler to cut a straight line from each base mark to the corners of the strip opposite it at the top. 

Shaping/proofing/baking: 

  1. Place a triangle of dough in front of you with the top pointing out. Starting with the base of the triangle, roll up the dough completely. 

  2. Place croissants seam side down on a parchment lined sheet pan. Cover with plastic wrap and let proof at room temperature for 2-2 1/2 hours. 

  3. Preheat oven to 400 ℉ about 30 minutes before baking. 

  4. Brush the croissants with egg wash and bake for 15-20 minutes, until deep brown and cooked through. 

Sample Production Schedule:

Day 1 (10:30 AM)- Make butter block; Make detrempe (proof for 1 1/2 hours, freeze for 30 minutes)

12:30 PM- Roll out dough and complete first fold, refrigerate for 1 hour

1:30 PM- Roll out dough and complete second fold, refrigerate for 1 hour

2:30 PM- Roll out dough and complete third fold, wrap tightly in plastic wrap and chill overnight.

Day 2 (AM): Roll out, cut and shape dough

Proof for 2 1/2 hours, until size increases by 50%; brush with egg wash and bake at 400 ℉ until deeply golden.

Coffee and Cardamom Crumb Cake

My favorite food group is “breakfast dessert”. These are lightly sweetened pastries that pair exceptionally well with a cup of coffee and are ideally meant to be a follow up to an egg sandwich. Since I try to eat fruits and vegetables about 80% of the time, I don’t often indulge in breakfast dessert, but when I do, I take it very seriously. Let me introduce you to the prime breakfast dessert exemplar- coffee and cardamom crumb cake.

I’ve been dreaming about making a super traditional NY-style crumb cake, one that is moist and sour cream based with a crumb layer equally as thick as the cake layer itself for the last few months. I’ve recently been drawing a lot of inspiration from Saveur Magazine’s special “Global Baking” issue and they included a crumb cake recipe that looked like it checked all my boxes so I decided to play around with it and ended up with this coffee and cardamom crumb cake. I made a base batter that I flavored with a little extra ground cardamom and then divided 1/3 of the batter out. I then made a paste with espresso and cocoa powder and mixed it in to the smaller amount of batter, swirling it in to plain batter. The whole thing is then covered with an extra buttery crumb topping. As your sprinkling, it’s going to feel like it’s too much crumb topping- it’s not, I promise. Keep going. Your half finished cup of coffee will thank you later.

Coffee and Cardamom Crumb Cake

Yield: 1 9x13 cake 

Ingredients: 

for the crumb topping: 

2 c all purpose flour

1 c brown sugar

1/4 c sugar

1 tsp cinnamon 

1/2 tsp cardamom

1 tsp salt 

1 cup + 2 tbsp unsalted butter, cubed and slightly softened

for the cake: 

2 1/4 c all purpose flour

1/2 tsp baking powder

1/2 tsp baking soda

3/4 tsp salt

1 tsp cardamom

3/4 c + 2 tbsp unsalted butter, softened 

1 1/2 c sugar

3 eggs

2 tsp vanilla

1 c sour cream

2 tbsp ground espresso

2 tsp dark cocoa powder

1-2 tbsp hot water

Procedure:

to make the crumb topping: 

  1. In a medium bowl, whisk together flour, both sugars, cinnamon, cardamom, and salt. 

  2. Add cubed butter pieces and use your fingers to work butter into dry ingredients until evenly distributed. Refrigerate while you make the rest of the cake. 

to make the cake: 

  1. Preheat the oven to 350 degrees. Grease a 9x13 cake pan and line with parchment paper. Set aside. 

  2. In a medium bowl, stir together flour, baking powder, baking soda, salt, and cardamom. Set aside. 

  3. In the bowl of a standing mixer fitted with the paddle attachment, cream together butter and sugar until light and fluffy. 

  4. Add eggs and vanilla extract and mix until combined, making sure to scrape down the sides and bottom of the bowl. 

  5. With the mixer on low speed, add 1/3 of the dry ingredients, followed by 1/2 of the sour cream. Scrape down the sides of the bowl. Add another 1/3 of the dry ingredients, mix to combine, followed by the other half of the sour cream. Add the last 1/3 of the dry ingredients and then scrape down the sides of the bowl to ensure that everything is combined. 

  6. Spread 2/3 of the batter evenly into the prepared pan. 

  7. In a small bowl, combine espresso and cocoa powder. Add hot water and stir together to make a paste. Add this paste to the remaining 1/3 of the cake batter. Return to the mixer and mix on medium speed until completely combined (about 30 seconds). Scrape the sides/bottom of the bowl again. 

  8. Dollop the espresso cocoa batter evenly over the top of the cake. Use a knife or a toothpick to swirl batters together. 

  9. Sprinkle crumb mixture evenly over the top of the cake. Bake for 50-55 minutes, until the cake begins to pull away from the sides of the pan and a toothpick inserted in the center comes out clean. 

  10. Let cool in the pan for 15-20 minutes before using the parchment paper to lift the cake out of the pan.