Wilderness Tiramisu

Transitions call for cake. All too often, we are quick to celebrate the exciting things in life- graduations, weddings, babies, promotions- things that show achievement and accomplishment. These are all great, but I would like to submit that the halfway points and routine steps along the path are worth celebrating too. These moments are the ones that seem quieter, routine and mundane, yet often more challenging. They are the moments when gratitude and joy are most needed, but sometimes hardest to find. For me, cake is something that you create with your hands, built layer by layer, resulting in a final product fit for an accomplishment or a regular day. It’s an important little reminder that though you’re not there yet, you’re moving and that’s what matters.

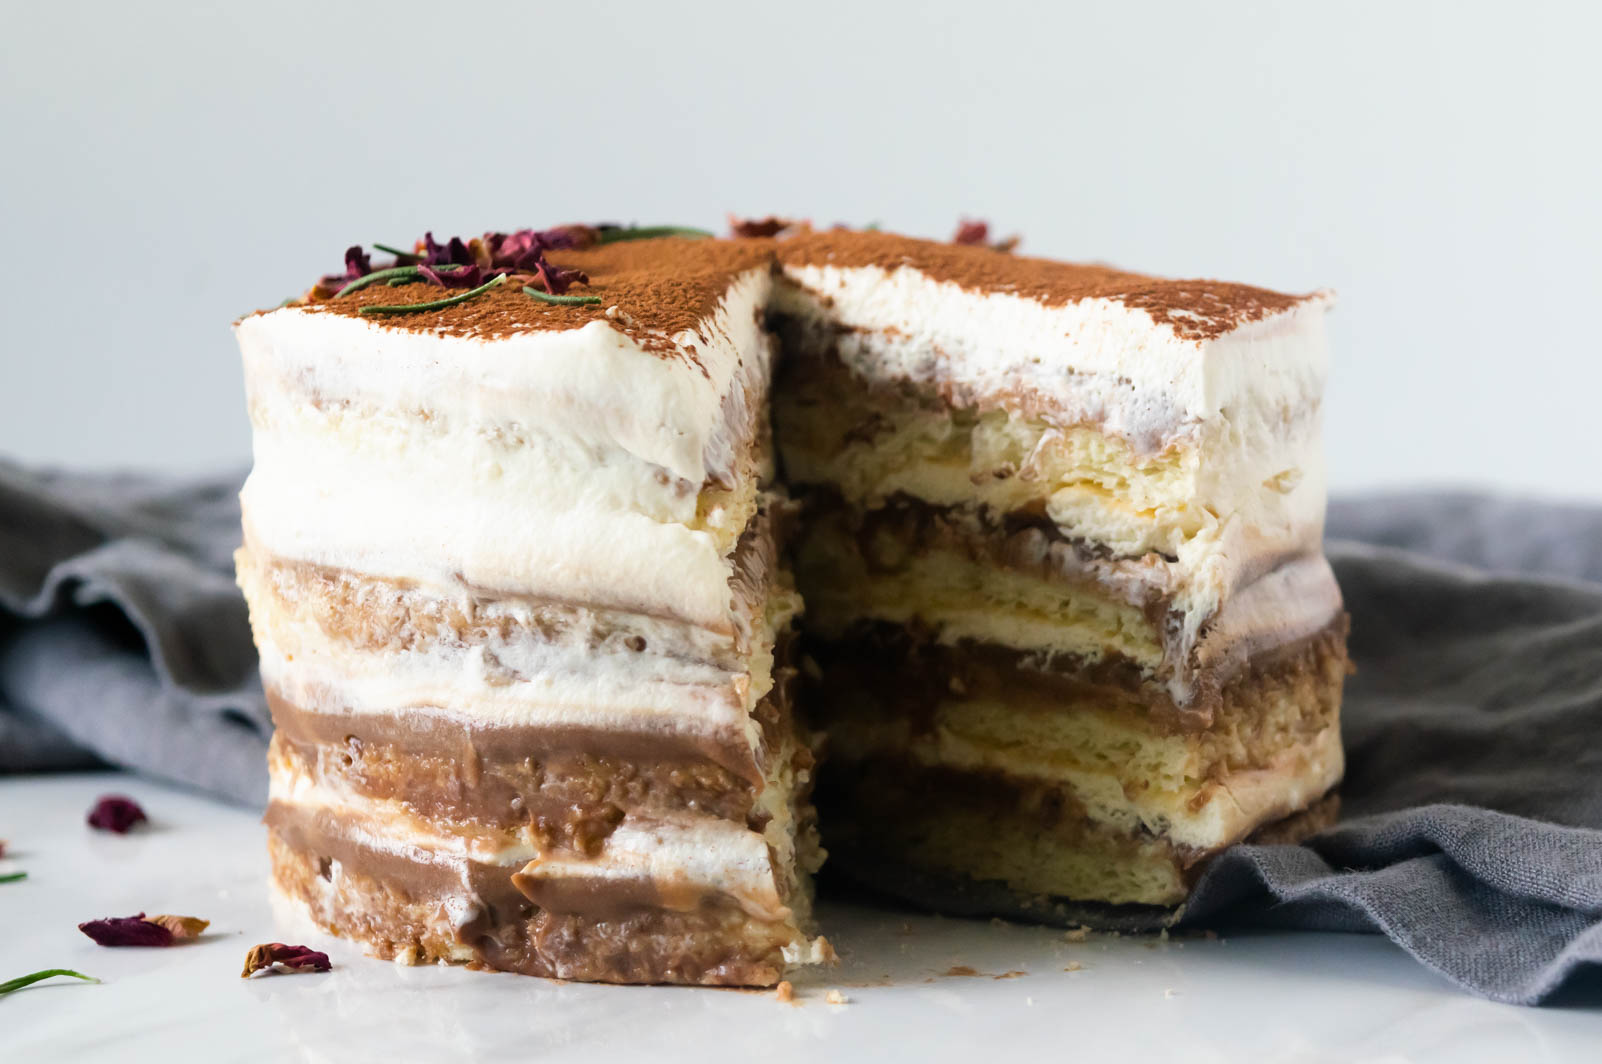
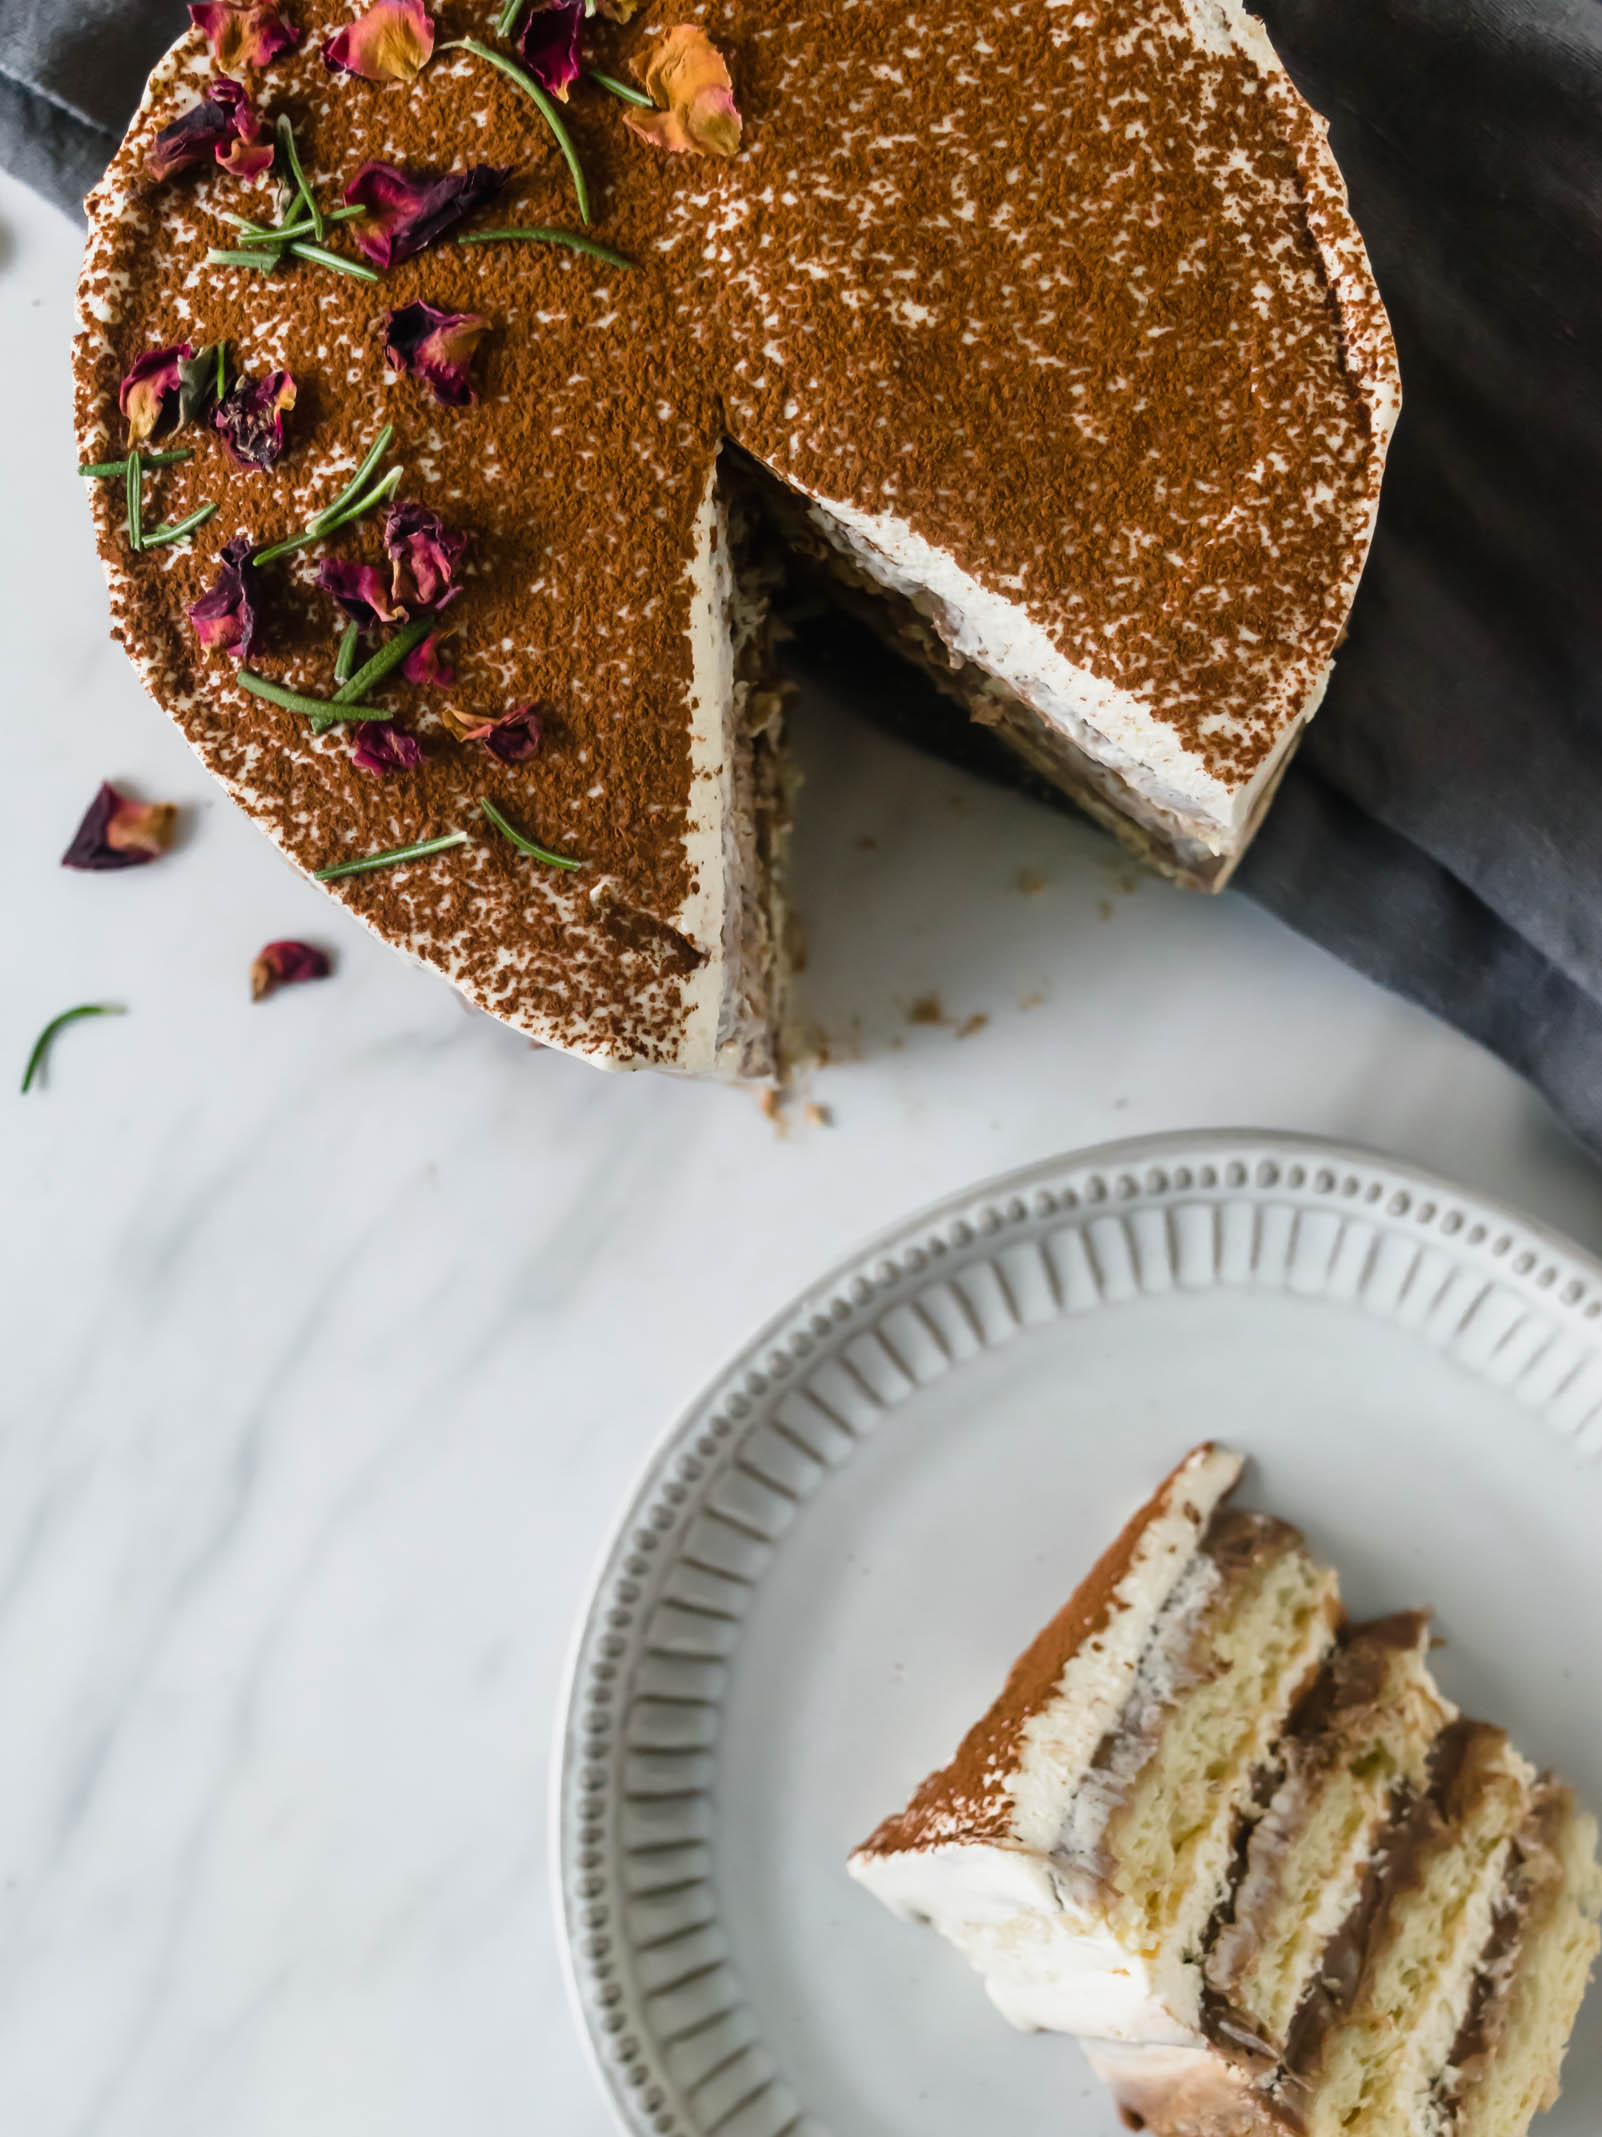
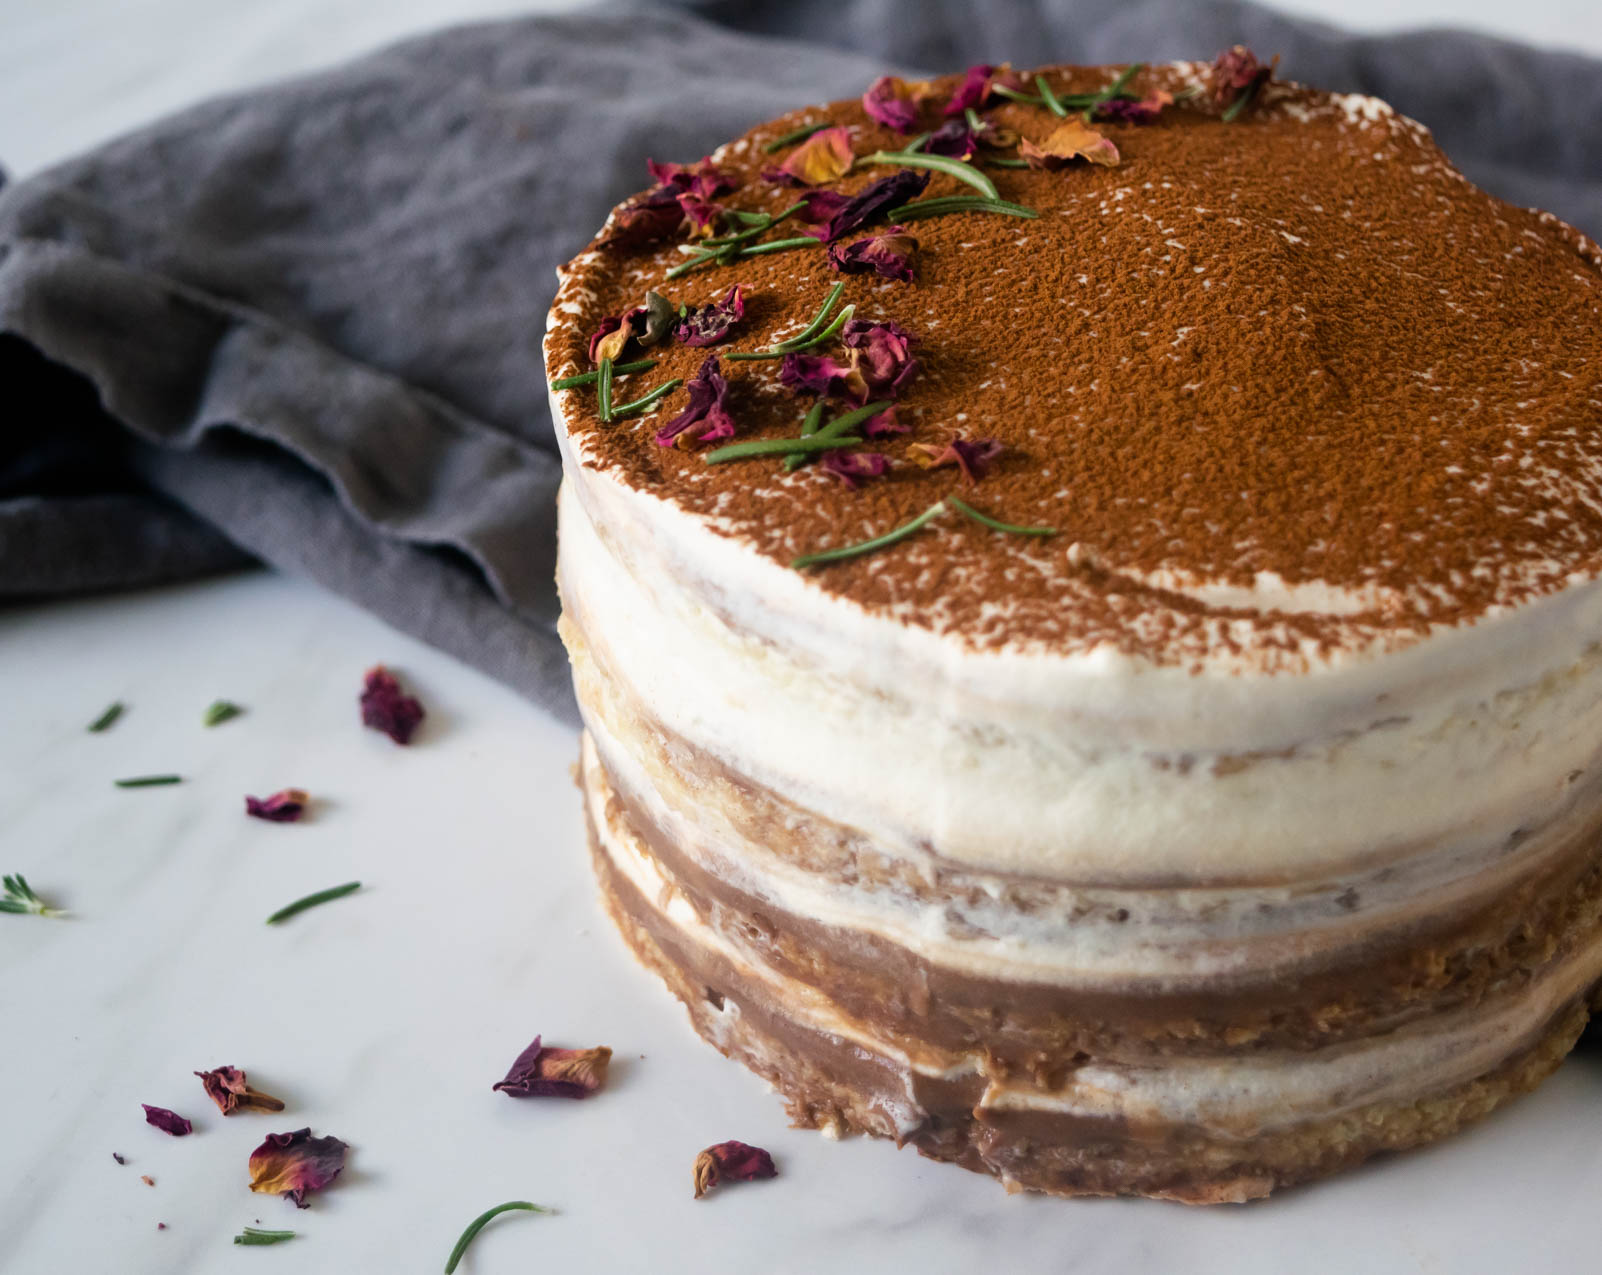
I’ve been spending the last few weeks winding down and finishing my last exams in pastry school, while also preparing to leave my comfort zone and stretch my talents as I start my final internship. It’s a perfect time for transition cake. This is a riff on a cake that I completed for my contemporary cakes practical and is more of a blueprint; you can build it any way you like. Rounds of ultra-light, lady-fingeresque sponge cake are soaked with a rosemary coffee syrup and layered with dandelion and rose chocolate pastry cream and mascarpone mousse. Make it as tall or as wide as you please, dust it with cocoa powder and pretty little florals, and sit back to enjoy the fruits of your labor.

Wilderness Tiramisu

Yield: 2 5” 3 layer cakes

Ingredients: 

for the vanilla sponge: 

4 egg yolks

4 egg whites

1 cup sugar

1/2 cup all purpose flour

1/4 cup cornstarch

Pinch of salt

for the dandelion rose chocolate pastry cream: 

1 1/2 cups whole milk

1/2 cup heavy cream

3 eggs

1 egg yolk

3/4 cup sugar

3 tbsp cornstarch

1/4 tsp salt

1 1/2 tbsp butter, softened

5 tbsp roasted dandelion root tea (or 5 tea bags)

1 tbsp rose petals 

3 oz dark chocolate, chopped

for the mascarpone mousse: 

1 1/2 tsp powdered gelatin 

1 cup heavy cream

4 egg yolks, at room temperature

2 tbsp Kaluha 

2 tbsp sugar

1 tsp vanilla 

1/2 tsp salt 

8 oz mascarpone cheese, at room temperature 


for the rosemary coffee syrup: 

1/4 cup brewed rosemary coffee, see notes below

2-3 tbsp rosemary simple syrup

2 tbsp Kaluha

Procedure: 


to make the sponge: 

  1. Preheat oven to 375°. Line a rimmed baking sheet (18x23) with parchment paper.

  2. In a mixer fitted with the whisk attachment, beat egg whites on low speed until slightly frothy. Slowly add ½ cup sugar, gradually increasing the speed to medium, and beat until a stiff meringue forms. Transfer to a medium bowl; chill until ready to use.

  3. Whip egg yolks, 2 Tbsp. water, and remaining ½ cup sugar in the still-messy bowl you used for the meringue on high speed until a fluffy, ribbony mixture forms. Using a rubber spatula, gently add reserved meringue and fold until just combined. *Be careful not to overwork the batter here, it’s okay if there are a few streaks!

  4. Sift flour, cornstarch, and salt into a medium bowl. Gently fold into egg mixture until no dry spots remain. Carefully transfer batter to prepared pan with and smooth with a spatula.

  5. Bake cake until top is golden brown and still soft to the touch, 7–10 minutes. Let cake cool completely in pan. Run a knife around sides of pan to release cake. Place a cutting board on top of pan. Invert cake onto board; remove pan and carefully peel away parchment. Use a cake ring to help you cut small circles out of the cake sheet. *I chose to do small, 5” circles, but you could do any size you want- just remember the larger your circle is, the fewer layers your final cake will have. 

to make the pastry cream: 

  1. In a medium saucepan set over low-medium heat, warm milk and cream until bubbles begin forming around the outside of the pan. Add dandelion tea and rose petals. Cover pan and let steep for 30 minutes. Strain mixture and return to saucepan. 

  2. Reheat milk mixture until slightly simmering. In a medium bowl, whisk together sugar and cornstarch until no lumps remain. Add eggs and egg yolks and whisk until a paste forms.

  3. Slowly, while continually whisking, pour half of hot milk into the egg mixture. Still whisking, add your egg mixture to the milk mixture and return to heat. (This process is called tempering and it helps to prevent scrambling your eggs when making cream based sauces, like pastry cream and creme anglaise.) 

  4. Cook pastry cream, whisking CONSTANTLY, until thickened and boiling. 

  5. Remove from heat and strain into a clean bowl. Add butter, salt, and chocolate and whisk to combine. 

  6. Press plastic wrap to surface and chill.

to make the mousse: 

  1. Place ¼ cup cold water in a small bowl and sprinkle gelatin evenly over top; set aside while you begin making the rest of the mousse. 

  2. In a mixer fitted with the whisk attachment, beat heavy cream on medium-high speed until medium peaks form. Transfer to a clean bowl, cover with plastic wrap and chill until you are ready to use it. Reserve bowl; you don’t need to clean it.

  3. Set a medium, heat-proof bowl over a saucepan of simmering water. (Make sure the bowl is not touching the water.) Add egg yolks, liquor, sugar, vanilla and salt and whisk constantly until yolks are lightened in color, doubled in volume and are warm to the touch. Remove egg yolk mixture from heat and scrape into reserved mixing bowl. Fit bowl onto mixer.

  4. Remove saucepan from heat and pour out water, then scrape in softened gelatin. Heat over medium-low, swirling pan often, until gelatin is dissolved, about 1 minute. With mixer on medium speed, stream gelatin into egg yolk mixture. Beat until sides of bowl are cool to the touch, about 2 minutes. Switch to the paddle attachment, add mascarpone 1-2 tbsp at a time, and beat until smooth.

  5. Remove bowl from mixer and gently fold in chilled whipped cream. You should have about 4 cups mousse. Cover with plastic wrap, pressing directly onto surface and chill until you are ready to assemble the cake. 

to assemble the cake: 

  1. Make the rosemary syrup: Combine 1 cup of sugar, 1 cup of water, and 3-4 rosemary sprigs in a small saucepan over medium heat. Cook until the sugar is dissolved and then remove from heat. Leave rosemary sprigs in syrup while cooling and remove just before you are ready to use. *This will make more rosemary syrup than you need to brush on the cakes, but I always like keep herbal simple syrups in my fridge to make fancy coffees and last minute cocktails. 

  2. For the coffee: You can simply make espresso/coffee, cool it and then measure out 1/4 cup. If you are planning ahead and want a little extra rosemary flavor, grind some rosemary leaves along with your coffee beans and then use that to brew coffee. 

  3. For the cake syrup: stir together coffee, rosemary simple syrup, and Kaluha. Taste and adjust flavors as needed. 

  4. Place one cake layer on a cake stand/board. Brush the cake with coffee syrup, and be liberal with it-remember, this is supposed to be reminiscent of tiramisu. 

  5. Spread a layer of dandelion pastry cream on top, followed by a layer of mascarpone mousse. (I like to use a cookie/ice cream scoop when frosting cakes to make sure that each layer is even.) Repeat this process for as many cake layers as you want. 

  6. Use the remaining mascarpone mousse to frost the sides of the cake in a swoopy, rustic style. Dust the top of the cake with cocoa powder and sprinkle rose petals and rosemary leaves on top as desired. 

  7. Chill cake overnight for best flavor!

Dark Chocolate Coconut Cookies

Yesterday, I finished my last practical of pastry school. After countless batches of mousse and enough meringue making to last a lifetime, I’ve finally reached the end of the classroom. This semester, in my contemporary cakes class, we’ve focused completely on entremets- fancy little cakes, layered with mousse, cremeux, sponges, japonaise, and enough other components to make your head spin. They are usually glazed to perfection and decorated using contemporary designs and clean lines. I’ve enjoyed the opportunity to stretch my technical muscles and figure out how to put my stamp on the style and I will be sharing a rendition of my final exam entremet on the blog soon. But for now, as my semester and time in pastry school comes full circle I’ve been craving simplicity in my home kitchen. We’re going back to the basics today and I am sharing with you one of my signature, no-fail, last minute cookie recipes.

I developed this recipe back in college for my now-husband. It was 2011 and the height of the Levain Bakery cookie craze and I was all in. Despite having never been to NYC or had a Levain cookie of my own, I watched enough Food Network specials to know all about those extra-dense, soft and gooey on the inside, just crispy enough outside balls of dough to fall in love. They had all of my favorite cookie aspects (thin, crispy cookies have no place in my heart) and so I began browsing the internet in search of a copycat. I found a dark chocolate cookie recipe and began playing with it until I struck cookie gold. My husband’s birthday was coming up and I decided to make a special batch with coconut for him (it’s one of his favorite flavors) and these cookies were born. Funny enough, we celebrated his birthday last week and I made these cookies. A lot of things change in 8 years, but good cookies last a lifetime.

P.S. The cookies in the picture are scooped using a smaller cookie scoop. I DO NOT recommend doing this. I was making them for a larger group that needed smaller cookies, but the fudgey consistency of these cookies really begs for the giant cookie scoop. Do yourself a favor and indulge in the big boys.

P.P.S I have still never been to NYC to experience the Levain cookie, however, a few years ago, my husband was in the city for a work trip and he spent his only 2 hours of free time on a subway ride, a 10 block walk, and a 45+ minute line so that he could bring cookies home to me. I’m telling you, the man is a gem. Also, next day Levain cookies aren’t too shabby.

Dark Chocolate Coconut Cookies 

Yield: 18 large cookies 

Ingredients: 

1 cup butter, cold and cubed 

1/2 cup sugar

3/4 cup + 2 tbsp brown sugar

2 eggs 

1/2 cup dark cocoa powder

1 tsp vanilla 

2 1/4 cup flour 

1/4 tsp salt

1 tsp baking powder

2 1/2 cup dark chocolate, chopped 

7 oz shredded coconut 

Procedure: 

  1. In a medium bowl, whisk together flour, salt, baking powder, and coconut. 

  2. In a stand mixer fitted with the paddle attachment, beat butter, sugar, and brown sugar on medium speed until completely combined, fluffy, and lightened in color. Add eggs one at a time and mix until combined. Scrape down the bottom and sides of the bowl. 

  3. Add cocoa powder and vanilla and mix until combined. Decrease speed to low and gradually add dry ingredients, mixing until just combined and no flour streaks remain. Fold in dark chocolate pieces. 

  4. Use a large cookie scoop (or a 1/4 cup measure) to scoop dough onto a parchment-lined baking sheet. Chill for at least one hour and up to 12. 

  5. When you are ready to bake, preheat the oven to 350 ℉ and bake for 13-17 minutes, until the tops of the cookies are dry. Let cookies cool on tray for 5 minutes and then transfer to a cooling rack. 

Optional Glaze: Combine 2 oz of chocolate and 1 tbsp of coconut oil. Microwave, stirring frequently, until smooth. Drizzle or dunk cookies in glaze and let set. 

Note: You can sub regular cocoa powder for the dark cocoa powder if you have no other options, but having tried the recipe both ways, the dark cocoa powder makes the cookie and shouldn’t be skipped.

Bombolonis with Limoncello Cream

A fluffy brioche dough is the base for this recipe for Italian-style bombolonis. They are soft and buttery, filled with a limoncello pastry cream and tossed in sugar.

Have you ever had a meal that sticks with you for years to follow? Mine includes bombolonis, an Italian-style brioche donut, filled with silky cream, and I’ve been dreaming of making them at home ever since I tasted them.

About 4 1/2 years ago, we had just moved to Nashville and my cousin and his wife were visiting. We had heard endless recommendations about a new restaurant in an up-and-coming neighborhood called Rolf and Daughters. We waited outside in very cold weather until a table opened up in the dreamy, brick-walled, dimly lit restaurant and we were seated in a table just close enough to the kitchen to be warmed by the heat emanating from the stoves and to take a peek at every dish coming into the dining area. I remember the meal in snapshots- vibrant green cocktails peppered with jalapeño, dark, tannic red wine, two or three dishes with pork and whatever vegetable was popping up on Tennessee farms that week (all of which tasted completely differently, but all exceptional). As we were eating, we kept seeing roasted chicken after roasted chicken, balanced on the shoulder’s of servers coming out of the kitchen. We wondered amongst ourselves about the kind of person who orders roasted chicken at a restaurant with so many more diverse options on the menu, but our curiosity finally got the best of us and we asked our waiter, “What’s with all the roasted chicken?”. “It’s unlike any other roasted chicken,” he replied, “It’s the best I’ve ever had”. We were sold and even though our stomachs didn’t really need chicken, our mouths did. Our waiter was right, it was the best chicken I’d ever eaten. Happy that we didn’t miss out on the chicken, we finished the meal with bombolonis, tennis ball sized rounds of brioche, fried and filled with the perfect pastry cream.

A few years, and two cities later, Bon Appetite published the recipe for the Rolf and Daughters Garlic Confit Chicken in the now-retired R.S.V.P section of their magazine and the splattered, torn sheet of magazine paper still hangs from my refrigerator, a daily reminder of that night, that chicken, and those little bombolonis.

When I started doing research for the brioche dough for the donuts, I stumbled on a recipe from Thalia Ho at Butter and Brioche. I intended to use it as my starting point, testing and tweaking as I went, but after making them once, I couldn’t find anything that needed changing. For this recipe, I simply adapted her recipe to reflect both metric and U.S. measurements and rounded out a few ingredients to make it a little easier for a home baker without a scale. (And if you haven’t already, check out Thalia’s blog and Instagram. Her work is whimsical and unique and her photography is stunning!)

Yield: 13 donuts
Author: Anna Ramiz
Bombolonis with Limoncello Cream

Bombolonis with Limoncello Cream

Prep time: 45 MinCook time: 30 MinInactive time: 12 HourTotal time: 13 H & 15 M
These Italian donuts are pillowy soft and filled with a slightly tart limoncello cream.

Ingredients

for the brioche dough
  • 200 ml (1 3/4 cup) whole milk
  • 14 g (3 tsp) active dry yeast
  • 530 g (3 3/4 cup) all purpose flour
  • 60 g (1/4 cup) sugar
  • 1 1/4 tsp salt
  • 3 eggs, at room temperature
  • 113 g (1 stick) butter, at room temperature
for frying
  • 1 L vegetable oil, for frying
  • Granulated sugar for coating donuts
for the limoncello cream
  • 3 cups whole milk
  • 1 cup heavy cream
  • 5 whole eggs
  • 2 egg yolks
  • 1 1/4 cup sugar
  • 7 tbsp cornstarch
  • 1/2 tsp salt
  • 3 tbsp butter, cubed
  • 1 tbsp limoncello
  • 1 lemon, juiced and zested

Instructions

to make the limoncello cream
  1. Combine milk, cream, and lemon zest in a medium saucepan and heat until it begins to simmer and small bubbles form around the outer edge of the pan.
  2. In a large bowl, whisk together sugar, cornstarch, and salt. Add eggs and egg yolks and whisk to form a paste.
  3. Temper (slowly stream) hot milk into the egg paste, stirring continually. Add egg/milk mixture back to the saucepan and return to heat- keep stirring!
  4. Cook over low-medium heat until the mixture begins to boil. Continue to cook for one minute longer. Remove from heat and strain into a clean bowl.
  5. Add butter, limoncello, and lemon juice, whisking to combine. Press a piece of plastic wrap directly on top of pastry cream and chill.
to make the brioche dough
  1. Heat milk in a medium saucepan until warmed to 110 degrees. Remove from heat and transfer to a glass measuring cup. Add yeast and stir to combine. Let proof for 5 minutes, until yeast is frothy.
  2. While the yeast is proofing, combine flour, sugar, and salt in the bowl of a stand mixer fitted with the dough hook. Mix on lowest setting, just until combined.
  3. With the mixture on medium-low speed, stream milk into the mixer and continue mixing until a shaggy mass forms. With the mixer running, add eggs, one at a time, making sure each is incorporated before adding the next. Set the mixer to medium speed and let the dough knead for 5 minutes.
  4. When the dough has formed a smooth ball, begin adding the butter, a tablespoon at a time until completely incorporated. Increase the mixer speed to medium-high and knead for another 5-6 minutes until the dough is smooth and elastic. (This is maybe the prettiest dough I’ve ever made!)
  5. Place the dough in a lightly greased bowl and cover with a towel. Let proof in a warm place for about an hour, until doubled in size. After the dough has doubled, punch the dough dough and cover the bowl with plastic wrap. Transfer to the refrigerator and chill overnight.
to fry and assemble the donuts
  1. Turn the chilled brioche dough out onto a floured surface. Roll the dough into a circle about 1 inch in thickness. Use a circular cutter to cut out as many donuts as possible from the dough. Press the scraps together and re-roll one more time to the same thickness and repeat the donut cutting.
  2. Place donuts on a parchment lined baking sheet, cover with a towel and proof for 20 minutes while you heat the oil.
  3. In a large, heavy-bottomed pan heat oil to 350 ℉. Place sugar in a medium bowl and place a cooling rack over a sheet pan lined with paper towels.
  4. Fry off the donuts, 2-3 at a time by placing the donuts in the oil using a mesh strainer or slotted spoon. Fry to 1 1/2-2 minutes, until golden brown and then use chopsticks to gently flip donuts. Fry for another 1-2 minutes, remove from the oil and place on cooling rack. Repeat until all donuts are fried.
  5. When cooled enough to handle, but still warm, toss donuts in the sugar.
  6. To fill the donuts, use a sharp knife to cut a small hole in one side of each donut. Place the limoncello cream in a piping bag or large ziploc bag with a hole cut in the corner and pipe cream into donuts. Enjoy immediately!

Notes:

This pastry cream can keep up to a week in a sealed container in the refrigerator. You won’t use all of the cream to fill the donuts and you can use the leftovers to fill a cake, make the base of a souffle, or experiment with tarts or Gateau Basque. 

Did you make this recipe?
Tag @gatheredatmytable on instagram and hashtag it #gatheredatmytable