Thoughts about Blogging and Samin Nosrat's Ligurian Focaccia
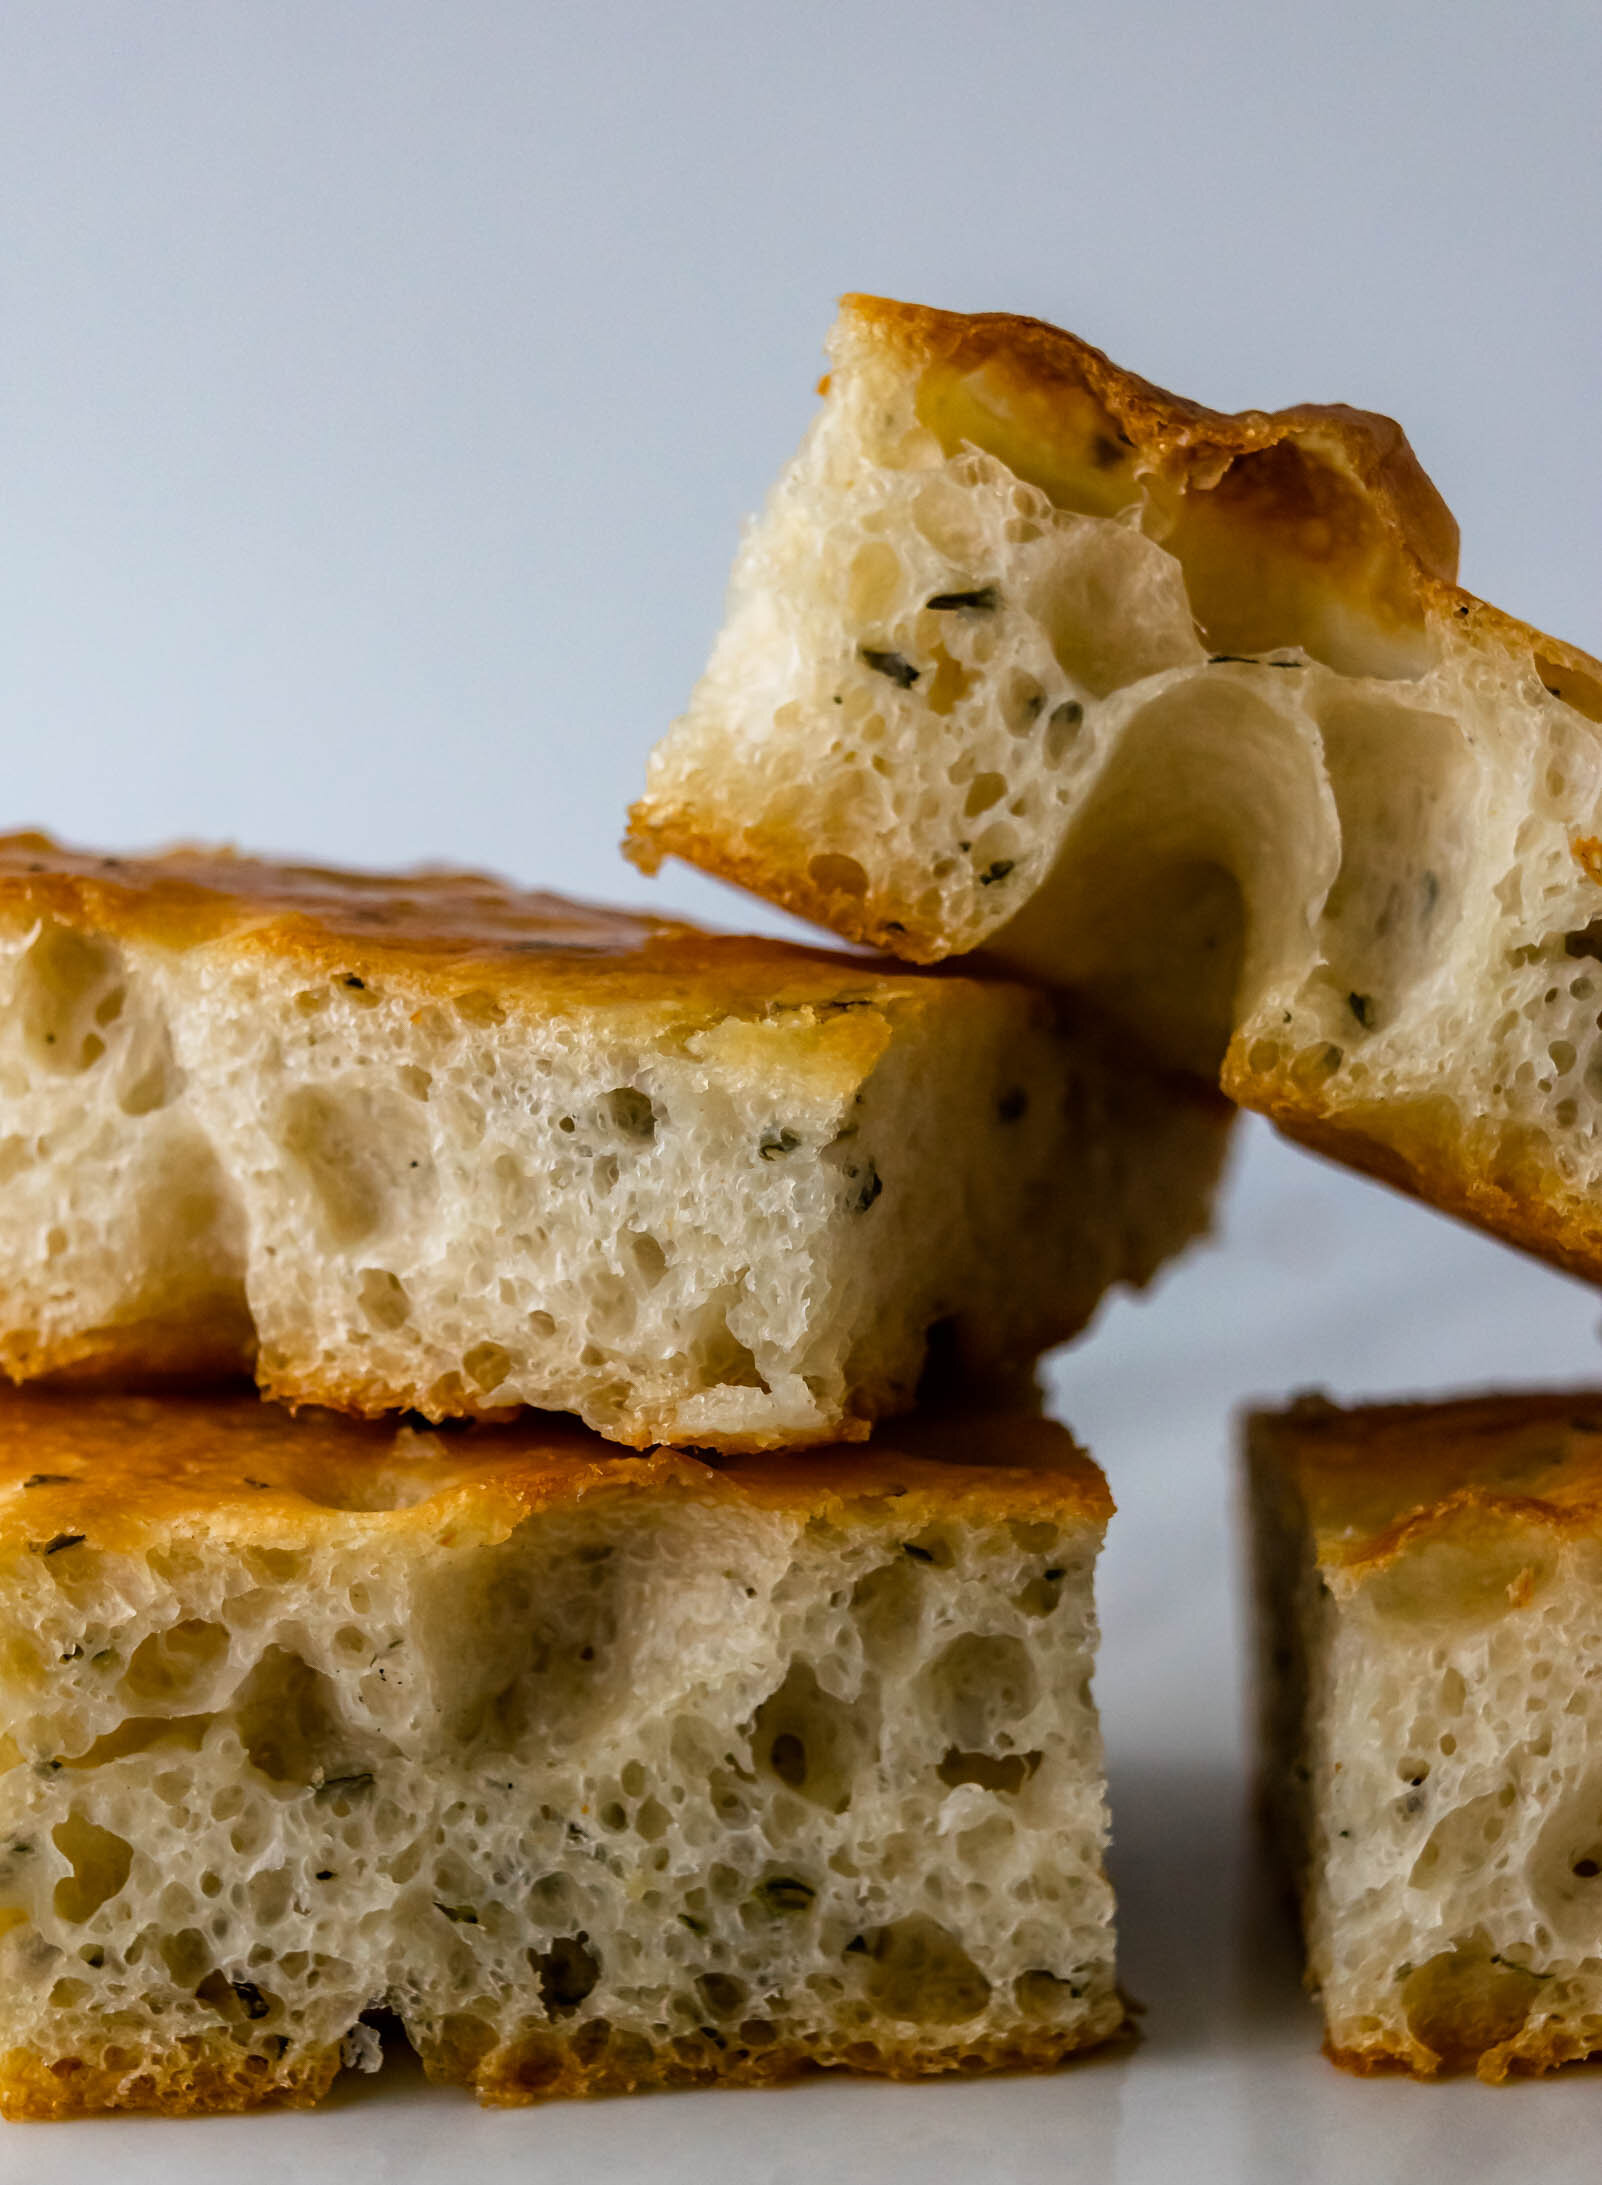
Samin Nosrat's Ligurian focaccia recipe from Salt, Fat, Acid, Heat with a smattering of fresh herbs and some instructions for incorporating your sourdough starter into a focaccia recipe.

HerbFoc3.jpg

There are many days (far too many if I’m being completely honest) where I feel silly. Silly for quitting a full-time career —a career that is looked admirably upon by our society, one that comes with benefits and a consistent salary—to become a food blogger. Silly that I spent a year and a half in culinary school and interned in a high-end restaurant to spend my days developing recipes at home. There are so many days when I think to myself, I just need to go get a real job, mostly because I care a lot about what everyone else thinks about me. 

Being a teacher has value in our society. I was doing important work. It didn’t matter that I was so drained emotionally, mentally, and physically that I fell asleep on the couch before 8 p.m. almost every single night or cried on the way to work most mornings. I was changing the world. Or at least that’s what I liked to tell myself. Even working in a restaurant has value. Set time shifts, a menu to follow, guests to serve. It’s a real, viable career. In my mind, there is this hierarchy of important-ness when it comes to choosing a career and testing flourless chocolate cakes and writing detailed posts teaching someone how to start a sourdough culture doesn’t top the list. It’s been really hard for me to reconcile this with that hierarchy in my head.

It’s hard for me to find value in my work in a society that constantly tells you to “hustle” and “be a boss” and elevates “the grind” onto the highest pedestal. Am I still a strong, independent woman if I choose to spend my days following “domestic” passions? Am I a contributing member of society if I don’t receive a regular paycheck? Can I stay home if I’m not a mom? These questions swirl in my head almost every day. 

HerbFoc12.jpg

Just before Christmas, we had some plumbing issues in our house and for an afternoon, our home was a revolving door of repairmen. I was shooting a new recipe for the blog in our office and as our landlord left, he asked if I was a food photographer. I was so proud, and in an effort to appear confident and poised, I replied with a definite yes. And a recipe developer, I added. His immediate follow-up question was “you make money from that?” I felt the confidence seep from me like air out of a balloon. Because, in our culture of busy-ness, that’s what it always comes down to. What are you worth? That question is asked of us everyday in someway or another. When you meet someone new, the first question is always “what do you do?”. We title ourselves teacher, doctor, lawyer, chef…stamping our careers on ourselves like a badge. This is who I am. It’s so easy, and even encouraged, to find our identity in our jobs. 

Last October, I spent a weekend in Knoxville to help out a dinner party. I spent the Monday before I headed back to Orlando with my cousin Meg (who owns her own herbal goods business) and our friend Jordyn (who had the day off from work). We went to lunch and ended up on the front porch at 2 p.m., sharing a bottle of 1995 Vouvray and it was perfect. The afternoon was one I won’t soon forget forget, because slowing down, enjoying simple things like great wine and good weather, being outside, and spending time in community brought me so much joy. But with it came that nagging guilt in the back of my head. It’s a Monday afternoon, what are we doing drinking wine on the porch? We should be out there with the rest of the world, staring at computer screens and answering phone calls, right? 

The work I do now sometimes feels so slow. For every food blogger that is able to create a business for themselves, write a book, or have work published in magazines, there are a hundred who never “make it”. What makes me any different? Recipe ideas scribbled into notebooks don’t feel much like a book proposal. I’ll spend hours developing and shooting a recipe I’m proud of, only to lose Instagram followers. I often find myself glued to my analytics. How many people came to the site today? Did they read anything? Why did my traffic go down? And I’m dragged right back into it— finding my value and worth in my performance or my work, rather than simply finding joy in my privilege to spend my day following my passions.

All of this to say, I’m working on remembering my real identity. I’m so grateful that those voices whispering in my head don’t speak the truth. My value isn’t dependent on the importance of my job, the size of my paycheck, or my success in the eyes of the world. And I’m trying to spend more time remembering the absolute joy I experience when someone reads my work and takes the time to make a sourdough culture. Even if it’s only one person. I’m working on reminding myself that it’s okay if I never publish a book, or make a dime off of the recipes I create or the pictures I take, or reach 10,000 Instagram followers, because at the end of it all, I’m going to be remembering the afternoons spent on the porch with friends anyway. 

Samin Nosrat’s Ligurian Focaccia (lightly adapted)

Over the last few years, I’ve learned that I love making bread. The process is both precise and romantic. It slows me down and helps me take note of the little things—the change as water saturates the flour, the tightness the dough takes on when the salt is added, and the feel of gluten developing in each turn. Something about taking only a few ingredients (flour, water, salt, yeast) and using my hands to transform them into something completely new reminds me of why I love the work I do.

If you’ve ever been interested in making bread, but intimidated by the process of it all, this is the bread for you. It’s the starting line of bread making and the fact that the recipe is very low effort and very high reward makes it ideal for your first foray into bread land. (No stand mixer, no folding every hour, no fancy ingredients.) Bonus, this recipe yields the most delicious focaccia I’ve ever eaten and you feel like a star after making it. 

This is the same recipe that Samin uses, I’ve just added some fresh herbs and included instructions for adding sourdough if you want to get really fancy. I like to mix together my dough the night before, let it rest on the counter and bake it first thing in the morning so that I have warm, crunchy focaccia for the entire day. This makes a pretty big sheet (about a half sheet pan size), so feel free to share some with a friend or freeze half for a rainy day. 

HerbFoc11.jpg
Samin Nosrat's Ligurian-Style Focaccia
Yield
one 12x18" sheet pan
Author
Prep time
20 Min
Cook time
30 Min
Inactive time
16 Hour
Total time
16 H & 50 M

Samin Nosrat's Ligurian-Style Focaccia

Samin Nosrat's Ligurian focaccia recipe from Salt, Fat, Acid, Heat with a smattering of fresh herbs and some instructions for incorporating your sourdough starter into a focaccia recipe.

Ingredients

  • 600g (2 1/2 cups) water
  • 1/2 tsp active dry yeast
  • 15g (2 1/2 tsp) honey
  • 800g (5 1/3 cups) all purpose flour
  • 18g (2 tbsp) kosher salt
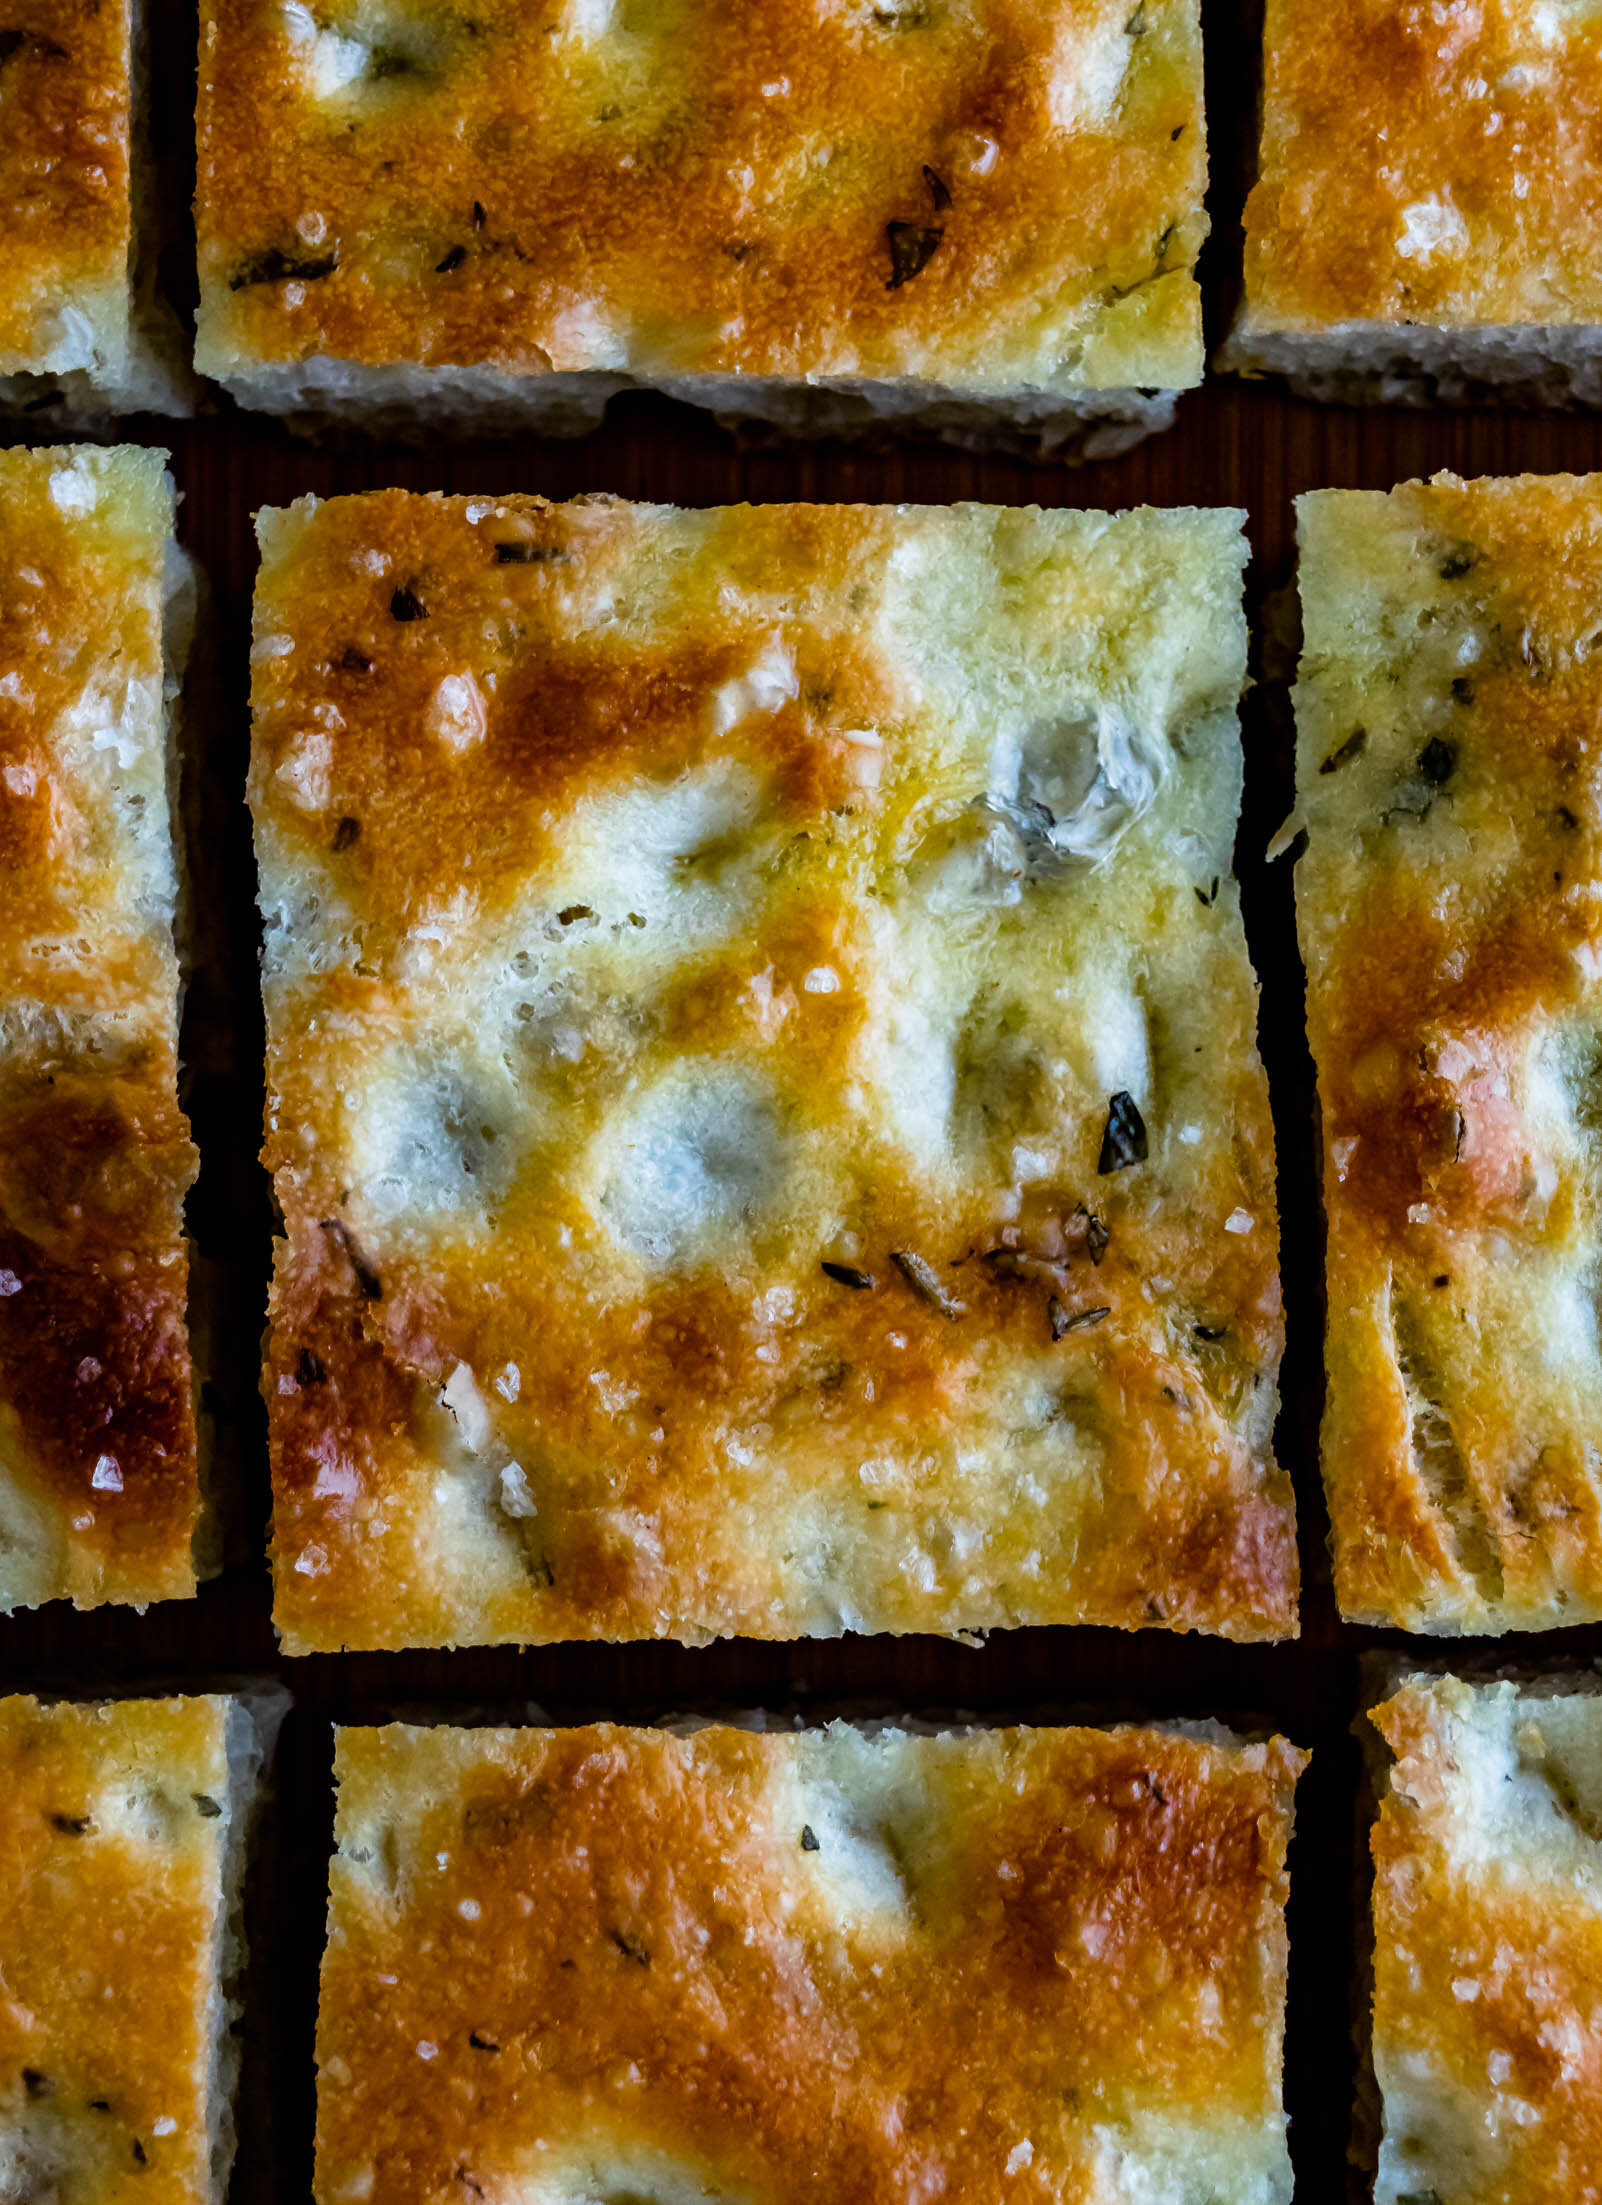
  • 50g (1/4 cup) extra virgin olive oil, plus more for pan and drizzling
  • 2-3 tbsp chopped fresh herbs (I used a blend of rosemary, oregano, and thyme)
for the saltwater brine
  • 1/3 cup warm water
  • 1 1/2 tsp kosher salt

Instructions

  1. In a large bowl, stir together water, yeast, olive oil, and honey. Let rest for 5 minutes. Add flour, salt, and herbs and stir with a rubber spatula or wooden spoon until completely combined and no flour streaks remain. Cover bowl with plastic wrap and let rest on your countertop for 12-14 hours, until doubled in volume. (I like to mix this together before bed and let it rest overnight.)
  2. Spread 2-3 tablespoons of olive oil over the surface of a rimmed 12x18” baking sheet. Turn dough out onto the baking sheet and gently stretch the dough towards to the edges of the pan. To do this without tearing the dough, I like to reach my hands underneath and gently pulling it towards the outside. At this point, it will probably shrink back a bit, but that’s okay. Drizzle the whole thing with olive oil and cover with plastic wrap. Let it rest for 30 minutes.
  3. After 30 minutes, use your fingers to dimple the entire surface of the dough. Stir together warm water and salt and then pour brine over the top of the dimpled dough. Cover again and proof for another 45 minutes.
  4. About 30 minutes into your final proof, preheat your oven to 450° F. When the oven is hot and the dough is proofed, remove cover, sprinkle with flaky salt. Bake for 25-30 minutes until golden brown. Make sure to check that the bottom of the dough is crisp and browned.
  5. Remove focaccia from oven and immediately drizzle with more olive oil. Let rest for about 5 minutes and then use a metal spatula to loosen from pan. Enjoy warm with butter or olive oil and more flaky salt.

Notes:

  • Adding a sourdough starter to any bread recipe is really fairly easy! Your sourdough culture is essentially a mixture of equal parts flour and water, so to add some to a recipe that doesn’t call for a culture, first decide how much starter you want to use. I usually start with 50 grams on my first experiment with a new recipe and then increase or decrease based on how the final product turns out. Then, you simply decrease your flour and water amounts to reflect the extra flour and water that you are adding to the dough. If you add 50 grams of starter, that breaks down to 25 grams of flour and 25 grams of water, so you will subtract 25 grams from each of the flour and water amounts that recipe calls for.
  • For this recipe, I added 50 grams of mature starter to my water, yeast, olive oil, and honey mixture and decreased the water to 575g and flour to 775g. 
Did you make this recipe?
Tag @gatheredatmytable on instagram and hashtag it #gatheredatmytable

Briolata

briolata8.jpg

I’m named after my grandmothers. My mom’s mother, Judith Anne and my dad’s mother Naomi Gene combined and my parents named me Anna Naomi. When I was younger, I never really liked my middle name. In classrooms filled with Megans and Brittanys, Naomi stuck out and my classmates loved to poke fun at the pronunciation. When I was 17, my dad’s mom passed away suddenly and at the funeral, there were pictures of my grandma from her youth, pictures I had never seen (or didn’t remember anyway) and stranger after stranger commented on how much I resembled my grandmother. As I remembered my grandmother through pictures and stories, I was struck with what an honor it was to carry her name.

My grandmother was so much fun. Growing up, we would drive to Pensacola each year right after Christmas and spend the second half of our Christmas holidays with her and my grandfather. We would make the trek out to the outlet mall and spend at least one entire day blowing through all of the Christmas money we were gifted, eat butter pecan ice cream from cake cones, and watch “West Side Story” over and over again. I remember so many little things about my grandma, but the strongest pull was the smells of bread and sausage that would come from the kitchen when she would make Briolata, a Sicilian-style sausage bread, synonymous with our family. Everyone makes briolata, but everyone makes it a little differently. My grandma would make giant, snail-like rolls that would almost envelop the entire countertop when they rose. My mom, who worked full-time, would use pizza dough for a quicker, more accessible briolata. We made briolata for my husband the first time I brought him home to meet my parents and now, even he has created his own rolling and filling system. When I started making briolata on my own, I sought to put my own stamp on it. I emailed my aunts and my dad, looked through photos of old recipe cards, and tested batch after batch. I decided to lean into the simplicity and use an adapted Italian bread dough. It’s pretty easy to put together in the way of bread doughs and gives a consistency as close to the ones coming out of my grandma’s kitchen that I can remember. The dough is rolled out, filled with Italian sausage, roasted garlic, and lots of freshly-cracked black pepper and each time I make it, I’m taken back to a small kitchen in Pensacola, sitting with a woman I’m proud to be named after.

briolata6.jpg
Yield: makes one large loaf, serves about 12 people
Author: Anna Ramiz
Briolata (A Sicilian Sausage Bread)

Briolata (A Sicilian Sausage Bread)

Prep time: 1 HourCook time: 30 MinInactive time: 14 HourTotal time: 15 H & 30 M
Briolata, a Sicilian-style sausage bread, is an Italian family recipe. Italian bread dough is filled with roasted garlic and spiced sausage and baked under fragrant and golden. *dough recipe adapted from Peter Reinhart*

Ingredients

for the biga
  • 2 1/2 cups (11.25 oz, 319 g) bread flour
  • 1/2 tsp (1.5 g) instant yeast
  • 3/4 cups + 2 T (7.5 oz, 213 g) warm water
for the italian bread dough
  • 3 1/2 cups (18 oz, 510 g) biga, at room temperature
  • 2 1/2 cups (11.25 oz, 319 g) bread flour
  • 1 2/3 tsp (11.5 g) kosher salt
  • 1 T (14 g) sugar
  • 1 tsp (3 g) instant yeast
  • 2 T (28 g) olive oil
  • 3/4 cup + 2 T (198 g) warm water
for the filling
  • 3/4 lb ground Italian sausage
  • 1 head garlic, roasted
  • 2 tbsp extra virgin olive oil
  • 1/4 tsp aleppo chili flakes
  • 1/2 tsp salt
  • fresh ground black pepper
  • *1 egg, beaten for egg wash

Instructions

to make the biga
  1. The night before baking, combine bread flour, yeast, and water in the bowl of a stand mixer fitted with a paddle attachment. Mix until just combined and then switch to the dough hook attachment. Knead on medium-low speed until dough is cohesive and pliable.
  2. Transfer to a greased bowl, cover, and let rest on your countertop overnight.
to make the italian bread dough
  1. In the bowl of a stand mixer fitted with the dough hook attachment, combine water, oil, and biga. Add in bread flour, salt, sugar, and instant yeast. Mix on low speed for 2 minutes, until a dough begins to form.
  2. Increase speed to medium and knead for another 4-6 minutes until dough is smooth and elastic. (You can check gluten development here by using the window pane test).
  3. Transfer dough to a lightly-oiled bowl and cover with plastic wrap or a damp towel. Place in a warm, draft-free area of your kitchen and let proof for about 2 hours, until doubled in size. About 30 minutes into your bulk fermentation time, fold the dough by reaching underneath and stretching the two sides of the dough out and over the top of the dough. Turn the bowl 90° and repeat with the other two sides of the dough. Cover the bowl again and continue to proof.
  4. When the dough has doubled in size, turn it out onto a lightly floured work surface and use a rolling pin to roll the dough into a rectangle, roughly 12x18”.
assembling the briolata
  1. In a small bowl, combine mashed roasted garlic with 1 tbsp olive oil and stir to make a paste. Use an offset spatula or spoon to spread paste on the rectangle of dough, all the way to the edges of the rectangle. Drizzle remaining tablespoon of oil over dough.
  2. Pinch of pieces of Italian sausage, about the size of quarters, and place evenly over the surface of the dough. Sprinkle the whole thing with aleppo chili flakes, salt, and pepper.
  3. Starting with a short end of the dough, begin rolling the dough into a tight log. Transfer the dough log to a parchment-lined baking sheet.
  4. Take a pair of scissors and starting on one end of the dough log, beginning cutting on 45° angel, in intervals about 1” apart. You will be cutting almost to the bottom, but not all the way through, and each piece should look sort of like a bird’s beak. (see photos)
  5. Use your hands to pull each snipped corner piece away from the center of the log, alternating left and right.
  6. Cover the loaf with plastic wrap or a damp towel and let rise another 45 minutes-an hour, until swollen and 3/4 larger in size. (You can test whether a dough is sufficiently proofed by lightly poking it with your finger. If the indentation fills back in about half way, the dough has sufficiently proofed. If it springs back immediately, it needs to proof a little longer and if the dough deflates when poked, it has over-proofed.)
  7. While the dough is proofing, preheat the oven to 375° F. When the loaf is ready, brush lightly with the egg wash, and bake for 25-30 minutes, rotating halfway through the baking time. The finished loaf should be golden brown, and very fragrant, and the sausage should be cooked through.
  8. Remove from oven and let cool for 5-10 minutes before serving.
Did you make this recipe?
Tag @gatheredatmytable on instagram and hashtag it #gatheredatmytable
Created using The Recipes Generator
briolata4.jpg

Banana Muffins with Cinnamon Oat Crumble

My aunt makes the best banana bread. When I was a kid, every year after Christmas, all of my aunts, uncles, and cousins would squeeze into a condo on Pensacola beach for three or four days for the New Year’s holiday. The highlight of this trip was always banana bread. When we got to the condo, there would be petite-sized loaves wrapped in red and green cellophane sitting atop the small, beige-colored countertop and it was all my sister and I could do not to consume all of them in the first afternoon. As I got older and started puttering around in the kitchen, I asked my aunt for her recipe and began making my own banana breads. I had a very elaborate system for how to cool, rest, and wrap these little dark, speckle-y loaves in order to maximize that gooey top layer synonymous with banana bread and I would always save that little top ridge for my last, most savored bites.

But sometimes you get tired of making banana bread, especially if you’re anything like me and seems you always have a never-ending supply of too ripe bananas. My husband loves muffins and always requests them when we have a surplus of bananas rapidly browning on the counter, but I have never been able to master that sticky, soft top layer on the muffin. But, alas, I have come up with a solution to the problem. This cinnamon oat topping is not a traditional bakery-style muffin topping. I actually developed it from a cobbler recipe, so this is the real-deal crunch topping. Oats and brown sugar are bound together by a hefty amount of softened butter and you are really going to lay it on thick so that you get some of that crunchy goodness in each bite. Who knows, maybe this year I’ll wrap them in red and green cellophane and send them to my nieces and nephews to carry on the aunt who makes the best banana baked goods tradition.

BananaMuffin10.jpg

Banana Muffins with Cinnamon Oat Crumble

Yield: 12 large muffins


Ingredients: 

BananaMuffin7.jpg

1 1/2 cups all purpose flour

1 tsp baking soda

1 tsp baking powder

1/2 tsp salt

3 large, ripe bananas

3/4 cup sugar

1 egg, beaten

1/3 cup coconut oil, melted and cooled 

for the crumble: 

1/4 cup all purpose flour

1/2 cup old fashioned oats

2 tbsp + 2 tsp light brown sugar

1 tsp ground cinnamon

1/4 tsp salt 

4 tbsp unsalted butter, cold and cubed 

Procedure: 

  1. Preheat oven to 350 degrees F. Grease 12 muffin cups, or line with cupcake liners, and set aside.

  2. In a large bowl, whisk together flour, baking soda, baking powder, and salt. Set aside.

  3. In medium sized bowl, combine sugar, mashed bananas, egg, and coconut oil. Use a whisk to mix well, until combined and homogenous. Make a well in the center of your dry ingredients. Add wet ingredients to the dry ingredients and whisk until smooth and no dry spots remain. Use a large cookie scoop to divide among prepared muffin tin and set aside.

  4. To make the crumble: In the bowl of a mixer fitted with the paddle attachment (or in a large bowl using a handheld electric mixer), combine flour, oats, cinnamon, salt, and brown sugar. Stir together. With the mixer on low speed, gradually add the butter. When all the butter has been added, increase speed to medium and beat until fully incorporated and no dry spots remain.

  5. Use your fingers to scatter oat topping evenly over the muffin batter. Bake for 18-22 minutes, rotating the pan halfway through, until muffins are golden brown and the tops spring back slightly when touched. Let muffins cool for 5 minutes in pan and then transfer to a wire rack to cool completely.