Caramelized Tomato and Mozzarella Bread

tomatobread17.jpg

this recipe is sponsored by Pomi USA

Happy New Year everyone! I’ve been a little quiet on here for the past month because I needed a little break after 12 new Christmas recipes. We also bought a house, which turned out to be quite the endeavor! But my kitchen is unpacked and I’m back and ready to go, friends! I’m kicking off 2021 with this savory caramelized tomato and mozzarella pull-apart bread because it’s the comfort food we all need.

For my job as a recipe developer, I get to work with a lot of different brands and Pomi is one of my favorites. Most of my weeknight dinners hinge on canned tomatoes and I love that Pomi tomatoes are high-quality Italian tomatoes that won't break the bank. They are also so versatile and can make everything from classic marinara sauces to tikka masala. And of course, bread.

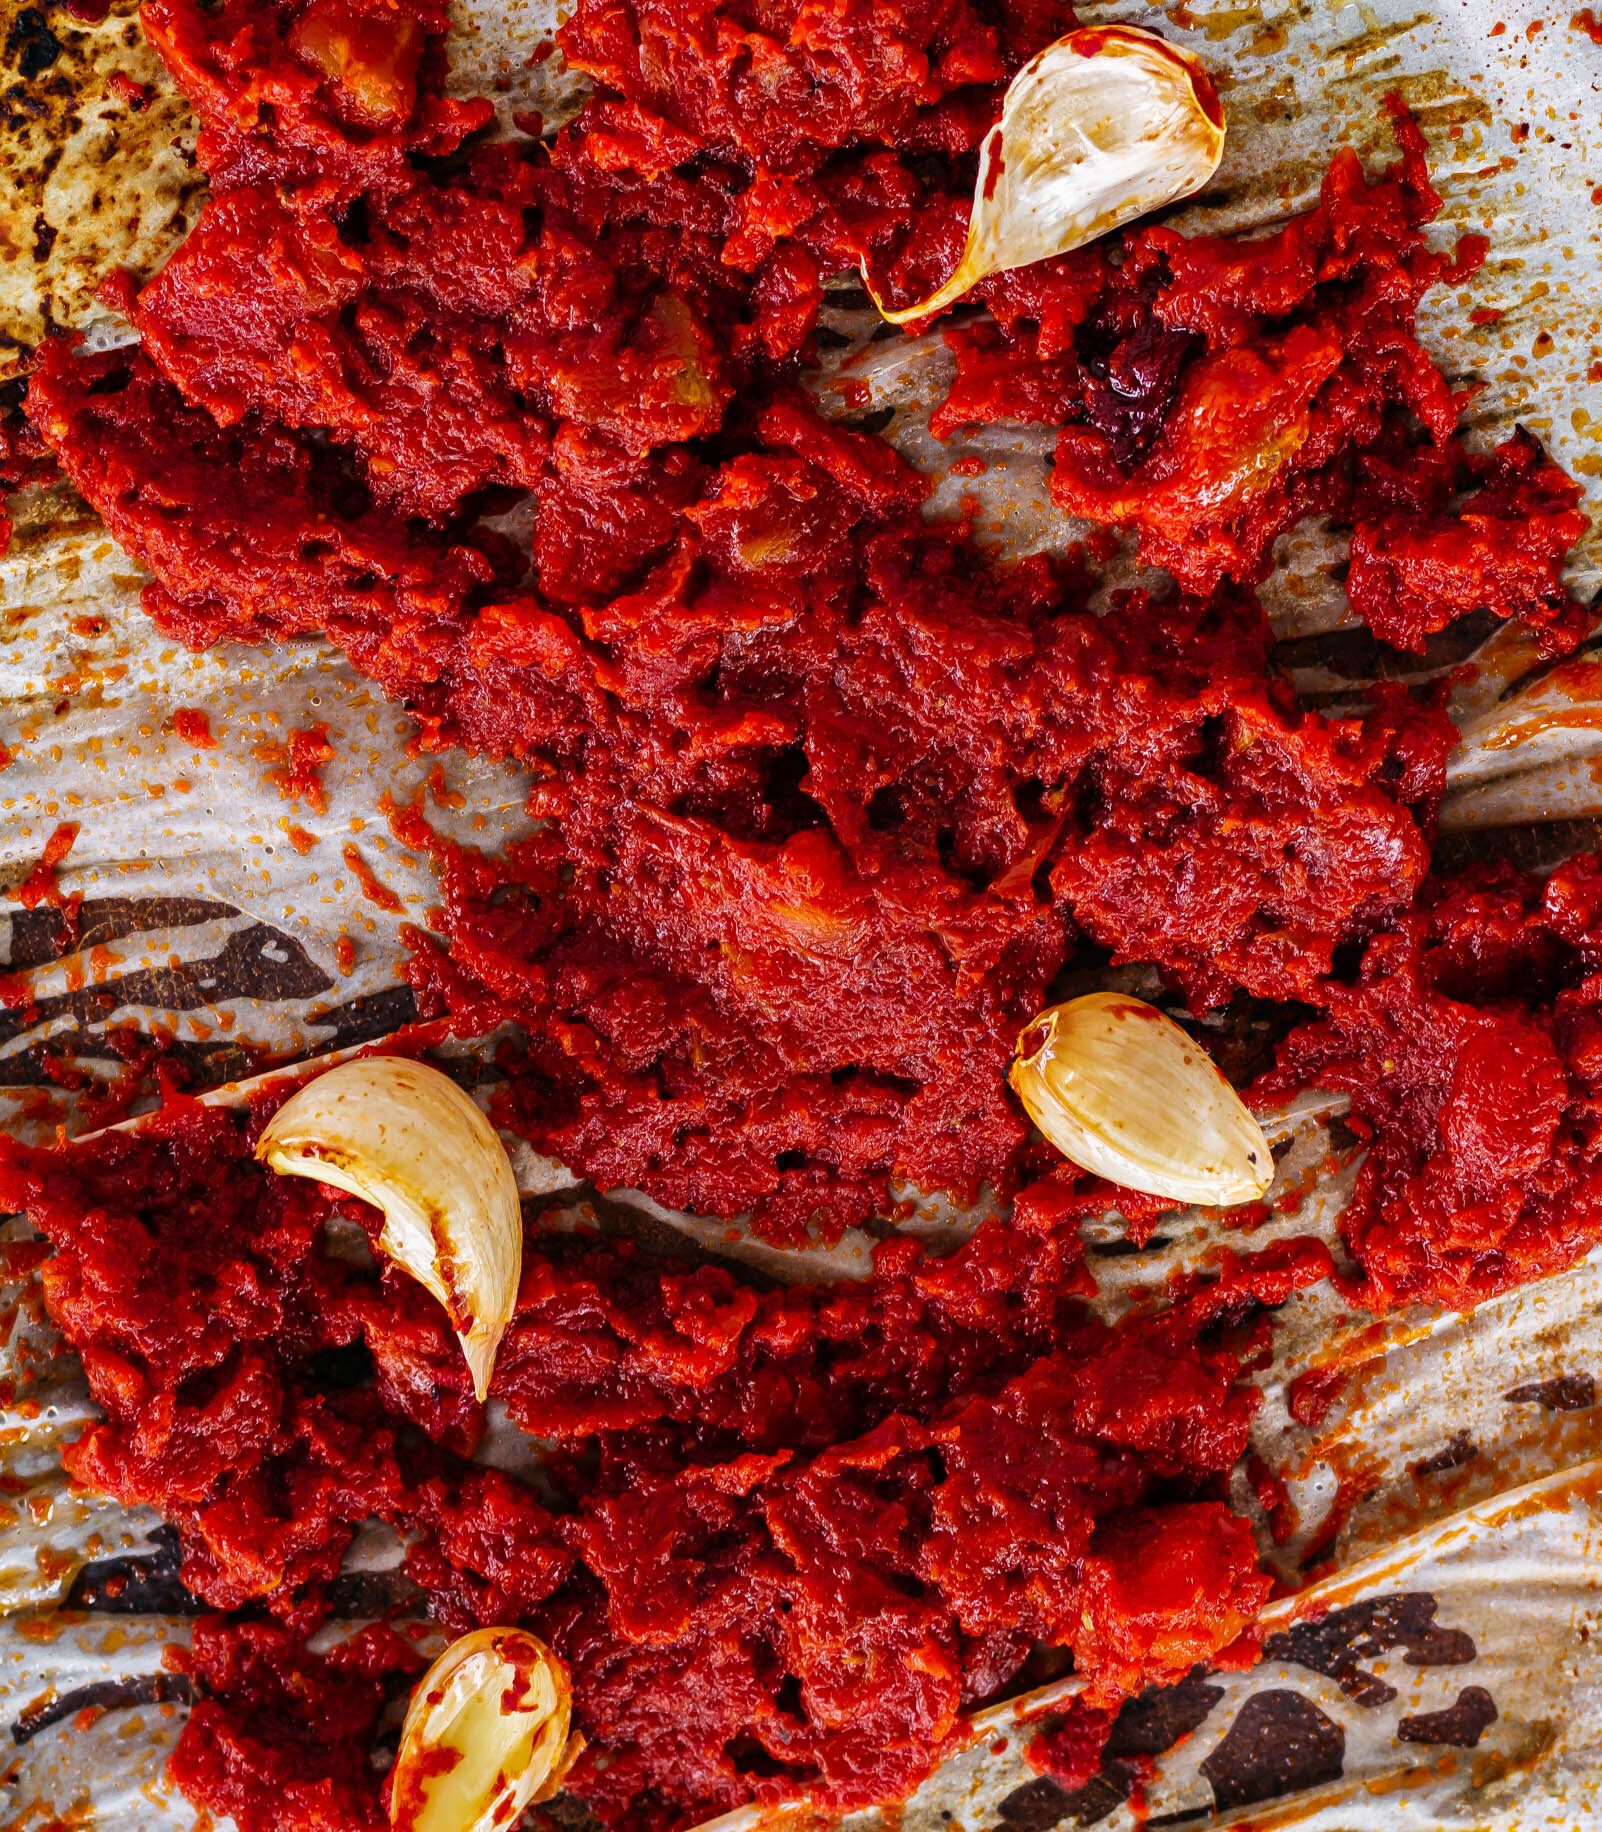
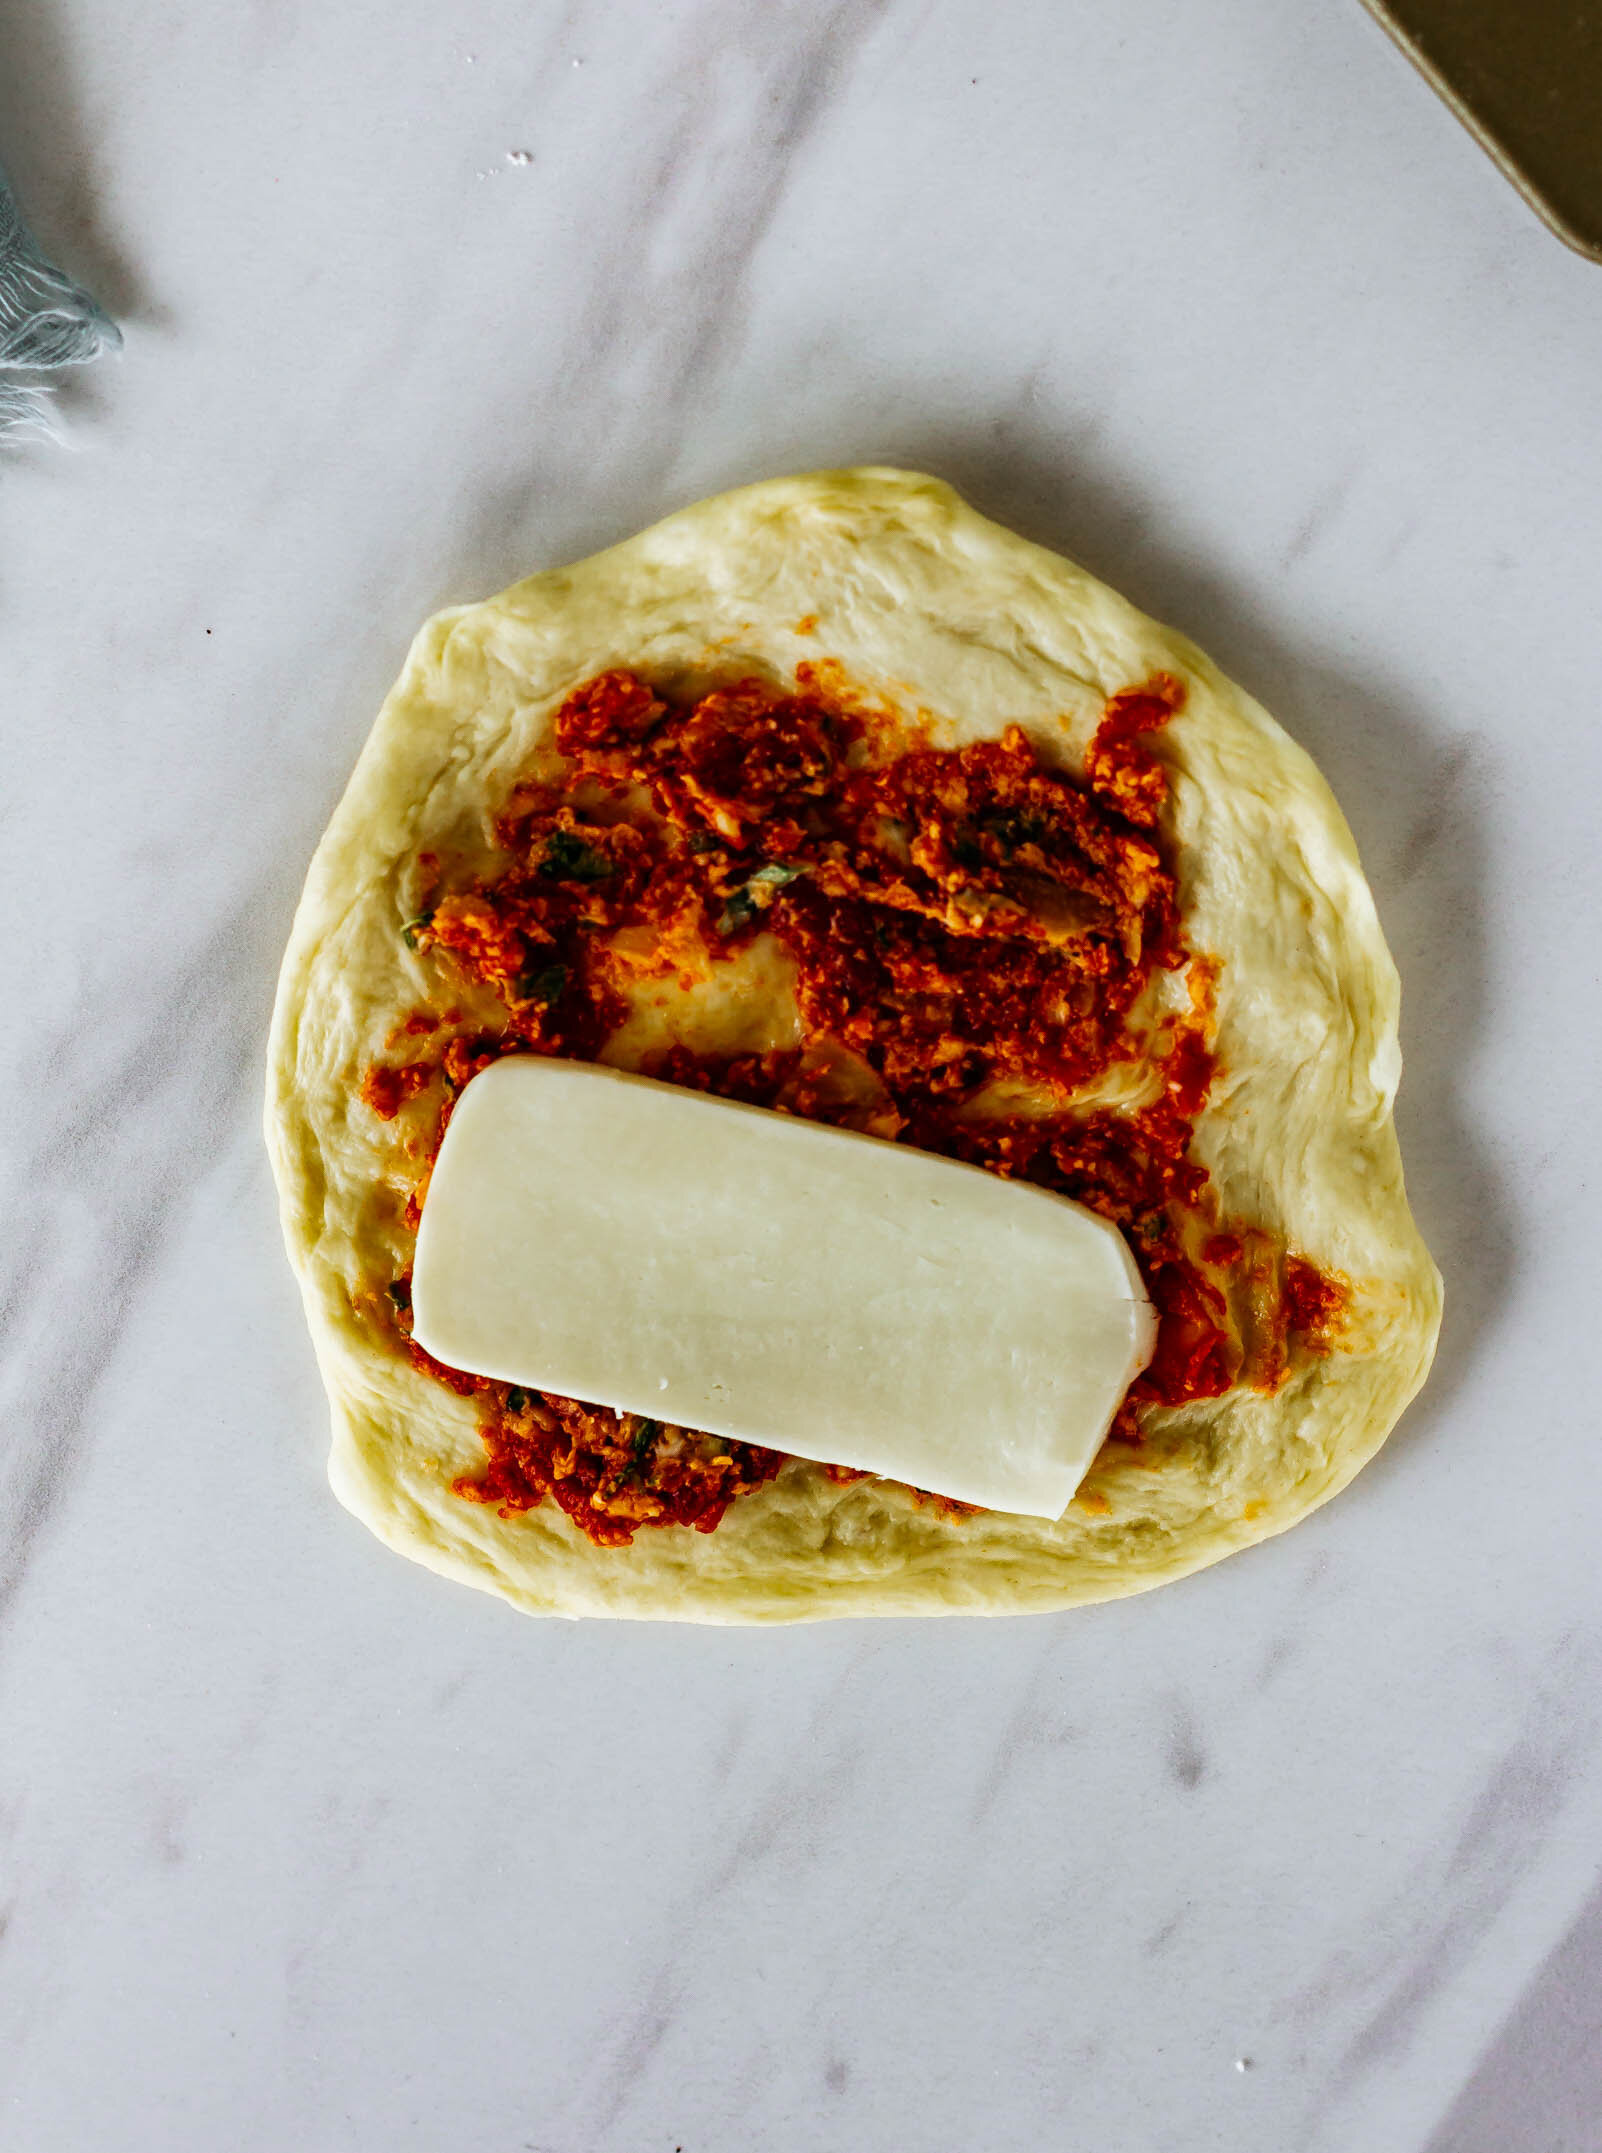
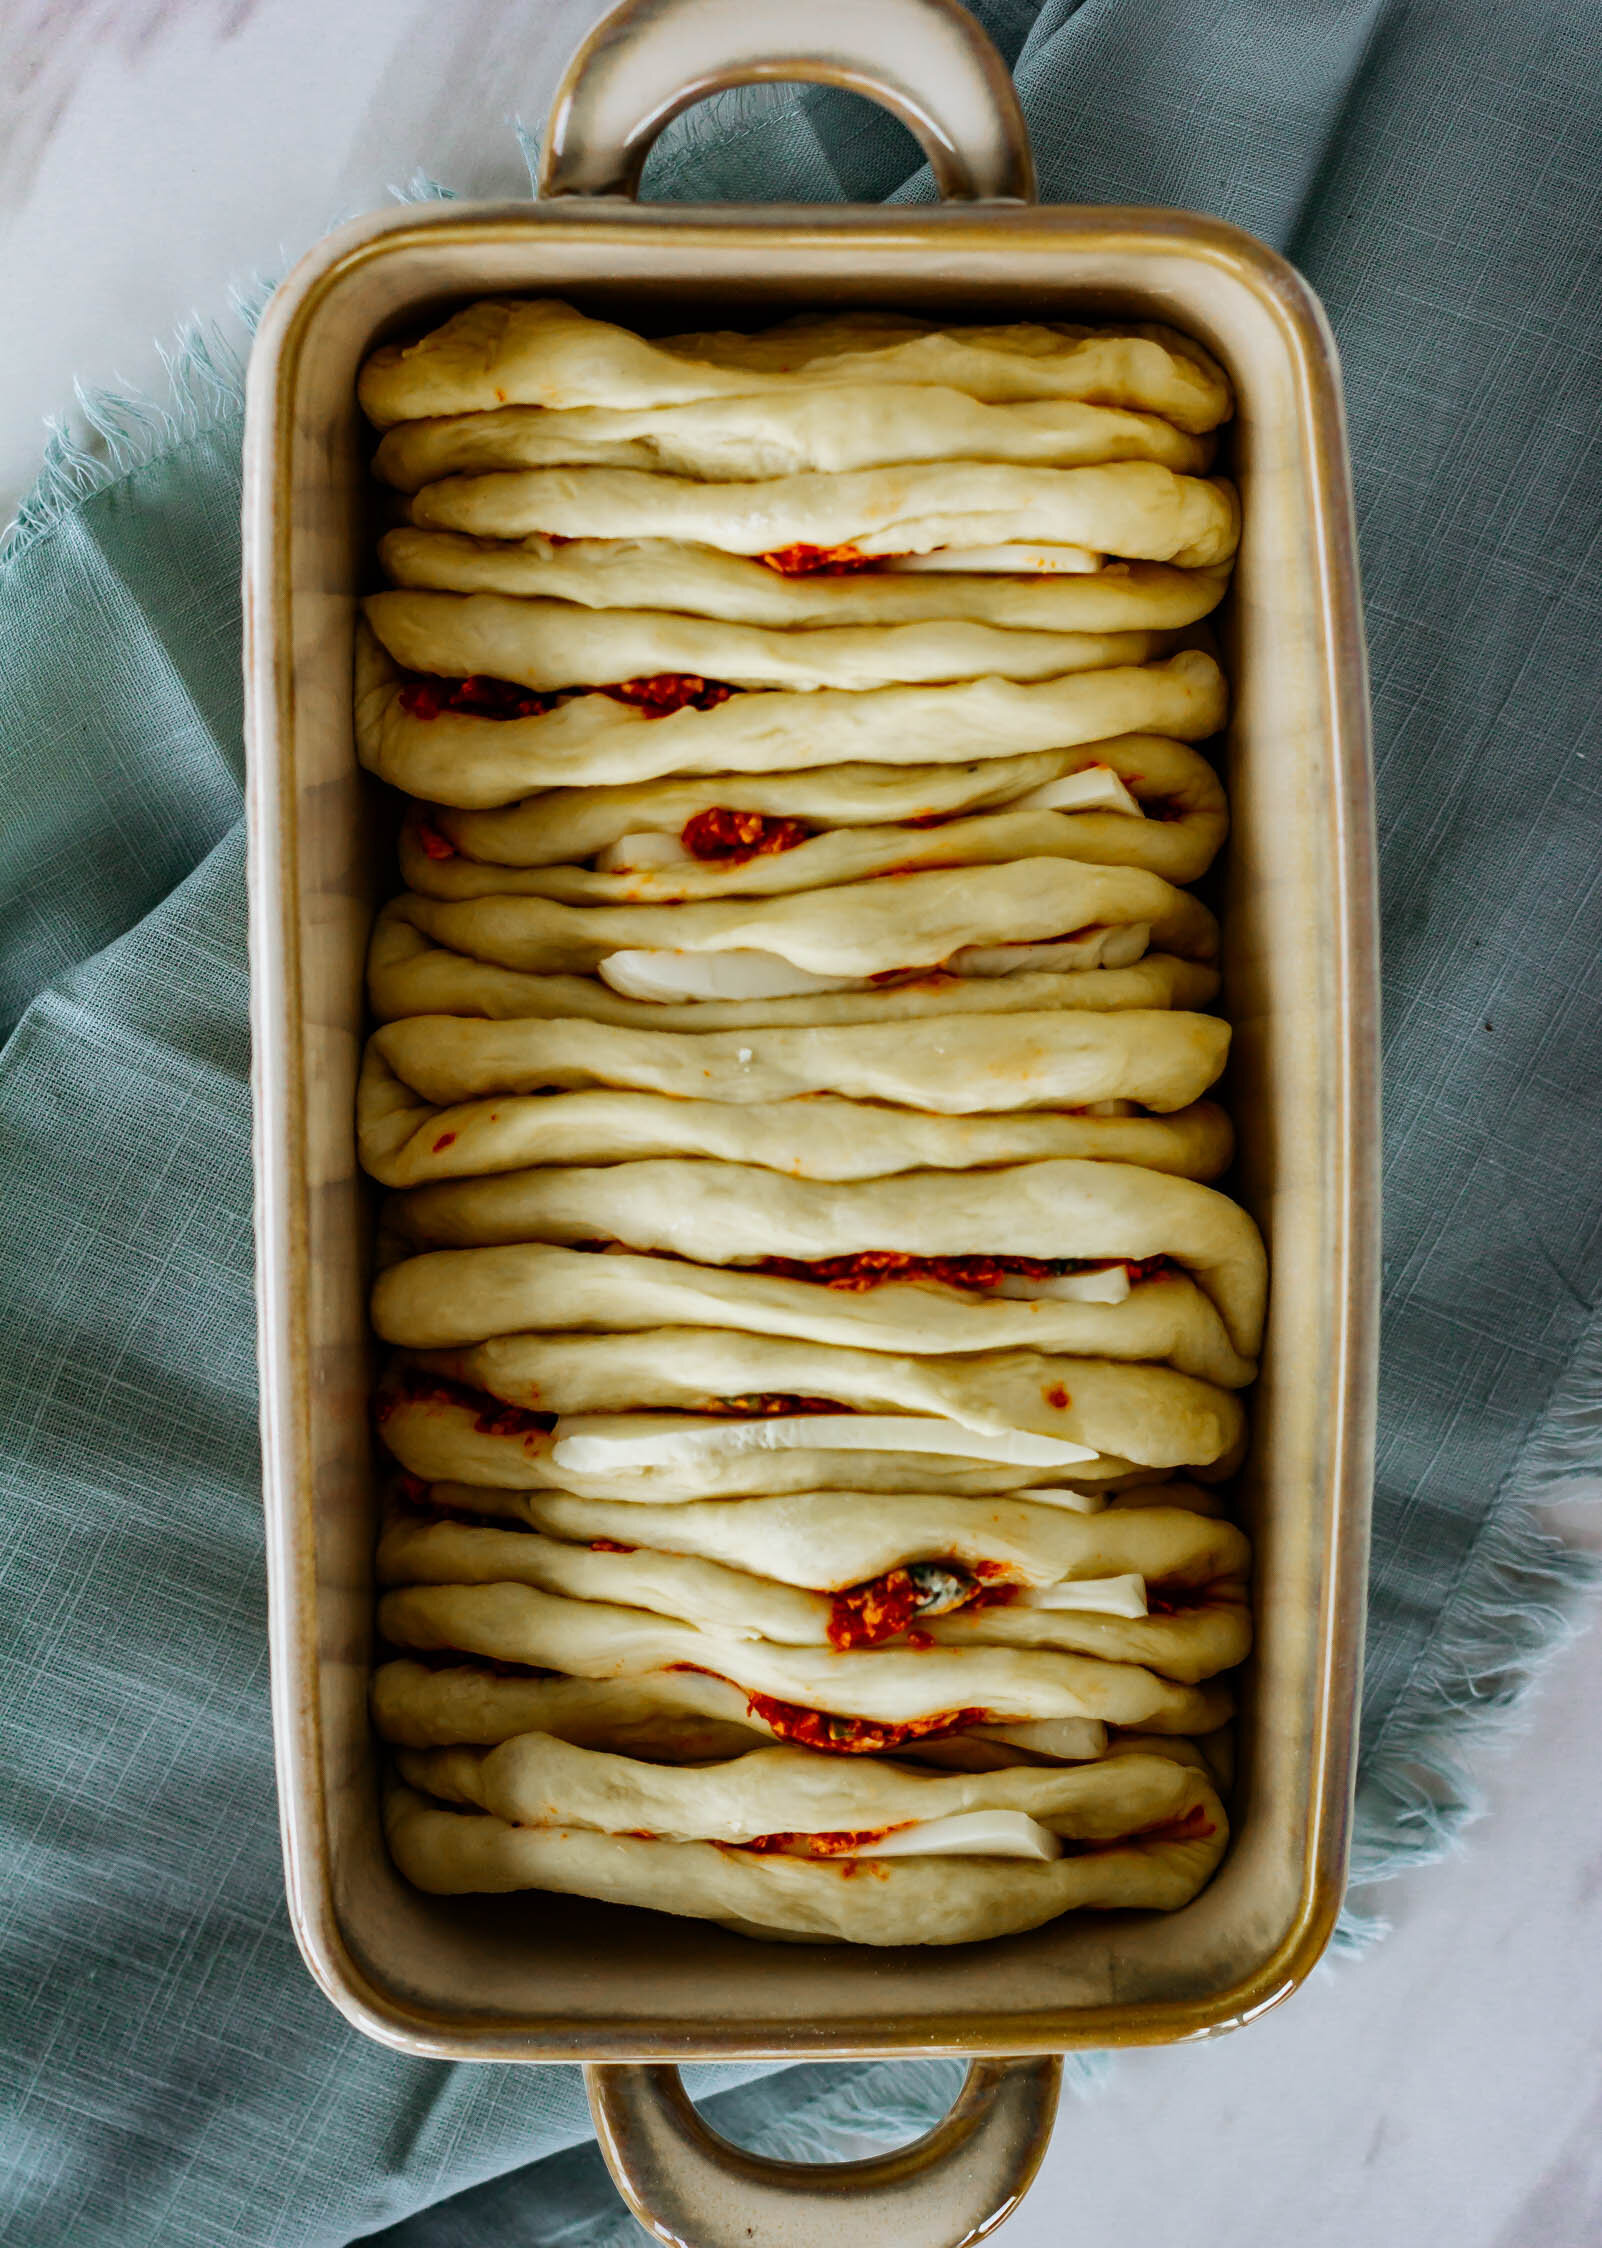
This pull-apart bread tastes like a hot pocket and I’m not mad about it. Canned tomatoes get roasted low and slow in the oven with a couple cloves of garlic before being stirred into an herbed butter to create a tomato butter that you could honestly just swipe onto crackers and it would be excellent. But we’re taking it a step further and stuffing dollops of tomato butter and slices of mozzarella cheese into a light, fluffy buttermilk dough, folding them like little pizza tacos and tucking them into a loaf. The whole thing is proofed, dusted with parmesan cheese, and baked. It’s a little pizza bread work of art.

tomatobread20.jpg
tomatoes, italian, bread recipes, pull-apart bread, cheesy bread, mozzarella cheese
breads
italian
Yield: makes one 9” loaf pan
Author: Anna Ramiz
Caramelized Tomato and Mozzarella Pull-Apart Bread

Caramelized Tomato and Mozzarella Pull-Apart Bread

Prep time: 1 HourCook time: 50 MinInactive time: 2 HourTotal time: 3 H & 50 M

Ingredients

for the buttermilk dough
  • 2 tsp active dry yeast
  • 1 tsp granulated sugar
  • 3/4 cup (180 ml) buttermilk
  • 4 tbsp (56 g) unsalted butter, softened
  • 1 egg, at room temperature
  • 2 1/3 cup (300 g) all purpose flour
  • 1 tsp kosher salt
for the caramelized tomatoes
  • 1 (14-oz) can Pomi Chopped Tomatoes
  • 4 cloves garlic, in paper
  • 1 tbsp olive oil
  • 1/2 tsp kosher salt
  • 1/4 tsp freshly cracked black pepper
for the tomato butter
  • 4 tbsp unsalted butter, softened
  • Caramelized tomatoes and roasted garlic, recipe below
  • 2 tbsp fresh basil
  • 1 tbsp fresh parsley
  • 1/2 tsp kosher salt
  • 1/4 tsp freshly cracked black pepper
  • 2 tbsp grated parmesan cheese
  • 5 oz low-moisture mozzarella cheese, sliced
  • Beaten egg, for egg wash
  • 2 tbsp grated parmesan cheese, for sprinkling

Instructions

to make the caramelized tomatoes
  1. Preheat oven to 300° F and line a rimmed sheet pan with parchment paper.
  2. In a small bowl, toss garlic cloves with olive oil and pour out onto prepared pan.
  3. Pour chopped tomatoes on the pan with the garlic, sprinkle everything with salt and pepper and give it a quick stir.
  4. Roast for 45-50 minutes, stirring every 15 minutes or so, until tomatoes are a deep red color and almost all of the liquid has evaporated.
  5. Let cool completely.
to make the tomato butter
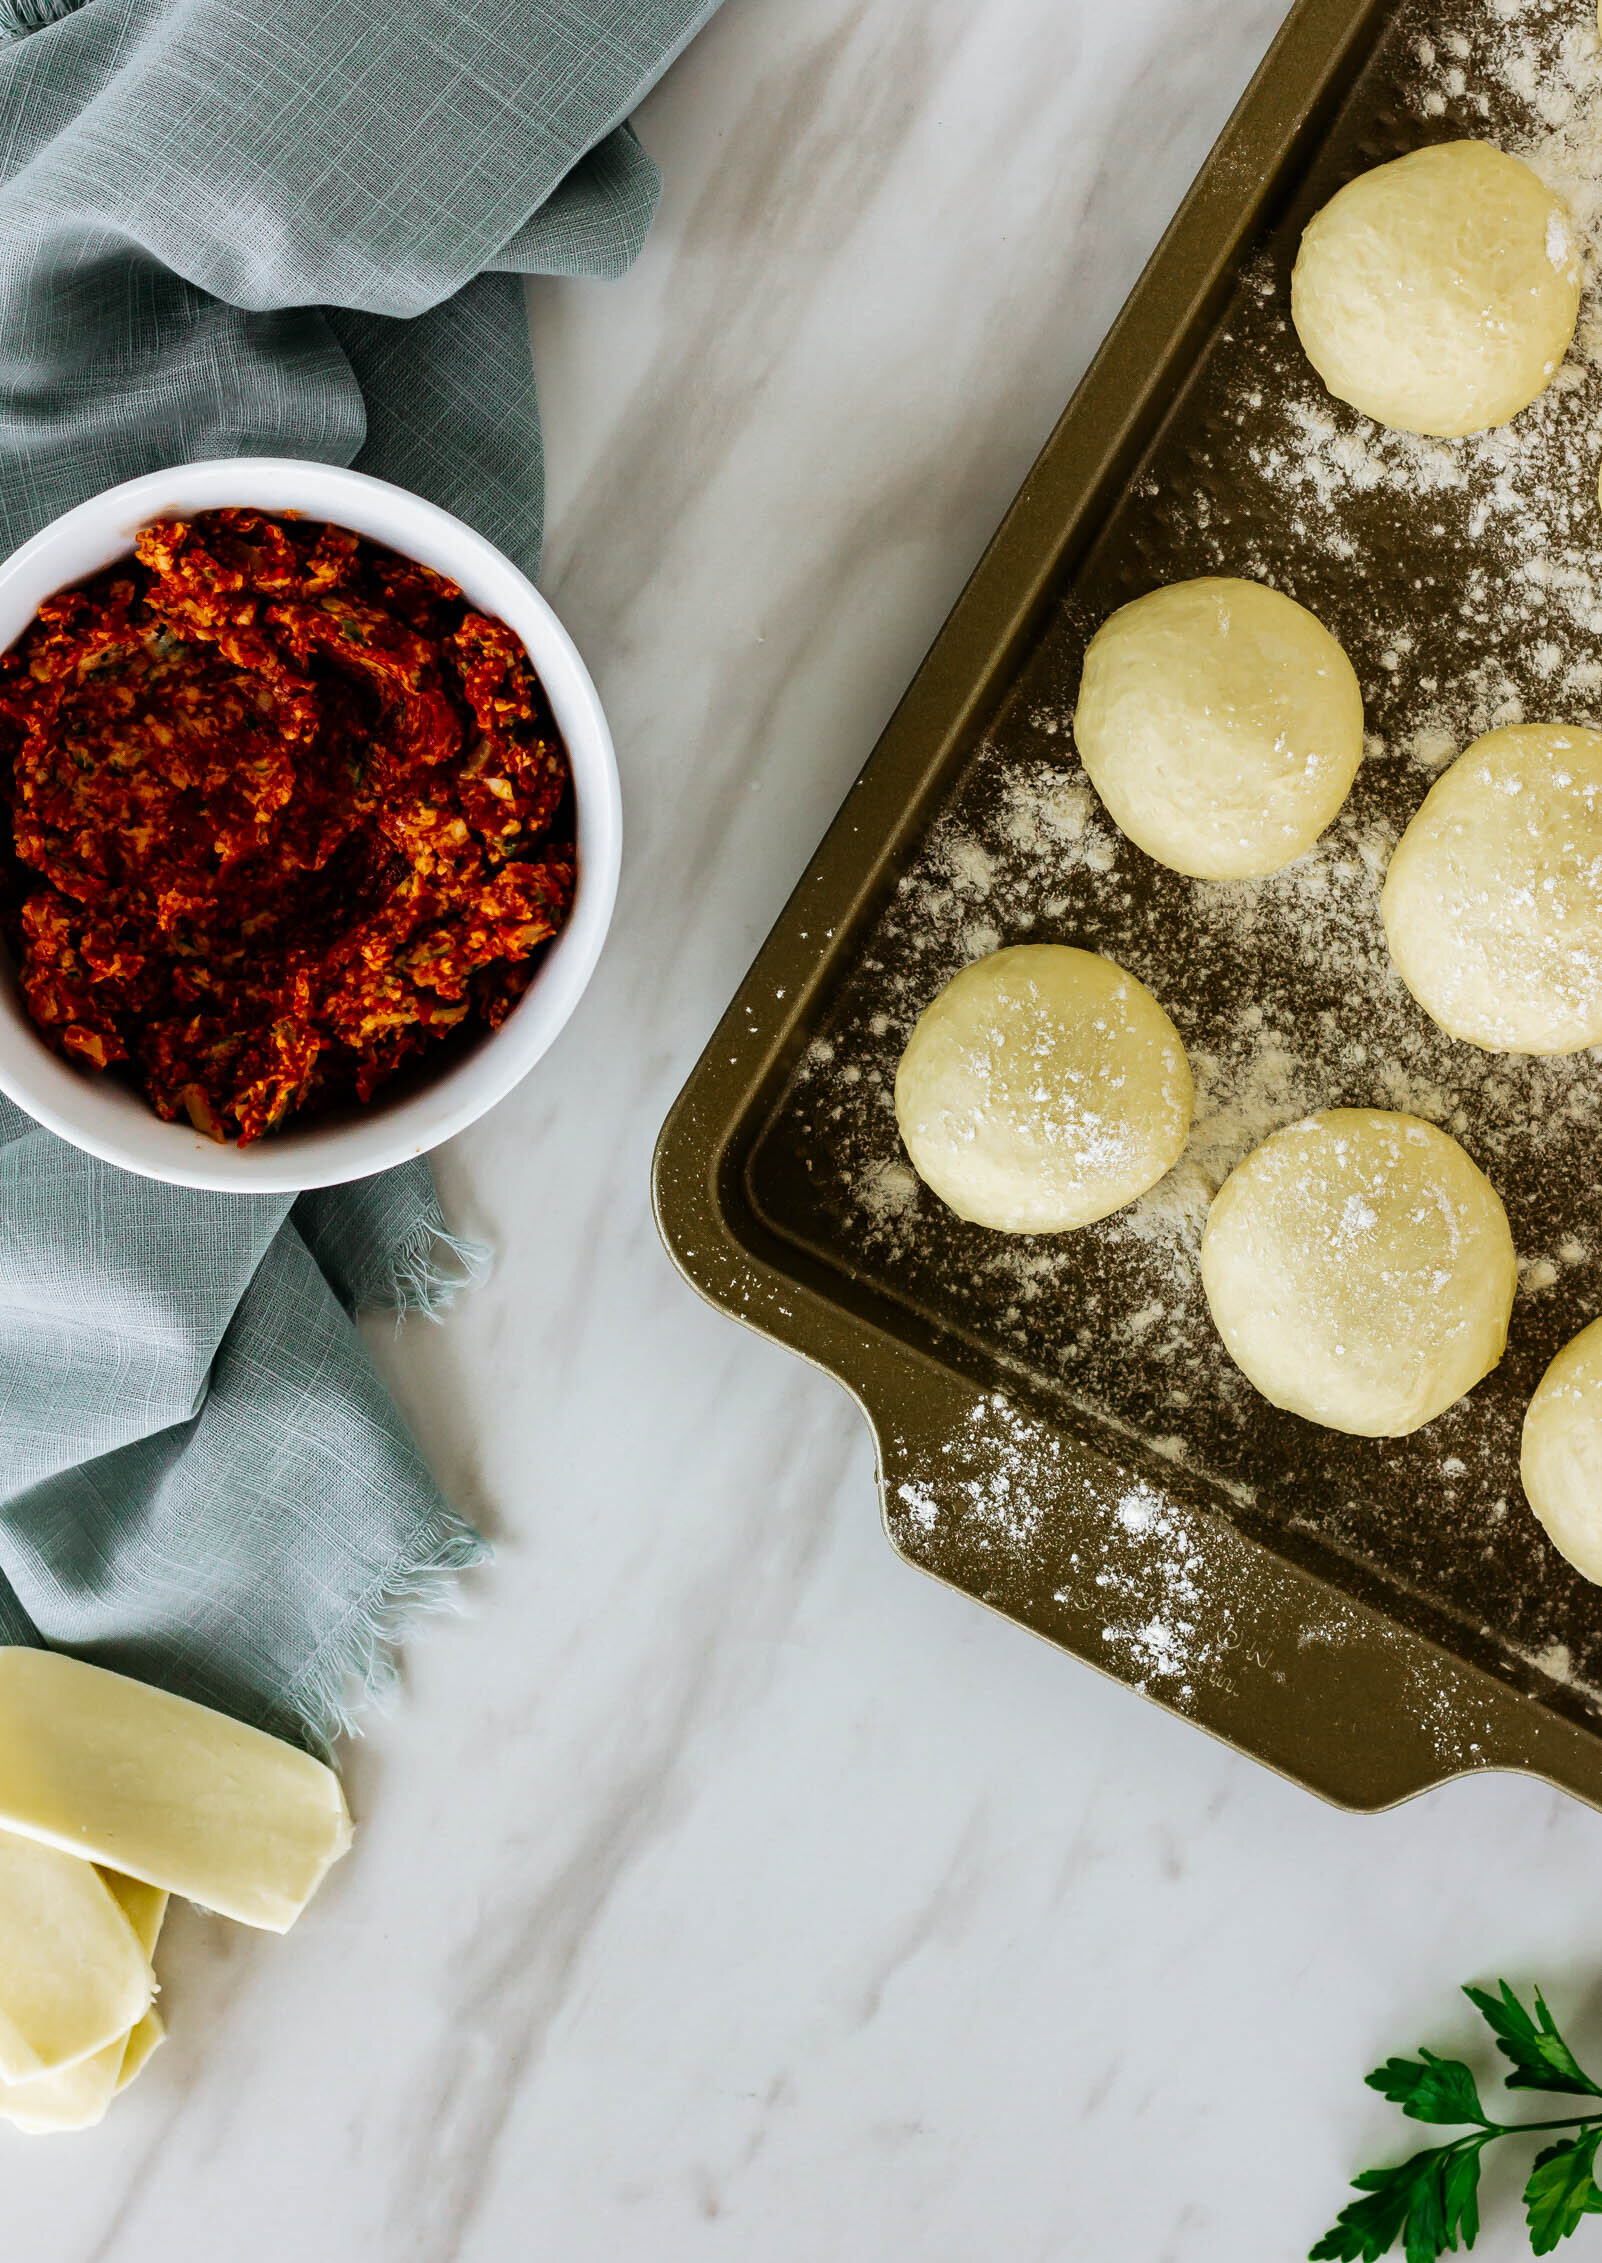
  1. Into a medium bowl, squeeze the roasted garlic cloves from above out of their skins. Add salt, fresh basil and parsley, and parmesan cheese. Mash together with a fork.
  2. Add the softened butter and the caramelized tomatoes and stir well, until combined and homogenous.
to make the buttermilk dough and tomato bread
  1. Heat buttermilk in the microwave until warm to the touch. Pour into the bowl of a stand mixer fitted with a dough hook attachment and add the yeast. Let rest for 5 minutes, while you prepare the rest of the ingredients, until yeast is foamy.
  2. In a small bowl, whisk together flour, sugar, and kosher salt. Set aside.
  3. When yeast is ready, add the egg to the buttermilk and yeast mixture and whisk briefly to combine.
  4. Add the dry ingredients to the mixer and mix on medium speed for 2-3 minutes, until a shaggy dough forms.
  5. Decrease mixer speed to low and gradually add softened butter, one tablespoon at a time. When all of the butter has been added increase speed to medium-high and knead for 5-6 minutes until dough is smooth and elastic. Scrape down the sides of the dough and gently shape into a round. Place dough in a lightly-oiled bowl, cover, and let proof at room temperature for 1 1/2 hours, until doubled in size.
  6. When dough has completed its first proof, turn it out onto a lightly-floured work surface. Divide the dough into 12 equal pieces and roll each piece into a ball. Let rest, covered with a towel, for 15 minutes.
  7. Working with one bowl at a time, roll or press each ball into a 4-5” round. Fill the center of each round with a tablespoon of tomato butter and a slice of mozzarella cheese. Fold the dough circle upwards into a half-moon shape, so that each circle looks like a little filled taco.
  8. Place each filled dough-taco, open side up, in a row in a lightly-oiled loaf pan. Cover the loaf pan with a towel or plastic wrap and let proof at room temperature again for 30-40 minutes, until swollen and dough has risen to the height of the pan.
  9. Brush the top of the loaf with beaten egg and sprinkle with parmesan cheese. Bake at 350° F for 40-45 minutes, until deeply golden brown.
  10. Let cool for 5-10 minutes in pan before removing from pan and serving.

Recommended Products:


Did you make this recipe?
Tag @gatheredatmytable on instagram and hashtag it #gatheredatmytable

A Very Good At-Home Pizza Dough

pizza1.jpg

For someone who makes it almost weekly, I get very grouchy about homemade pizza. Without a wood-burning pizza oven, it just is never the same as the good stuff you get at restaurants. Sure it’s easy and you can top it with whatever you like, but I’m almost always disappointed at the lack of charred edges and those dough bubbles created by the blast of hot air. Nevertheless, I press on and continue to make pizza at home, because in the grand scheme of things, it really isn’t bad.

I’ve struggled for the last few years to find a dough recipe that is better than and just-as-easy-as the refrigerated dough in the Publix bakery shelves. Every recipe that I’ve tried worth anything requires an overnight proof and I just am not put-together enough to think about what I want for dinner an entire day ahead. A lot of doughs come out too bread-y for my taste and my jaw gets sore chewing each slice. Some create a dough that more closely resembles a cracker. It’s been a rough time, y’all.

PizzaDough5.jpg

Yet, I’ve persevered and I’ve finally created a pizza dough that checks off all of my boxes. 1) It can be made same-day, though if you are exceptionally good at planning ahead, you can definitely cold-proof this overnight for a little more flavor development. 2) It yields a crust that’s not too thick and not too thin, that falls somewhere in that perfect pizza region. 3) Did I mention it can be made same-day?

I’m not going to call this “the very best pizza in the world” or anything like that, because that would be a lie. The very best pizza is often proofed for at least 24 hours and baked in a 700° F pizza oven, but I don’t have those kind of resources so this is simply “a very good at-home pizza dough”. It’s for Friday nights when you want pizza but don’t want to go out and weeknights where you have lots of leftover veggies that just need to be thrown into a heap and covered in cheese and called dinner. A very good, very easy pizza dough fit for your home kitchen.

A few practical notes: Depending on the type of baking pan you use, bake the pizza between 450° F and 500° F, or as hot as your oven and pan can handle. I’ve also found that par-baking the crust is essential or you’ll end up with slightly burnt toppings and a soggy middle. Stretch your dough onto your baking sheet, brush it with a little olive oil, and pop it in the oven for 5-7 minutes, until its just beginning to golden. Then top it with your sauces/cheese/veggies/etc and let it continue baking until everything is melted and the bottom is golden brown and crisp. Every oven runs a little differently, so I would give it 10 minutes with toppings and then check it every 5 minutes or so after that.

pizza5.jpg

A Very Good At-Home Pizza Dough

makes 1 lb of dough (or 14” pizza)

Ingredients

270 g all purpose or 00 flour*

1 tsp active dry yeast

pinch of sugar

188 g warm water

1 tbsp olive oil

2 1/2 tsp kosher salt

Procedure

  1. In the bowl of a stand mixer fitted with the dough hook attachment, combine warm water, pinch of sugar, and active dry yeast. Stir gently and let rest until foamy, about 5 minutes.

  2. When the yeast has proofed, add the olive oil, followed by the flour. Mix on low speed for 2-3 minutes, until all of the flour has mixed in and a sticky dough is beginning to form. Cover the bowl and let rest for 15-20 minutes at room temperature.

  3. After the dough has rested, turn the mixer on low and gradually add the salt. Increase mixer speed to medium-high and knead for 3-5 minutes, until the dough begins to pull away from the sides of the bowl and an elastic dough begins to form.

  4. Turn the dough onto a well-floured work surface, dust the top with a little more flour and use your hands to gently shape the dough into a ball. Place the dough ball into a well-oiled bowl, cover with plastic wrap, and let proof at room temperature for 1 1/2-2 hours, until swollen and puffy, almost doubled in size.

  5. After the dough has completed it’s first proof, turn it out onto a lightly-floured work surface. Use your hands to punch the dough down a bit and then shape it into a smooth, round ball. Place the ball seam side down on your surface, dust the top with a bit of flour, cover, and let rest for another 2-3 hours, until pillowy. To test if the dough is ready, gently press your finger into the dough. If the imprint fills back in halfway slowly, it is sufficiently proofed. If it fills back in completely very quickly, continue to proof the dough. Alternatively, you can transfer the dough back to the refrigerator before the second proof and let it cold proof overnight. Let the dough come to room temperature before shaping and baking.

  6. When you are ready to bake, preheat your oven to 450°. Gently stretch the dough into a circle on a pizza pan, brush with a bit of oil and par-bake for 6-8 minutes, until beginning to turn golden brown. Remove from oven, top with your desired toppings and then continue to bake for 10-15 minutes until the bottom of the crust is crispy and brown and all of the toppings are sufficiently baked.

*Notes: 00 flour is a finely-ground Italian flour that comes from durum wheat. It’s protein content is similar to all purpose flour, so they are interchangeable here, but if you’re able to seek out a bag of the 00, you’ll find your crumb just a little lighter and will give you a chewier crust with less of a chance of tearing while you’re stretching. I can always find 00 flour at Whole Foods and Fresh Market, or you can easily order it online.

Print Friendly and PDF
newpita3.jpg

alon shaya’s pitas

briolata8.jpg

briolata

HerbFoc12.jpg

herb focaccia

Fall Mediterranean Snacking Board

medsnackboard2.jpg

Let’s talk about one of my favorite food groups- breads with dips, a.k.a. snacking boards. There is nothing better than a good carb used as a vessel for scooping some salty, yogurty dip and that is a statement that I will always stand behind. Snacking boards have been a hot topic for the last few years because they can be ultra-pretty and can make you feel a bit like Martha Stewart when you make one. For me, they are the color by numbers of the food world and I’m personally very into that.

The inspiration for this particular board came after a long wait to early vote. About 2 weeks ago, when early voting opened in Florida, Martin and I headed to the library one afternoon to stand in line and vote. I finished a few minutes before Martin so I meandered over to the cookbook section, just to make sure I didn’t miss anything new or interesting and I’m so glad that I did. There, gleaming at me from those metal library shelves, was a copy of Falastin by Sami Tamimi, a book I’ve been eager to get my hands on since it’s release in this past spring. Sami Tamimi is a fairly well-known chef, largely in part because of his work with my very favorite guy, Yotam Ottolenghi. Falastin, which shares food and stories from his childhood in Palestine, is Tamimi’s first book without Ottolenghi and it is an absolute joy. In the five minute car ride home, Martin and I tagged at least ten recipes we couldn’t wait to try, the first being butternut squash m’tabbal, a butternut squash and eggplant dip that made it’s appearance on this board (and then on breakfast sandwiches, quesadillas, and scrambled eggs everyday after). I built a Mediterranean-esque board centered around that particular recipe, heavy on the dips and pitas with a few cheeses, some fruit and a little salty meat for good measure. I’ll break down this board for you and I also have a slightly more traditional charcuterie and cheese how-to post here, if you are interested, but the beauty of a good snack board is making it your own. Take some notes and then trust your self and give it a whirl!

butternut squash and eggplant dip from “falastin” by

butternut squash and eggplant dip from “falastin” by

olive tapenade

olive tapenade

a fall mediterranean snacking board

dips: The most important part of this board, you want a varied assortment. I used ______ as my centerpiece, and added to it a very traditional hummus drizzling with olive oil and sprinkled with za’atar and a salty olive tapenade (recipe below). A bright, herby yogurt dip or a smoky muhamarra would also go really well here.

breads: Pita, pita, pita! I skipped the crackers for this board and went straight for bread. Naan, focaccia, and even baguette slices would be great vessels for scooping all of those dips.

cheese: Since the focus of this board wasn’t exactly on the cheese, I only chose two: a sheep’s milk Israeli feta, which was really great sprinkled on top of dip-laden pita wedges, and a goat milk gouda.

meat: I almost skipped the meat entirely, and you definitely could and go full vegetarian, but I love a good salty meat and I couldn’t help myself. I just added a few slices of prosciutto, which ended up pairing excellently with the goat gouda and apple slices.

fruit: I used a combination of fresh and dried fruit here. Grapes, blackberries, apples, and dates for snacking and pomegranate wedges and dried persimmons for aesthetic appeal.

salty snacks: This category encompasses things likes olives and pickles and nuts. I already had an olive tapenade on the board so I didn’t add any extra snacking olives. Instead, I sliced a few Persian cucumbers and tossed them with salt, dill, red pepper, a pinch of sugar, and apple cider vinegar and created my own crunchy quick pickle. (I essentially followed this recipe from Bon Appetit, with just a few creative liberties.) I also added some pistachios for creaminess and crunch.

medsnackboard10.jpg

Olive Tapenade

makes about 1 1/2 cups

a few years ago, my aunt took me to the South of France for ten days to celebrate our birthdays. we ate confit duck legs at 11 am with sauternes, we strolled through cobblestone streets snacking on croissants, and we spent afternoons on the rooftop terrace of our AirBnB eating cheese. it was magical. we also spent an afternoon in a culinary class with my friend Gilles where we made grand aioli and olive tapenade and ate in the middle of his garden. this is a little riff on Gilles’ olive tapenade and it’s the easiest and most delicious recipe I’ve made.

Ingredients

200 g green and black olive, pitted

20 grams pistachios

a handful of fresh basil

2 tsp capers

50 grams olive oil

50 grams oil-packed tuna

Procedure

  1. Combine everything except the olive oil in the bowl of a food processor and pulse until everything is broken down into small, coarse pieces.

  2. Drizzle in olive oil and pulse a few more times until everything is combined. Taste and add salt and pepper if needed.

  3. Serve drizzled with more olive oil and lots of pita.

Print Friendly and PDF