Butterscotch Oatmeal Cookies with Hazelnuts and Espresso

These chewy butterscotch oatmeal cookies are filled with toasted hazelnuts and strong espresso. A quick and easy recipe, they make great freezer cookies--perfect for baking off at a moment's notice.

oatmeal cookies with butterscotch-1.jpg

Us recipe developers work weird food schedules. For the blog, I try to create and plan content a month ahead, but for client work, it’s often farther in advance. This is how I found myself making Thanksgiving dinner at the end of September this year. I had a client project for a full Thanksgiving feast—turkey, stuffing, mac and cheese…the works, due at the beginning of October. For the weeks leading up to the shoot, I spent quite a bit of time on the phone with grocery stores trying to locate a turkey (fun fact, most grocery stores won’t get turkeys in stock until “closer to the holiday”, though they won’t tell you when exactly that will be and lots of meat managers are really not huge fans of people calling and asking about them). After finally securing myself an out-of-season turkey, I began to work on my full Thanksgiving dinner, a project that would leave me with somewhere close to a million pounds of leftovers that I really didn’t want.

So we threw a party. We celebrated Thanksgiving in early October with a group of friends who brought bonus sides and desserts pot-luck style. It was the first party we’ve hosted since moving to Minnesota and it was such a fun night, though I am officially turkey-ed out for the year. I’ll be eating spicy noodles or something completely different this year on actual Thanksgiving and I’ll be giving thanks for not having to cook a turkey twice in two months.

oatmeal cookies with butterscotch-8.jpg

oatmeal cookies with butterscotch, hazelnuts, and espresso

I had this flavor idea swimming around in my head for a few weeks and decided to make a batch to go with our Thanksgiving party food so I could test them out on a group and they were a real hit. Think of them as classic oatmeal cookies with a bit of a grown-up twist.

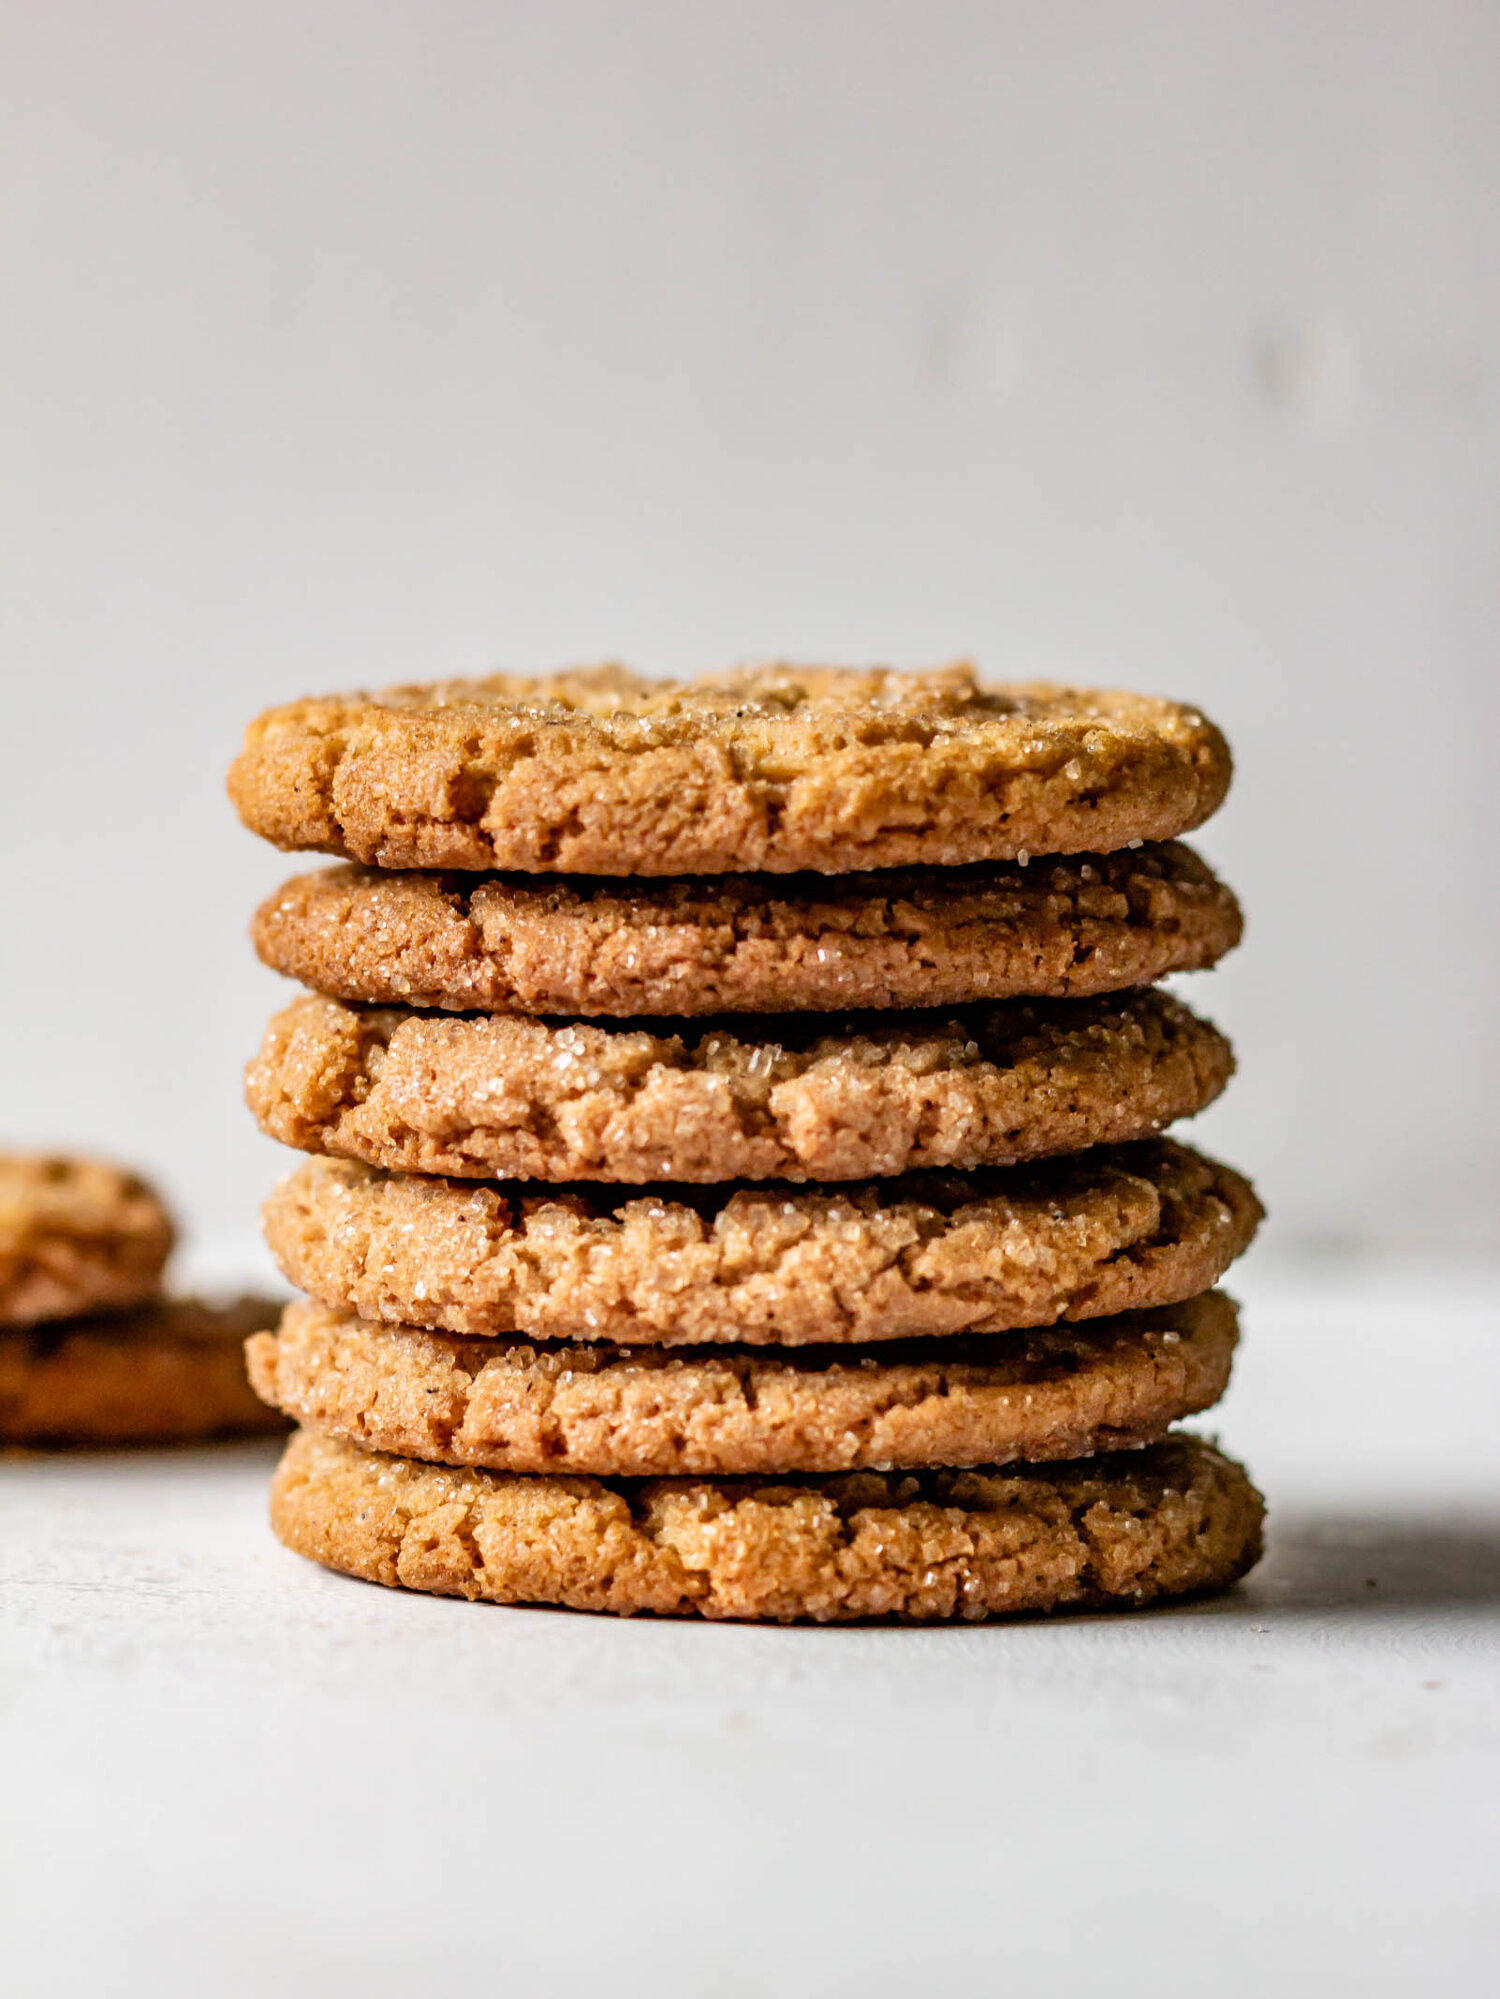
I have three nonnegotiables when it comes to oatmeal cookies: 1) they should have crunchy edges 2) they should have soft, pillowy middles and 3) they should have a deep brown sugar flavor. These cookies hit all three and more.

I love steeping flavors into the butter for my cookies so this time we added instant espresso to our melted butter as the base of flavor. It’s then mixed with lots of brown sugar and sugar, eggs, vanilla, and dry ingredients (flour, oats, leavening agents, and salt). So easy. A bunch of toasted hazelnuts and butterscotch chips round it out and then they are chilled slightly before baking. Side note: this cookie dough smells AMAZING. My whole kitchen smelled like a tiny little coffee shop or the smell of the hazelnut coffee from Panera Bread.

When baking these cookies, take extra care not to over-bake so you don’t lose your soft, pillowy centers. I found that 8 minutes, tapping the tray on the counter, and then another 2-3 minutes worked perfectly in my oven. The centers will look underdone, but let the cookies cool completely on the pan and they will set up. Like most cookie recipes, this cookie dough freezes beautifully so that you can bake some off and have warm oatmeal cookies within 15 minutes.

oatmeal cookies with butterscotch-2.jpg
Butterscotch Oatmeal Cookies with Hazelnuts and Espresso
Yield
22-24 cookies
Author
Prep time
15 Min
Cook time
10 Min
Inactive time
30 Min
Total time
55 Min

Butterscotch Oatmeal Cookies with Hazelnuts and Espresso

These chewy butterscotch oatmeal cookies are filled with toasted hazelnuts and strong espresso. A quick and easy recipe, they make great freezer cookies--perfect for baking off at a moment's notice.

Ingredients

  • 1 cup (226 g) unsalted butter
  • 2 tbsp instant espresso
  • 3 cups (270 g) rolled oats
  • 1 1/2 cup (190 g) all purpose flour
  • 3/4 tsp baking soda
  • 1 tsp baking powder
  • 1 tsp kosher salt
  • 1 cup (200 g) brown sugar
  • 1/2 cup (100 g) granulated sugar
  • 2 eggs
  • 1/2 tsp vanilla powder (or 1 tsp vanilla extract)
  • 11 oz butterscotch chips
  • 1 cup toasted hazelnuts, roughly chopped

Instructions

  1. Place butter and espresso in a medium saucepan and cook over medium heat until butter is melted and espresso is dissolved. Set aside to cool.
  2. In a large bowl, stir together oats, flour, baking soda, baking powder, and salt. Set aside.
  3. In the bowl of a stand mixer fitted with the paddle attachment, beat together brown sugar, granulated sugar, and espresso butter until smooth and homogenized and the mixture is room temperature.
  4. Add the eggs and vanilla and continue mixing for 1-2 minutes, until very smooth and completely combined.
  5. Gradually add the dry ingredients, mixing on low speed just until combined, followed by the butterscotch chips and the toasted hazelnuts.
  6. Using a large cookie scoop, scoop dough onto a parchment-lined baking sheet and chill for at least 30 minutes, preferably overnight.
  7. When you are ready to bake, preheat the oven to 350° F. Place cookies on another parchment-lined baking sheet, leaving about 2” space between cookies. Bake for 10-12 minutes, until the edges are golden and the centers are just set. Sprinkle with flaky salt and let cool on the pan.
Did you make this recipe?
Tag @gatheredatmytable on instagram and hashtag it #gatheredatmytable

Rosemary Espresso Chocolate Chip Cookies

These soft and chewy cookies are made by steeping rosemary and instant espresso into the butter. They are filled with dark chocolate pieces and topped with flaky salt.

rosemary espresso cc cookie_4.jpg

Ok, guys, I need a little vent session. Let’s talk about Instagram for a quick moment and then I promise, I’ll get back to the cookie content you came for. As you may know from my last little life update, we are currently in the process of moving from sunny Central Florida to Minneapolis (!!!) and there are a whole plethora of things (selling a house, packing a house, getting client work done, finding an apartment from across the country, hiring movers, loading a pod, driving across the country, etc, etc, etc) that have taken my attention for the last few weeks. I’ve taken a couple weeks off from sharing new recipes and allowed the blog to take a backseat for a bit while life settles in. So the last thing I needed during this move was for Instagram to rear it’s ugly head and throw a wrench into my plans. A couple weeks ago, my Instagram account was hacked and some little bot decided to post a RayBan advertisement on my page. I deleted the post, changed my password, and went on with my life. Then, a few weeks later, I woke up and checked Instagram (which I’ve finally learned is not a healthy thing to do first thing in the morning), only to find out that my account has been ‘temporarily locked’ as a precaution. I’ve gone through the security steps given in which I was supposed to receive a security code to verify my identity maybe a dozen times and have never received a code. I’ve tried to send a report (which is basically impossible when you are locked out of the app), and I even tried calling for support. Nothing. Nada. So I spent the last two weeks on a forced IG break.

All of this hooplah has really gotten me thinking because I HATE the idea that any part of my business is completely out of my hands and can be snatched away at a moments notice. As a food blogger, part of my business is partnering with brands for sponsored content. Imagine if I had partnerships lined up over this time—I would be breaching contracts and would lose income and there would literally be nothing I could do about it. It baffles my mind that Instagram has that kind of power over creatives. I decided this week, that I really hated the way that this dependency on Instagram has made me feel. I hate that I woke up to find myself locked out and was crying before my feet even hit the floor in the morning. I hate how it feels like something that is supposed to be a tool to help creatives grow their audience, has become this two-headed monster with the power to tank a person’s entire livelihood. I’m just not into this game anymore. So I’m choosing to focus on the blog for the time being and for the work that I create that I can control. While I finally figured out how to get back into my account, the time away was really perspective shifting. I’ll definitely still be sharing on the app regularly, but only as a way to get people excited about a recipe, not with a mindset that forces me to churn out content just for the sake of staying relevant.

how to support your favorite food blogs

To be honest, apps like Instagram are great with their likes and comments, but they don’t really help a lot if your goal is to share recipes and get people in the kitchen. The most important thing to a food blogger is blog traffic. Having consist traffic to your website provides for so many opportunities! So please, if you enjoy the content you find here or on any of your favorite food blogs, share links that lead back directly to their pages. Comment on recipes that you have made, pin images and recipes to Pinterest of recipes that you love and keep coming to our blogs!

rosemary espresso cc cookie_10.jpg

a chewy espresso chocolate chip cookie

Ok, back to what you came here for—cookies! These chewy, espresso chocolate chip cookies are a real winner in my book. They are made by steeping rosemary springs and espresso with butter, an tiny extra step that makes for a really fantastic cookie. When choosing an espresso for this recipe, you have a few options. You can use an instant espresso powder, which should dissolve completely in the butter, or you can use finely ground espresso powder, which may not dissolve completely but will give a bit stronger coffee flavor to the final cookie. The choice is yours, but since I like coffee that packs a punch and a little added texture, I prefer espresso powder.

These cookies are made using the all-familiar creaming method and the procedure is fairly straightforward for cookies. Melt/steep your butter. Cream butter with sugar, add the eggs, followed by dry ingredients and then chocolate. I always recommend using chopped chocolate over chips in cookie baking. Chocolate chips are coated in order to help them hold their shape during baking, which means you won’t get those much-desired chocolate puddles. Finally, the dough is chilled a bit before baking (if you’re wondering why—hop over here and read about the importance of dough chilling). These cookies, like all good cookies, are best enjoyed warm with lots of flaky salt and a big glass of milk.

a couple tips for baking rosemary espresso chocolate chip cookies

updated December 2021

I had a few folks reach out that their dough was drier than expected so I went back and tested this recipe a few more times to see if I could figure out where they were having difficulty. Here are a few things to keep an eye out to ensure that your cookies turn out perfectly!

  1. Butter

    Because of the way that melted butter hydrates flour, this dough will look slightly different than a traditional softened-butter method cookie dough. Once mixed, the dough takes on a shiny quality and will greatly benefit from that extra hydration time in the refrigerator before baking.

    When cooking the butter, be sure to only keep it on the heat, uncovered until the butter is melted and the mixture just begins to bubble a bit (this should only take about 5 minutes). If you keep the butter on the heat too long, water content will begin to evaporate and you will be left with quite a bit less liquid than the recipe calls for.

  2. Eggs

    I test all of my recipes with large eggs. A typical large egg weighs about 50 grams and each yolk weighs about 20 grams. If you are using smaller eggs, you may need to add an extra yolk.

  3. Flour

    This is a chance for me to wax poetic about the kitchen scale yet again. If you only ever take one thing away from this blog, let it be the kitchen scale. Baking with a kitchen scale (as opposed to relying on measuring cups) is really the only way to ensure accuracy and consistency in each recipe. If you were to scoop out one cup of flour 4 different times, you would end up with a different amount each time depending on the method you use, the brand of measuring cup you stock, or even the humidity in your kitchen. Weighing your ingredients ensures that you are using the correct amount every single time and, a fun bonus, it dirties fewer dishes.

    If you don’t have a kitchen scale, this is the one I have been using for the last 4 years and it has yet to let me down.

rosemary espresso cc cookie_5.jpg
Yield: makes 16 cookies
Author: Anna Ramiz
Rosemary Espresso Chocolate Chip Cookies

Rosemary Espresso Chocolate Chip Cookies

Prep time: 15 MinCook time: 10 MinTotal time: 25 Min
These soft and chewy cookies are made by steeping rosemary and instant espresso into the butter. They are filled with dark chocolate pieces and topped with flaky salt.

Ingredients

  • 1/2 cup (113 g) unsalted butter
  • 3 sprigs rosemary
  • 2 g instant espresso
  • 1/2 cup (107 g) brown sugar
  • 1/4 cup (50 g) granulated sugar
  • 2 egg yolks
  • 1 tsp vanilla extract
  • 1 1/2 cups (190 g) all purpose flour
  • 1/2 tsp baking powder
  • 1/4 tsp baking soda
  • 1/2 tsp kosher salt
  • 6 oz dark chocolate, chopped

Instructions

  1. In a small saucepan, combine butter, rosemary sprigs, and instant espresso. Cook over medium heat until butter is melted and bubbling, espresso has dissolved and rosemary is fragrant. Remove from heat, cover, and let steep while you prepare the rest of the ingredients.
  2. In a medium bowl, whisk together flour, baking powder, baking soda, and salt. Set aside.
  3. Remove rosemary sprigs from butter and discard. Place butter in the bowl of a stand mixer fitted with the paddle attachment. Add sugar and brown sugar and beat on medium speed for 1-2 minutes, until thoroughly combined.
  4. Add the egg yolks and vanilla and continue mixing until mixture is smooth and homogenous (about 2 minutes).
  5. With the mixer on low speed, gradually add the dry ingredients mixing until just combined and no flour streaks remain. Fold in chocolate chips.
  6. Using a 1 1/2 tbsp sized cookie scoop, scoop cookie dough and place them on a parchment lined baking sheet. Cover with plastic wrap and chill for at least 30 minutes.
  7. When you’re ready to bake, preheat the oven to 350° F. Bake cookies for 8-10 minutes, until the edges are golden brown, and then let cool completely on the baking sheet. Sprinkle with flaky salt.
Did you make this recipe?
Tag @gatheredatmytable on instagram and hashtag it #gatheredatmytable
Created using The Recipes Generator

Toasted Sugar and Dalgona Coffee Pots de Creme

toasted sugar and dalgona coffee pot de creme

toasted sugar and dalgona coffee pot de creme

This recipe is part of a paid partnership with Highground Organic Instant Coffee. As always, all thoughts and opinions are all my own. Thank you for supporting the brands that make Gathered At My Table possible!

The first time that I tasted a pot de creme was the first time that I realized that I could become a pastry chef. Back in college, while I spent my days in a classroom studying to be a teacher, my cousin Joey was attending culinary school across town. (Side note: He is now a very fancy executive chef at a very fancy restaurant and resort and his food is actual artwork. It’s amazing.) Anyway, Joey would stage in the afternoons and evenings at a upscale restaurant in town which meant that we would often pop in said restaurant for deeply discounted (read: free) fancy food experiences. We would sit at a little table near the open kitchen and eat whatever the kitchen sent out to us. At the end of our first dining experience, the pastry chef sent out a sampler of all of the desserts on the menu featuring a chocolate pot de creme served with toasted brioche sticks for dipping. I about lost my mind. The custard was rich and creamy. The brioche was so perfectly toasted, the outsides were crispy and the inside was as soft as a pillow. It was the first dessert that my 19-year-old self saw artistry in, something more precise and creative than the cookies and brownies I’d been living on my whole life. It took me another seven years to actually make the career change into pastry, but it all began with that little pot de creme.

what is a pot de creme?

Pot de creme (literally translated to pot of cream) falls into the baked custards family of pastry. It shares similarities with many of it’s custard cousins— it’s baked in a water bath, uses eggs as the primary setting agent, can be flavored in many different ways. Pots de creme are often lumped in with puddings, which is not technically accurate. While the consistency is very similar to a pudding, a pot de creme only uses eggs as it’s thickener/setting agent, while pudding traditionally employs some sort of starch, like flour or cornstarch, to aid in thickening.

While they do take a bit of time to make, pots de creme are fairly hands-off. A simple, egg based custard is made (very similar in process to a creme anglaise sauce) by heating milk and cream and then tempering in egg yolks and sugar. The hot cream is then poured into jars or ramekins and baked at a very low temperature in a water bath until set. The custards then cool to room temperature and are chilled for at least 6 hours and served cold (preferably with perfectly toasted brioche).

pot de creme featuring highground coffee

pot de creme featuring highground coffee

dalgona coffee

I know that I’m close to a year late on this whole Dalgona coffee trend, but I’m here! That’s all that matters. Dalgona coffee is a whipped coffee that got it’s start in South Korea and took over our Instagram feeds last spring. (Michele at Hummingbird High has a very in depth look at Dalgona coffee over on her blog.) It’s so simple to make and adds a really fun texture to the pot de creme. Highground Instant Coffee, hot water, and sugar are whipped using an electric mixer until it creates a fluffy, aerated coffee that holds it’s shape and texture when added to milk or scooped on top of pots de creme. It’s like having a latte and dessert at the same time.

a note on toasted sugar

The toasted sugar in this recipe is completely optional, but it is a fun little pastry chef trick for adding depth and flavor to otherwise fairly simple and straightforward desserts. The recipe below makes more toasted sugar than is needed for this recipe (it is very difficult to toast small amounts of sugar without making oven caramel, which is not something we want), but you can store the cooled sugar in a sealed container and bake with it just like you would regular granulated sugar. If you decide to skip the toasted sugar in this recipe, just use granulated sugar in its place.

toasted sugar and dalgona coffee pot de creme

toasted sugar and dalgona coffee pot de creme

Yield: makes six 6 oz puddings
Author: Anna Ramiz
Toasted Sugar and Dalgona Coffee Pot de Creme

Toasted Sugar and Dalgona Coffee Pot de Creme

Prep time: 30 MinCook time: 2 HourInactive time: 7 HourTotal time: 9 H & 30 M
A creamy vanilla bean and toasted sugar custard topped with whipped Dalgona coffee featuring Highground Organic Instant Coffee.

Ingredients

for the toasted sugar
  • 1 lb granulated sugar
for the pot de creme
  • 2 cups heavy cream
  • 1/2 cup whole milk
  • 1/2 cup toasted sugar
  • 1 vanilla bean
  • 5 egg yolks
for the dalgona coffee

Instructions

to make the toasted sugar
  1. Preheat the oven to 300° F. Place granulated sugar in a 9x13” baking dish and roast for 50-60 minutes, stirring every 10 minutes until sugar is a light tan color. Cool completely. Set aside the amount needed for the recipe, and store the rest in an airtight container and use in place of regular sugar.
to make the pot de creme
  1. Preheat oven to 300° F.
  2. Combine heavy cream and milk in a medium saucepan. Scrape out the inside of the vanilla bean and place the seeds and the empty pods into the pot with the cream and bring to a simmer. When the cream is hot, remove the pot from the heat and cover. Let steep for 1 hour and then strain out the vanilla bean pods.
  3. Return cream to the saucepan and add 1/4 cup of the toasted sugar. Bring to a simmer.
  4. Meanwhile, in a large bowl, whisk together the remaining 1/4 cup toasted sugar and the egg yolks.
  5. Whisking continually, gradually stream the hot cream into the bowl with the egg yolks.
  6. Strain the mixture through a fine mesh sieve and then divide it evenly between six glass jars or ramekins.
  7. Place the ramekins in a 9x13” baking dish and fill the dish with water, reaching to halfway up the sides of the ramekins. Bake the pot de cremes for 55-60 minutes, until the edges are set but the center still has a slight jiggle. Turn off the oven, open the door slightly and allow the pot de cremes to cool completely.
  8. Remove each ramekin and wrap with plastic wrap. Chill for at least 6 hours.
to make the dalgona coffee
  1. In a large bowl, combine toasted sugar, instant coffee, and boiling water. Whip using a handheld mixer for 3-5 minutes, until mixture is light and fluffy.
  2. Spoon dalgona coffee on the tops of the chilled pot de cremes and serve immediately.

Notes:

In this recipe, toasted sugar is completely optional. Toasted sugar is slightly caramelized so it adds a more complex flavor to the pot de creme and it's fun to have on hand to play around with. The recipe for this toasted sugar will yield more than you need for the recipe, so keep it on hand and substitute it in place of regular sugar in any baked good. If you choose not to make the toasted sugar, simply use granulated sugar in it's place.


This recipe is sponsored by Highground Instant Coffee, but the opinions shared here are all my own. Thanks for supporting the brands that make Gathered At My Table possible!


Did you make this recipe?
Tag @gatheredatmytable on instagram and hashtag it #gatheredatmytable
Created using The Recipes Generator