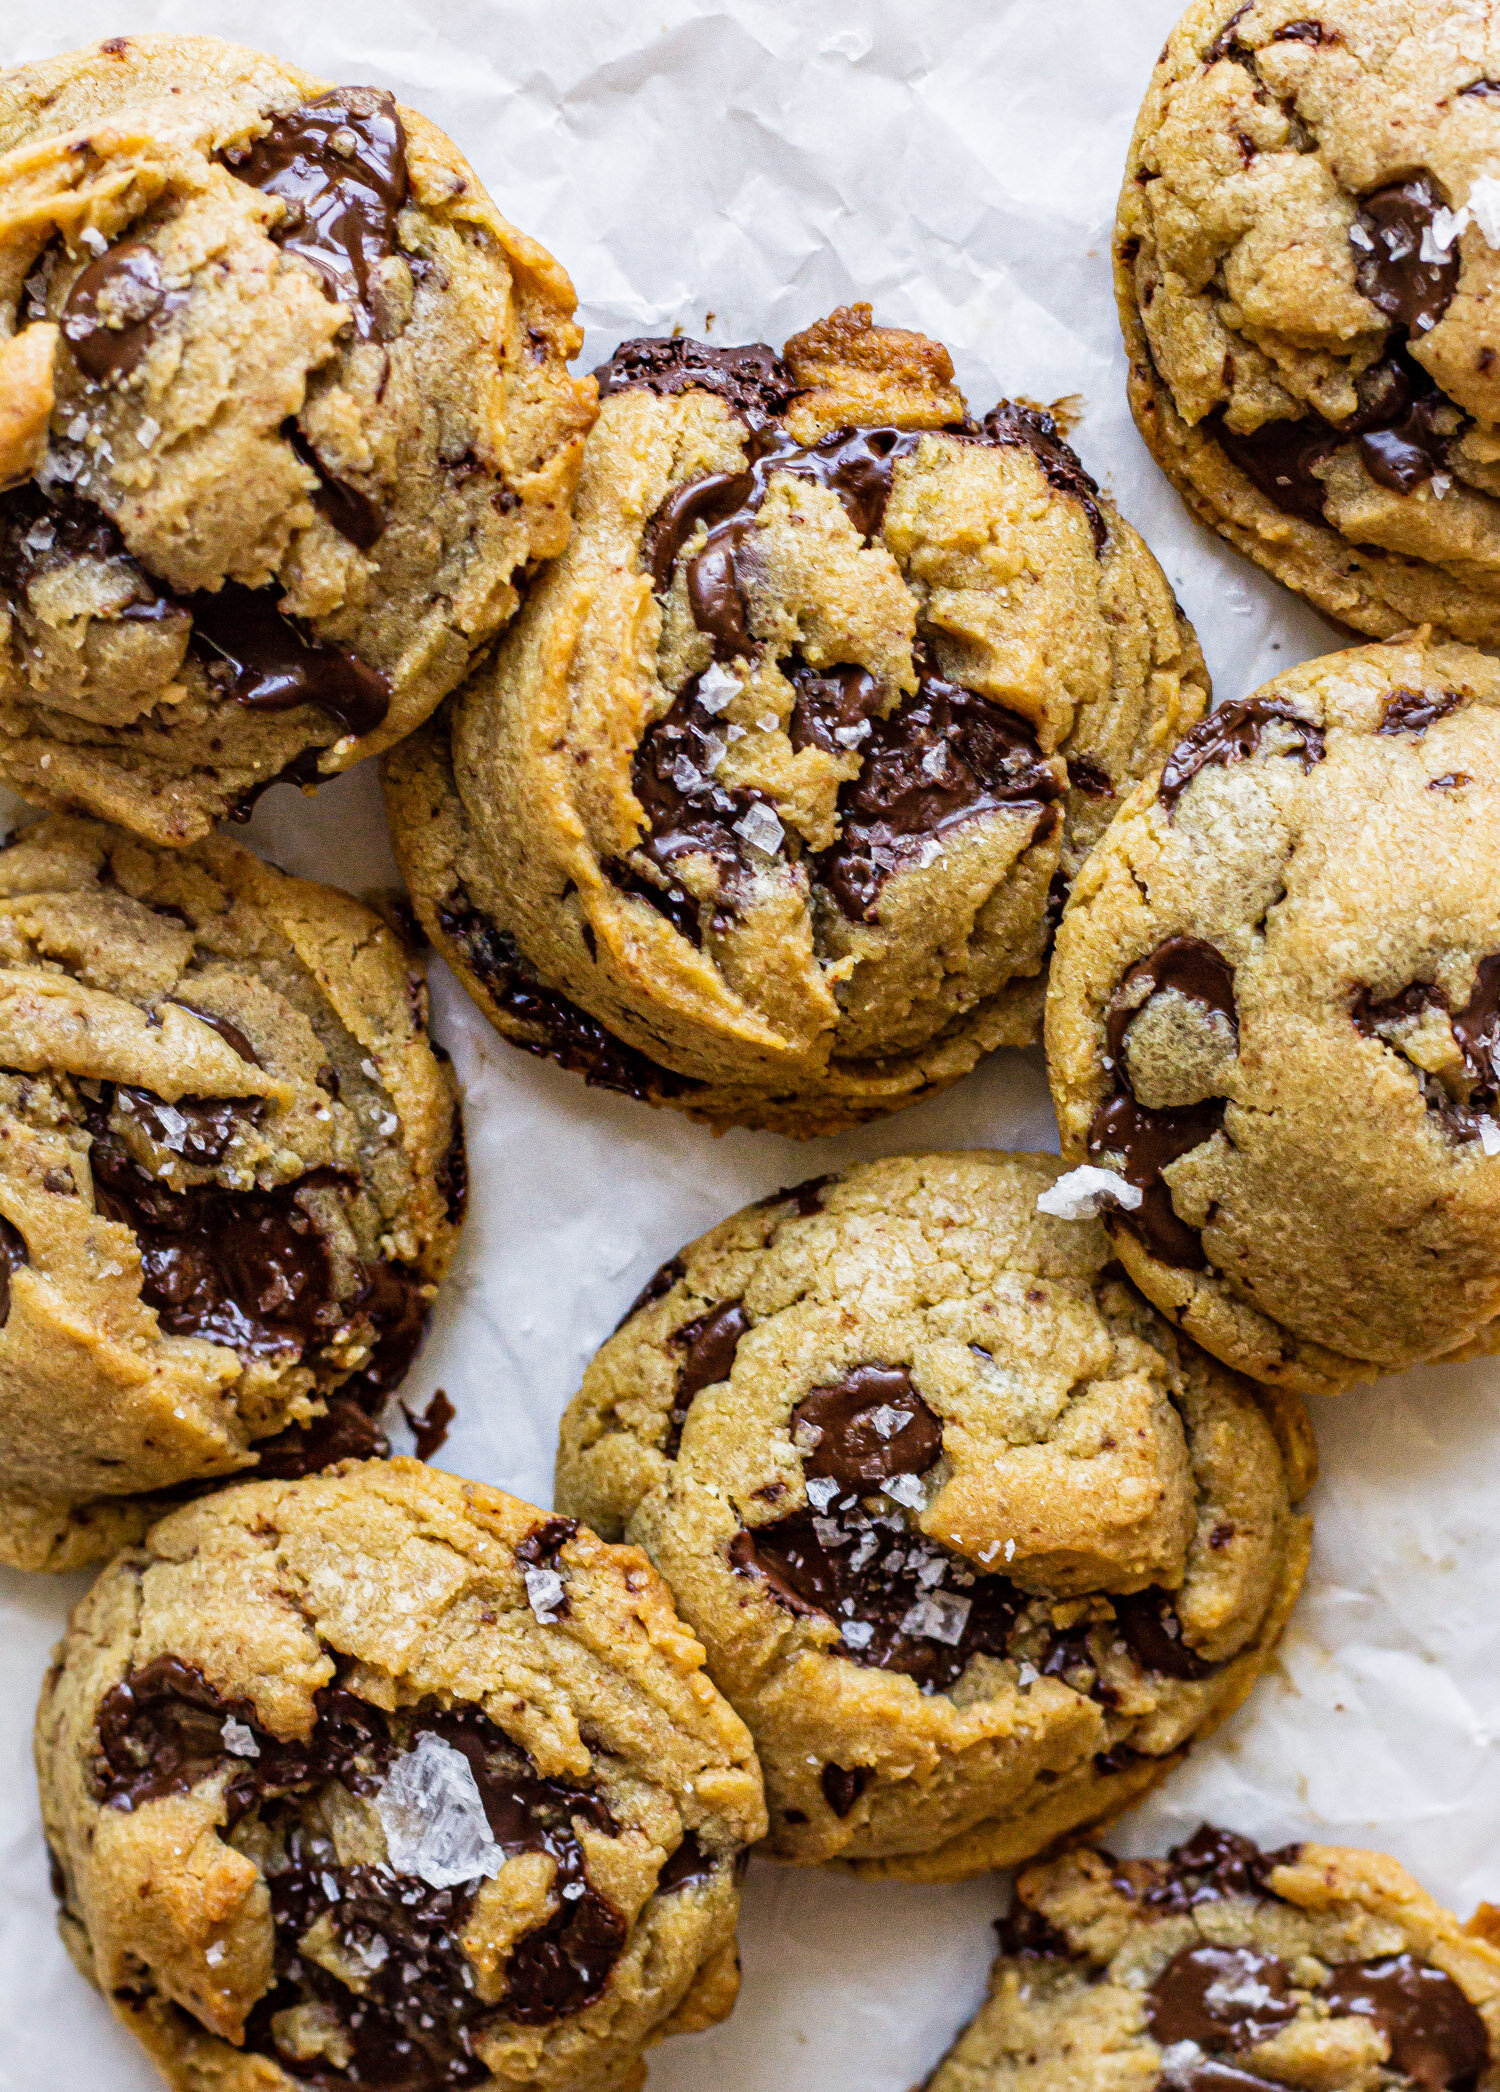
Rosemary Espresso Chocolate Chip Cookies
/These soft and chewy cookies are made by steeping rosemary and instant espresso into the butter. They are filled with dark chocolate pieces and topped with flaky salt.

Ok, guys, I need a little vent session. Let’s talk about Instagram for a quick moment and then I promise, I’ll get back to the cookie content you came for. As you may know from my last little life update, we are currently in the process of moving from sunny Central Florida to Minneapolis (!!!) and there are a whole plethora of things (selling a house, packing a house, getting client work done, finding an apartment from across the country, hiring movers, loading a pod, driving across the country, etc, etc, etc) that have taken my attention for the last few weeks. I’ve taken a couple weeks off from sharing new recipes and allowed the blog to take a backseat for a bit while life settles in. So the last thing I needed during this move was for Instagram to rear it’s ugly head and throw a wrench into my plans. A couple weeks ago, my Instagram account was hacked and some little bot decided to post a RayBan advertisement on my page. I deleted the post, changed my password, and went on with my life. Then, a few weeks later, I woke up and checked Instagram (which I’ve finally learned is not a healthy thing to do first thing in the morning), only to find out that my account has been ‘temporarily locked’ as a precaution. I’ve gone through the security steps given in which I was supposed to receive a security code to verify my identity maybe a dozen times and have never received a code. I’ve tried to send a report (which is basically impossible when you are locked out of the app), and I even tried calling for support. Nothing. Nada. So I spent the last two weeks on a forced IG break.
All of this hooplah has really gotten me thinking because I HATE the idea that any part of my business is completely out of my hands and can be snatched away at a moments notice. As a food blogger, part of my business is partnering with brands for sponsored content. Imagine if I had partnerships lined up over this time—I would be breaching contracts and would lose income and there would literally be nothing I could do about it. It baffles my mind that Instagram has that kind of power over creatives. I decided this week, that I really hated the way that this dependency on Instagram has made me feel. I hate that I woke up to find myself locked out and was crying before my feet even hit the floor in the morning. I hate how it feels like something that is supposed to be a tool to help creatives grow their audience, has become this two-headed monster with the power to tank a person’s entire livelihood. I’m just not into this game anymore. So I’m choosing to focus on the blog for the time being and for the work that I create that I can control. While I finally figured out how to get back into my account, the time away was really perspective shifting. I’ll definitely still be sharing on the app regularly, but only as a way to get people excited about a recipe, not with a mindset that forces me to churn out content just for the sake of staying relevant.
how to support your favorite food blogs
To be honest, apps like Instagram are great with their likes and comments, but they don’t really help a lot if your goal is to share recipes and get people in the kitchen. The most important thing to a food blogger is blog traffic. Having consist traffic to your website provides for so many opportunities! So please, if you enjoy the content you find here or on any of your favorite food blogs, share links that lead back directly to their pages. Comment on recipes that you have made, pin images and recipes to Pinterest of recipes that you love and keep coming to our blogs!

a chewy espresso chocolate chip cookie
Ok, back to what you came here for—cookies! These chewy, espresso chocolate chip cookies are a real winner in my book. They are made by steeping rosemary springs and espresso with butter, an tiny extra step that makes for a really fantastic cookie. When choosing an espresso for this recipe, you have a few options. You can use an instant espresso powder, which should dissolve completely in the butter, or you can use finely ground espresso powder, which may not dissolve completely but will give a bit stronger coffee flavor to the final cookie. The choice is yours, but since I like coffee that packs a punch and a little added texture, I prefer espresso powder.
These cookies are made using the all-familiar creaming method and the procedure is fairly straightforward for cookies. Melt/steep your butter. Cream butter with sugar, add the eggs, followed by dry ingredients and then chocolate. I always recommend using chopped chocolate over chips in cookie baking. Chocolate chips are coated in order to help them hold their shape during baking, which means you won’t get those much-desired chocolate puddles. Finally, the dough is chilled a bit before baking (if you’re wondering why—hop over here and read about the importance of dough chilling). These cookies, like all good cookies, are best enjoyed warm with lots of flaky salt and a big glass of milk.
a couple tips for baking rosemary espresso chocolate chip cookies
updated December 2021
I had a few folks reach out that their dough was drier than expected so I went back and tested this recipe a few more times to see if I could figure out where they were having difficulty. Here are a few things to keep an eye out to ensure that your cookies turn out perfectly!
Butter
Because of the way that melted butter hydrates flour, this dough will look slightly different than a traditional softened-butter method cookie dough. Once mixed, the dough takes on a shiny quality and will greatly benefit from that extra hydration time in the refrigerator before baking.
When cooking the butter, be sure to only keep it on the heat, uncovered until the butter is melted and the mixture just begins to bubble a bit (this should only take about 5 minutes). If you keep the butter on the heat too long, water content will begin to evaporate and you will be left with quite a bit less liquid than the recipe calls for.
Eggs
I test all of my recipes with large eggs. A typical large egg weighs about 50 grams and each yolk weighs about 20 grams. If you are using smaller eggs, you may need to add an extra yolk.
Flour
This is a chance for me to wax poetic about the kitchen scale yet again. If you only ever take one thing away from this blog, let it be the kitchen scale. Baking with a kitchen scale (as opposed to relying on measuring cups) is really the only way to ensure accuracy and consistency in each recipe. If you were to scoop out one cup of flour 4 different times, you would end up with a different amount each time depending on the method you use, the brand of measuring cup you stock, or even the humidity in your kitchen. Weighing your ingredients ensures that you are using the correct amount every single time and, a fun bonus, it dirties fewer dishes.
If you don’t have a kitchen scale, this is the one I have been using for the last 4 years and it has yet to let me down.

Rosemary Espresso Chocolate Chip Cookies
Ingredients
- 1/2 cup (113 g) unsalted butter
- 3 sprigs rosemary
- 2 g instant espresso
- 1/2 cup (107 g) brown sugar
- 1/4 cup (50 g) granulated sugar
- 2 egg yolks
- 1 tsp vanilla extract
- 1 1/2 cups (190 g) all purpose flour
- 1/2 tsp baking powder
- 1/4 tsp baking soda
- 1/2 tsp kosher salt
- 6 oz dark chocolate, chopped
Instructions
- In a small saucepan, combine butter, rosemary sprigs, and instant espresso. Cook over medium heat until butter is melted and bubbling, espresso has dissolved and rosemary is fragrant. Remove from heat, cover, and let steep while you prepare the rest of the ingredients.
- In a medium bowl, whisk together flour, baking powder, baking soda, and salt. Set aside.
- Remove rosemary sprigs from butter and discard. Place butter in the bowl of a stand mixer fitted with the paddle attachment. Add sugar and brown sugar and beat on medium speed for 1-2 minutes, until thoroughly combined.
- Add the egg yolks and vanilla and continue mixing until mixture is smooth and homogenous (about 2 minutes).
- With the mixer on low speed, gradually add the dry ingredients mixing until just combined and no flour streaks remain. Fold in chocolate chips.
- Using a 1 1/2 tbsp sized cookie scoop, scoop cookie dough and place them on a parchment lined baking sheet. Cover with plastic wrap and chill for at least 30 minutes.
- When you’re ready to bake, preheat the oven to 350° F. Bake cookies for 8-10 minutes, until the edges are golden brown, and then let cool completely on the baking sheet. Sprinkle with flaky salt.