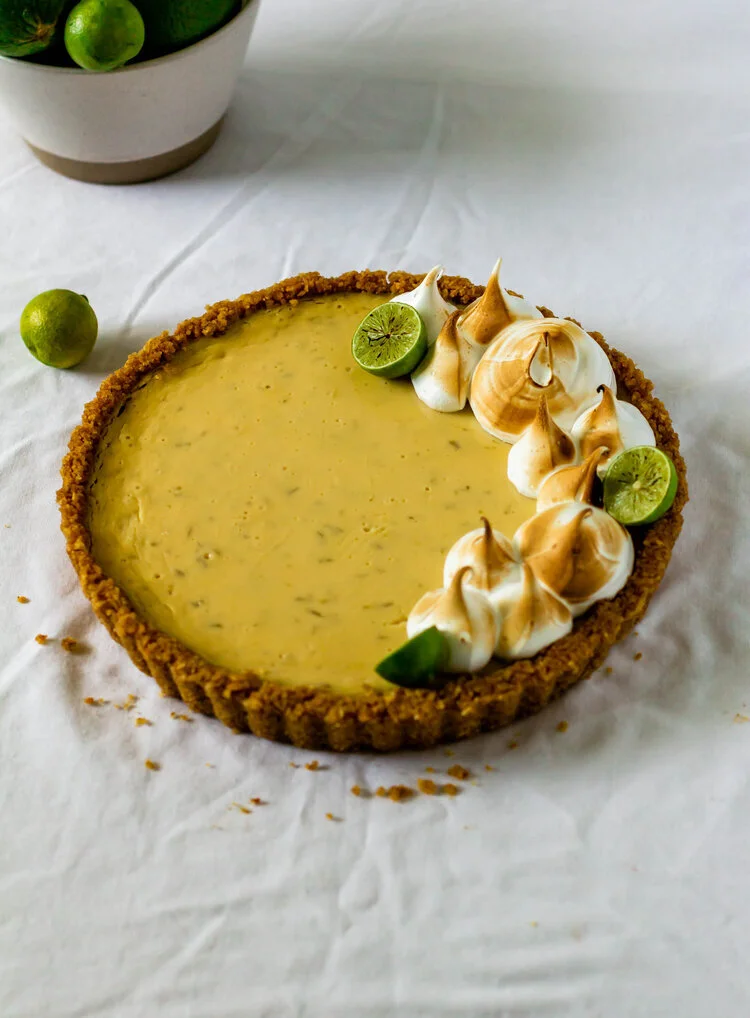
Grapefruit Meringue Tarts
/A simple sweet crust, filled with a floral and tart grapefruit curd and topped with torched meringue.

I’m going to sound like a weirdo, but the idea for this recipe came to me from the sky. In early January, we began our drive back to Minnesota after spending the holidays with family. We had made our way from Florida to Tennessee to spend a day or two with my cousin and woke up before dawn to start our trek back to the north. This meant that I was driving through the Smoky Mountains as the sun began to peek over the tops of the trees. As we were winding down the steep mountain roads, light began to reflect off of the newly fallen snow and deep hues of pink and corals inked themselves across the sky. It was absolutely breathtaking and we drove for a bit in complete silence, soaking in the glow of the day beginning to unfurl itself across the sky.
And then, it made me think of dessert. The juxtaposition of the deep pink propped up against the sparkling white of the snow made me think of grapefruit and meringue, and because I was driving, I made Martin jot down a note in my recipe ideas folder of my notes.
Of course, as I began testing, I found that grapefruit juice isn’t quite vibrant enough to create a pink hued curd (a bit of a bummer), but I loved the flavor enough to stick with it so instead of pink and white, we ended up with a creamy yellow and white color palette. Not the color scheme I was initially going for, but a very delicious tart.

These grapefruit meringue tarts have three simple components: a crust, a curd, and a meringue.
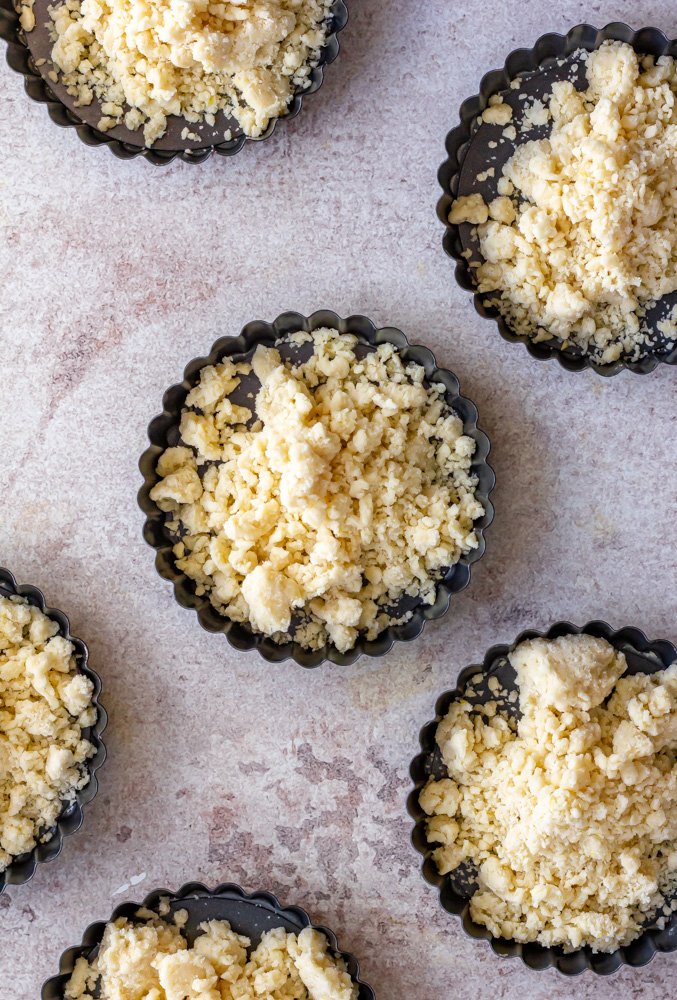
the crust
For this recipe, I used my favorite sweet crust dough from Thalia Ho’s book, Wild Sweetness. It's similar to a pie crust, but we add sugar and use a softened butter instead of cold butter. The soft butter helps to create a crumblier dough that doesn’t need to be rolled out. Simply sprinkle it into the tart pans and press it into the sides.
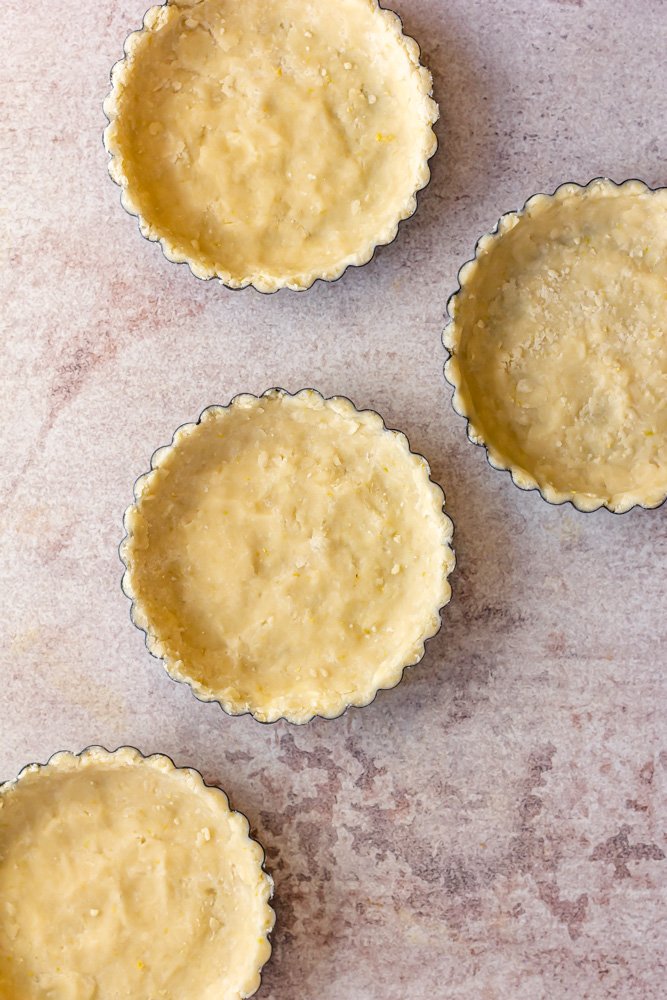
After the tart pans are filled, we will chill the dough to allow it to set up and prevent melted butter from oozing everywhere when we bake. I like to pop the tray crust-lined tarts into the freezer for about 30 minutes, then dock them with a fork and bake until golden.
A note: If your crusts come out of the oven a little swollen and puffy, it’s okay! You can take a drinking glass or another flat-bottomed tool and press gently into the warm centers to push the dough down and make room for the filling.
the curd
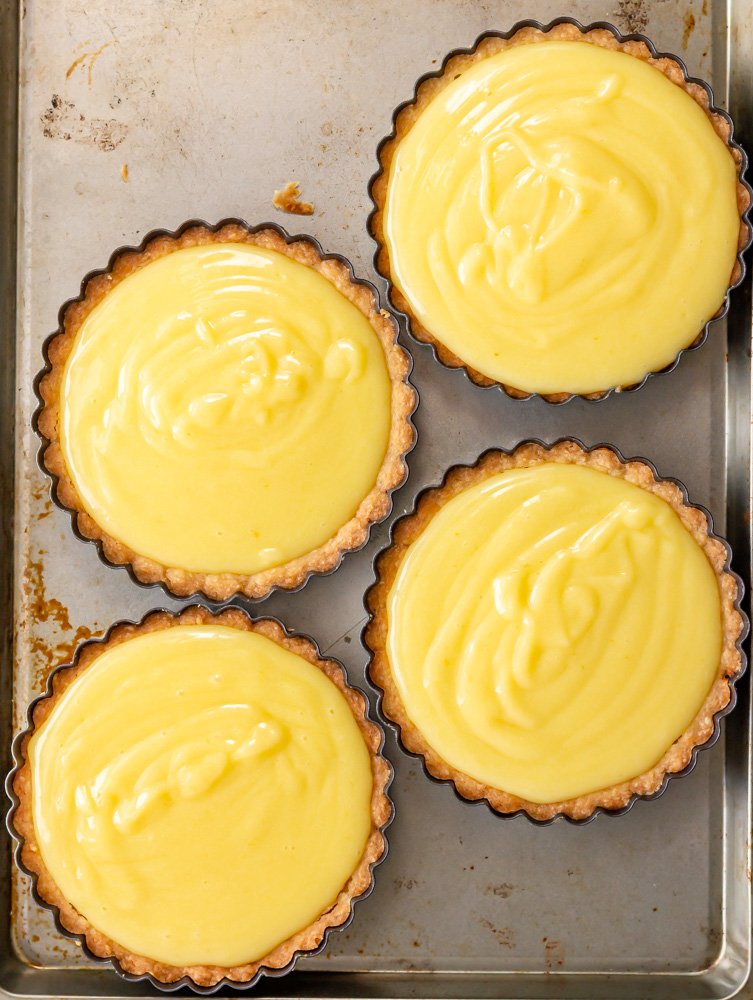
The curd for this recipe is simple and can be made ahead of time. We start by simmering grapefruit juice with half of the sugar, just until hot and the sugar has melted. While that’s simmering, whisk together the rest of the sugar, cornstarch, zest, and salt in a large bowl. This will break any clumps of cornstarch. Add the eggs and yolks and whisk to form a paste. When the juice is hot, slowly temper it into the egg mixture, whisking continually, until all of the juice has been incorporated. Pour it all back into the pot and bring to a boil, whisking continually. Once the mixture boils, cook for 1-2 more minutes, to allow the cornstarch to cook out and the mixture to thicken, strain it through a sieve and whisk in the butter.
Since the curd is fully cooked, we’ll simply pour it into the cooled tart shells and let it chill until set.
the meringue
There are three main types of meringue: French, Swiss, and Italian. French meringue is made by whipping granulated sugar into egg whites and needs to be baked. Swiss is made by cooking egg whites and sugar over a double boiler and then whipping and Italian meringue whips egg whites with a hot sugar syrup.
For this recipe, we went with Swiss—my favorite. Swiss meringue follows a 2 parts egg whites to 3 parts sugar ratio so it’s very simple to scale up or down depending on your need.
After you make the meringue, you can swoop or pipe as much or as little as you want on top of your chilled tarts. You can use a torch to blister the edges for some added flair, or if you’re like me and your torch is packed in a box in storage, you can bake the tarts at 375° F for 10-15 minutes, until browned.


Grapefruit Meringue Tarts
Ingredients
- 1 1/4 cup (155 g) all purpose flour
- 2/3 cup (80 g) powdered sugar
- 1 tsp grapefruit zest
- 1/4 tsp kosher salt
- 2/3 cup (150 g) unsalted butter, softened
- 3/4 cup (165 g) freshly squeezed grapefruit juice
- 1 cup (200 g) granulated sugar
- 3 tsp cornstarch
- Pinch of salt
- 1 tbsp grapefruit zest
- 3 large eggs
- 2 egg yolks
- 5 tbsp unsalted butter, softened
- 110 g egg whites (from 3-4 eggs)
- 1 cup (200 g) granulated sugar
Instructions
- In a large bowl, whisk together flour, powdered sugar, grapefruit zest, and kosher salt. Add the softened butter and use your fingers to work the butter into the dry ingredients until crumbly and well combined.
- Divide the dough between the tart pans and press into an even layer along the bottom and up the sides of the pan. Freeze for 30 minutes, then dock with a fork.
- Preheat the oven to 375° F. Bake the chilled tarts for 10-12 minutes, until golden brown. Let cool completely.
- Combine grapefruit juice and half of the sugar in a large saucepan. Bring to a boil over medium high heat and cook until sugar is mostly dissolved.
- While the juice is cooking, whisk sugar, cornstarch, salt, and zest in a large bowl. Add the eggs and yolks and whisk again to form a smooth paste.
- While whisking continually, gradually stream the hot liquid into the bowl with the eggs and sugar. When all of the liquid has been added, transfer the mixture back to the pot and return to the heat.
- Continue cooking, stirring continually, until the mixture begins to boil. When it begins to boil, cook for 2 minutes more and then strain through a sieve into a clean bowl.
- Whisk in the butter and let cool.
- When the curd has cooled slightly, divide it between the tart shells and transfer to the refrigerator. Let chill for at least 4 hours, until curd is completely set.
- When you are ready to serve, make the meringue by combining egg whites and sugar in a large bowl set over a double boiler.
- Cook, whisking continually, until the mixture is hot to the touch and all of the sugar has dissolved.
- Transfer the mixture to the bowl of a stand mixer fitted with the whip attachment and whip on medium-high speed until medium peaks form.
- Top each of the tarts with meringue and torch, or bake at 375° F for about 10 minutes, until the edges are golden brown. If you decide to bake the tarts, let them cool completely before serving. If you torch the tops of the meringue, serve immediately.
Notes
This recipe is endlessly adaptable:
- If you don't have individual tart pans, you can make one 9" tart.
- Substitute any citrus in place of the grapefruit.
- Add an herb or floral component to the crust in place of grapefruit zest.