Toasted Buckwheat and Chocolate Cookies with French Grey Salt

buckwheatchocolate6.jpg

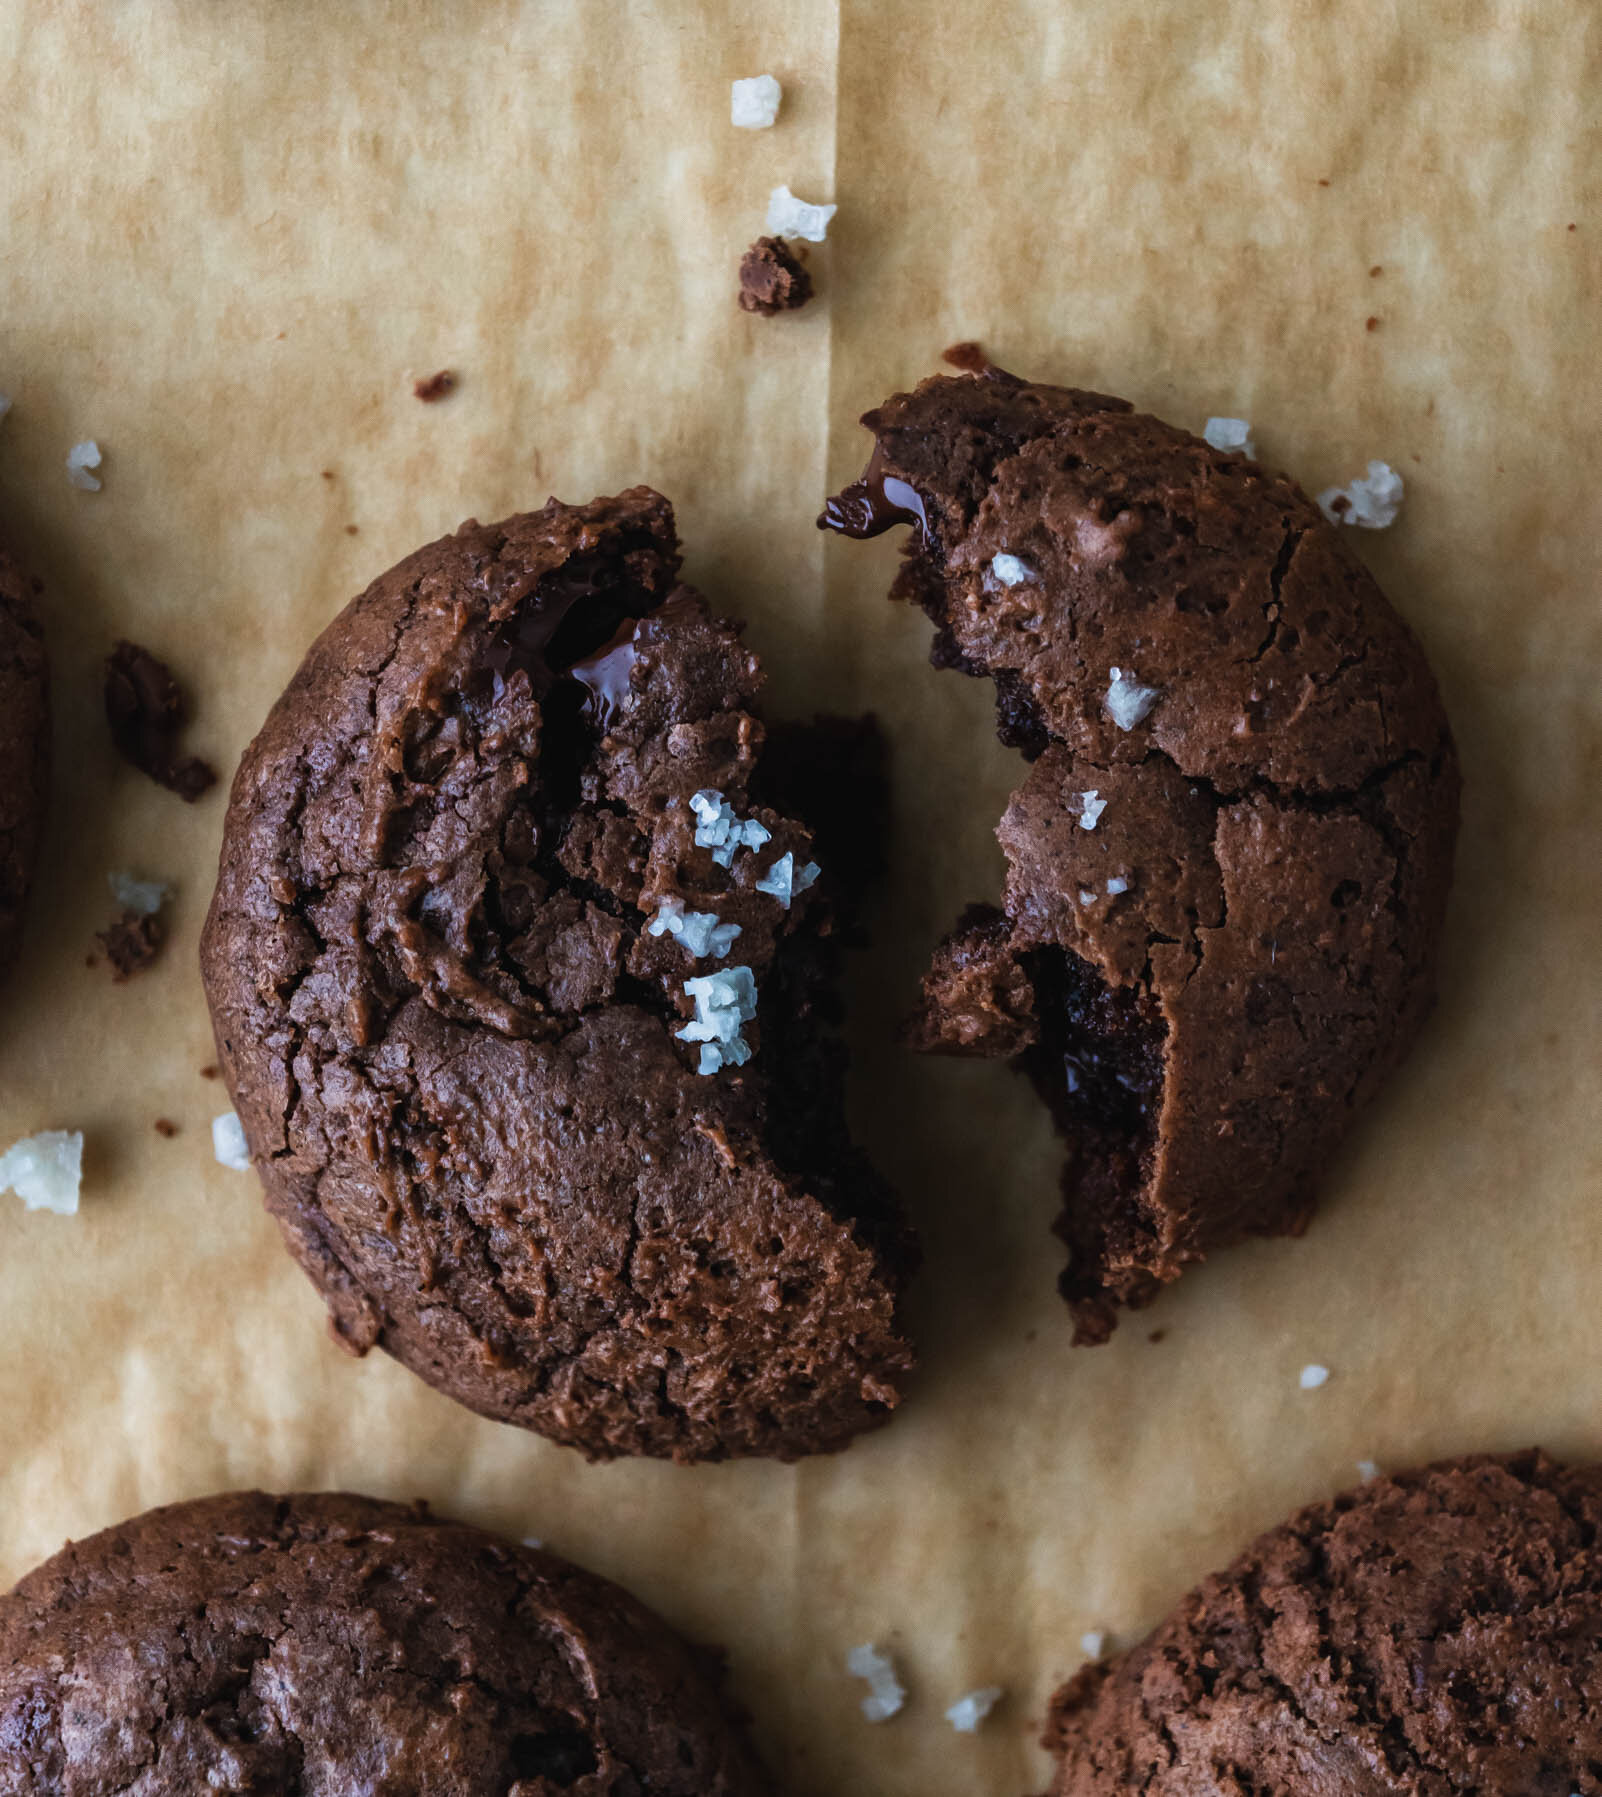
A few months ago, I was wandering through World Market probably spending more money than I needed to on more linens and kitchen gadgets than I needed, when a giant bag of French grey salt caught my eye. I love new and fancy salts. A few years ago Martin even built me a little kitchen tray just for my salt collection and let me tell you, that tray is very full. I love how salt comes in different shapes and sizes and colors, each with it’s own characteristics and purpose when cooking. I also firmly believe that desserts especially need salt. Salt makes every other ingredient in a dessert shine, while cutting through sweetness and adding complexity. I just really love the stuff. And if you have been around this blog for any amount of time, you know that the most important part of any great cookie is the flaky salt sprinkled generously on top right as they come out of the oven. (If you don’t believe me, you can find proof here, here, and here.)

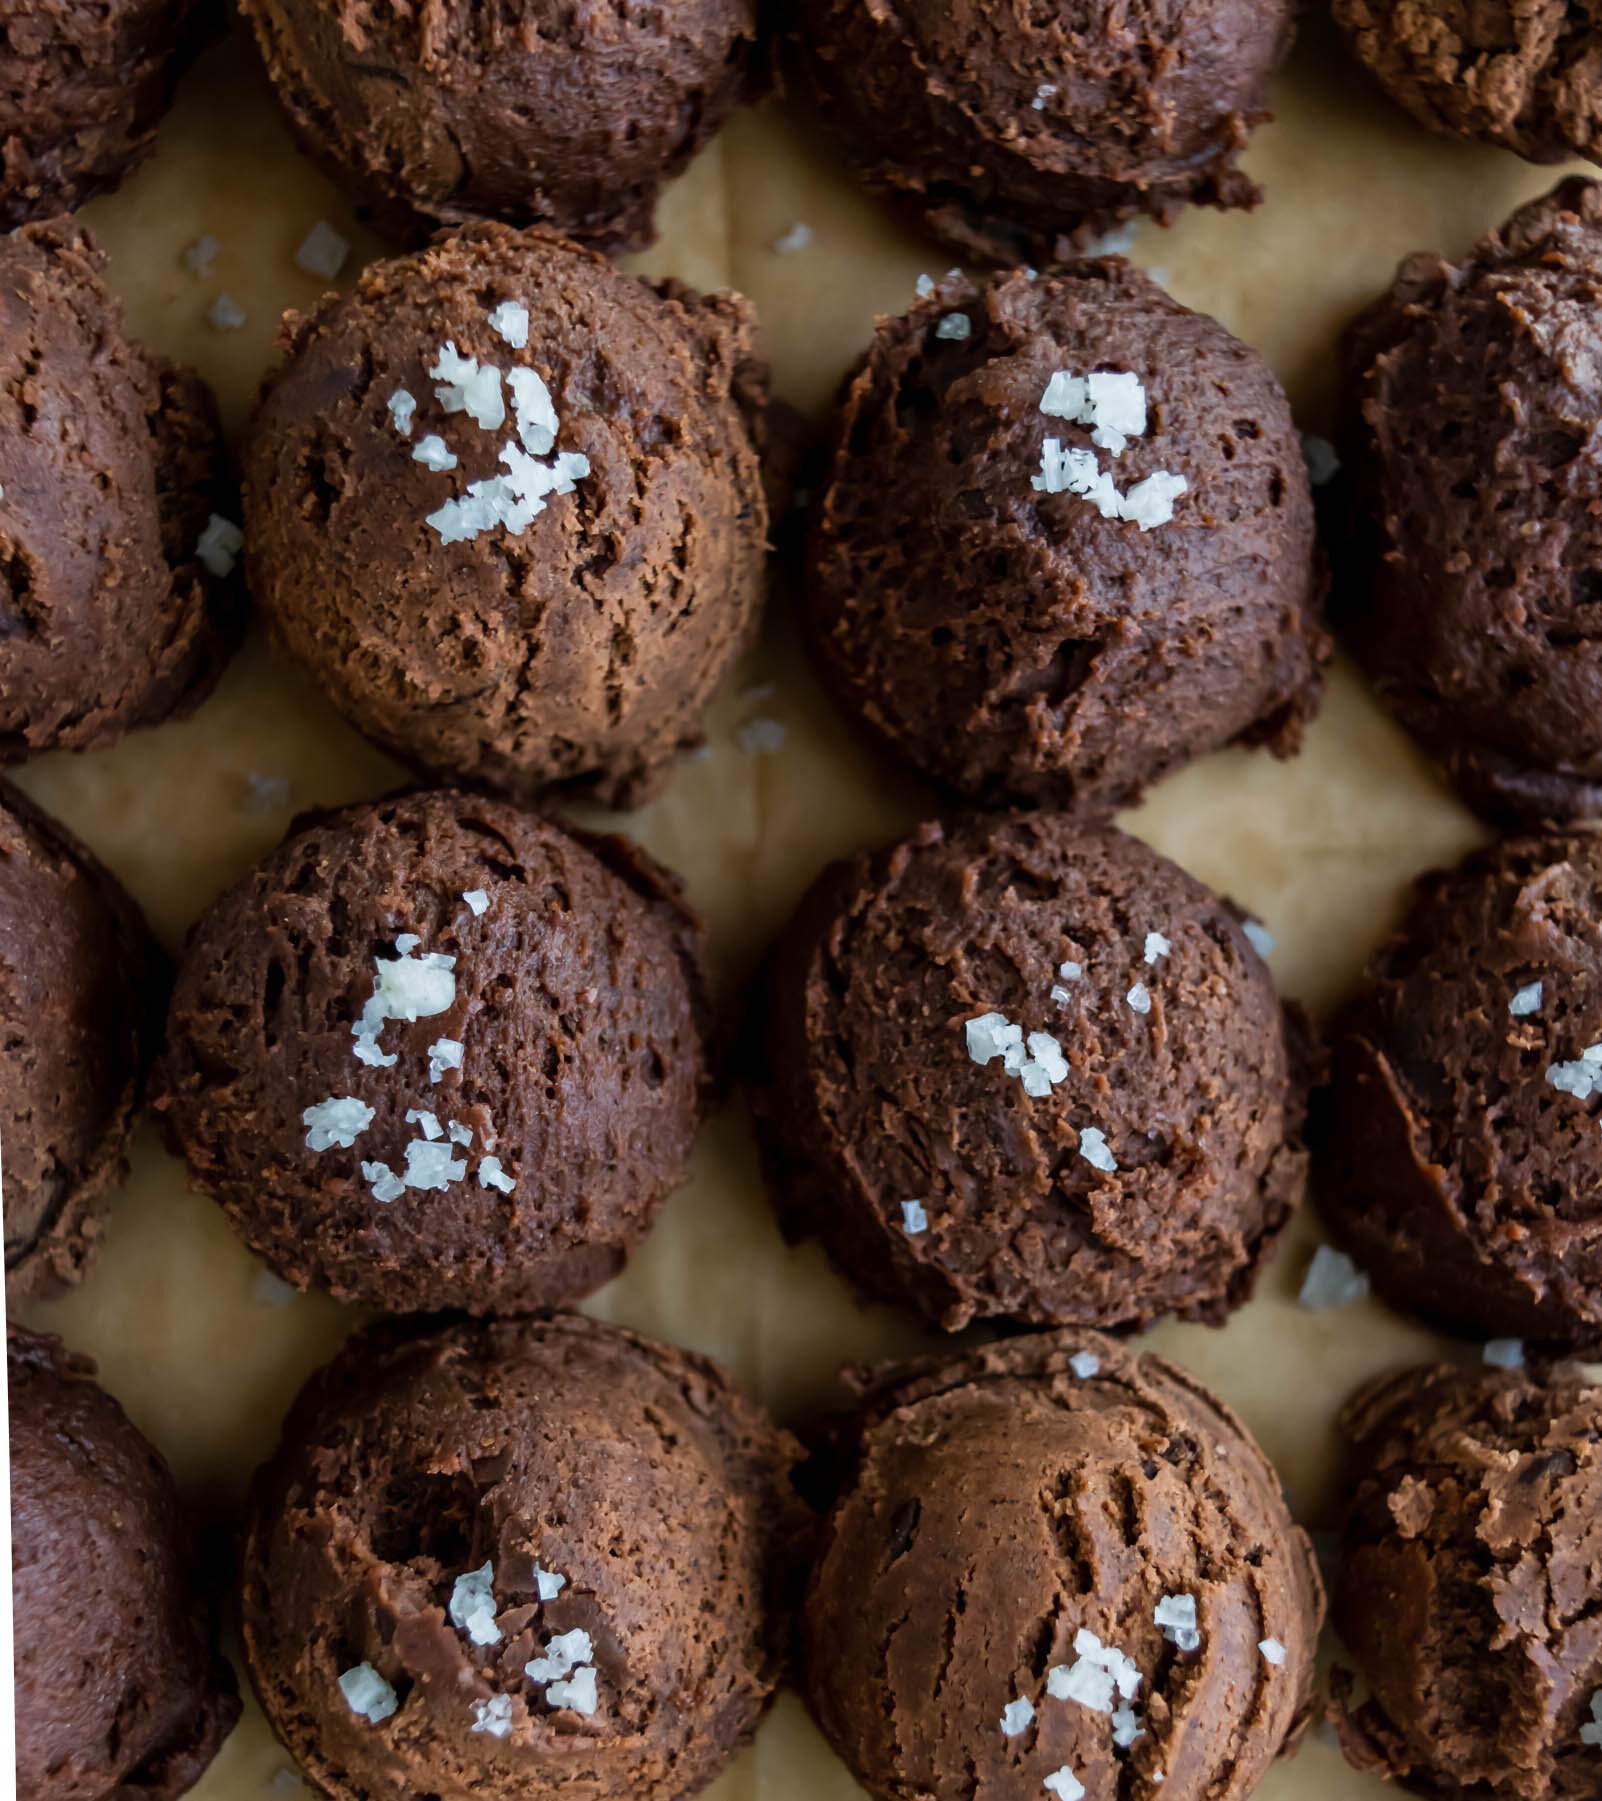
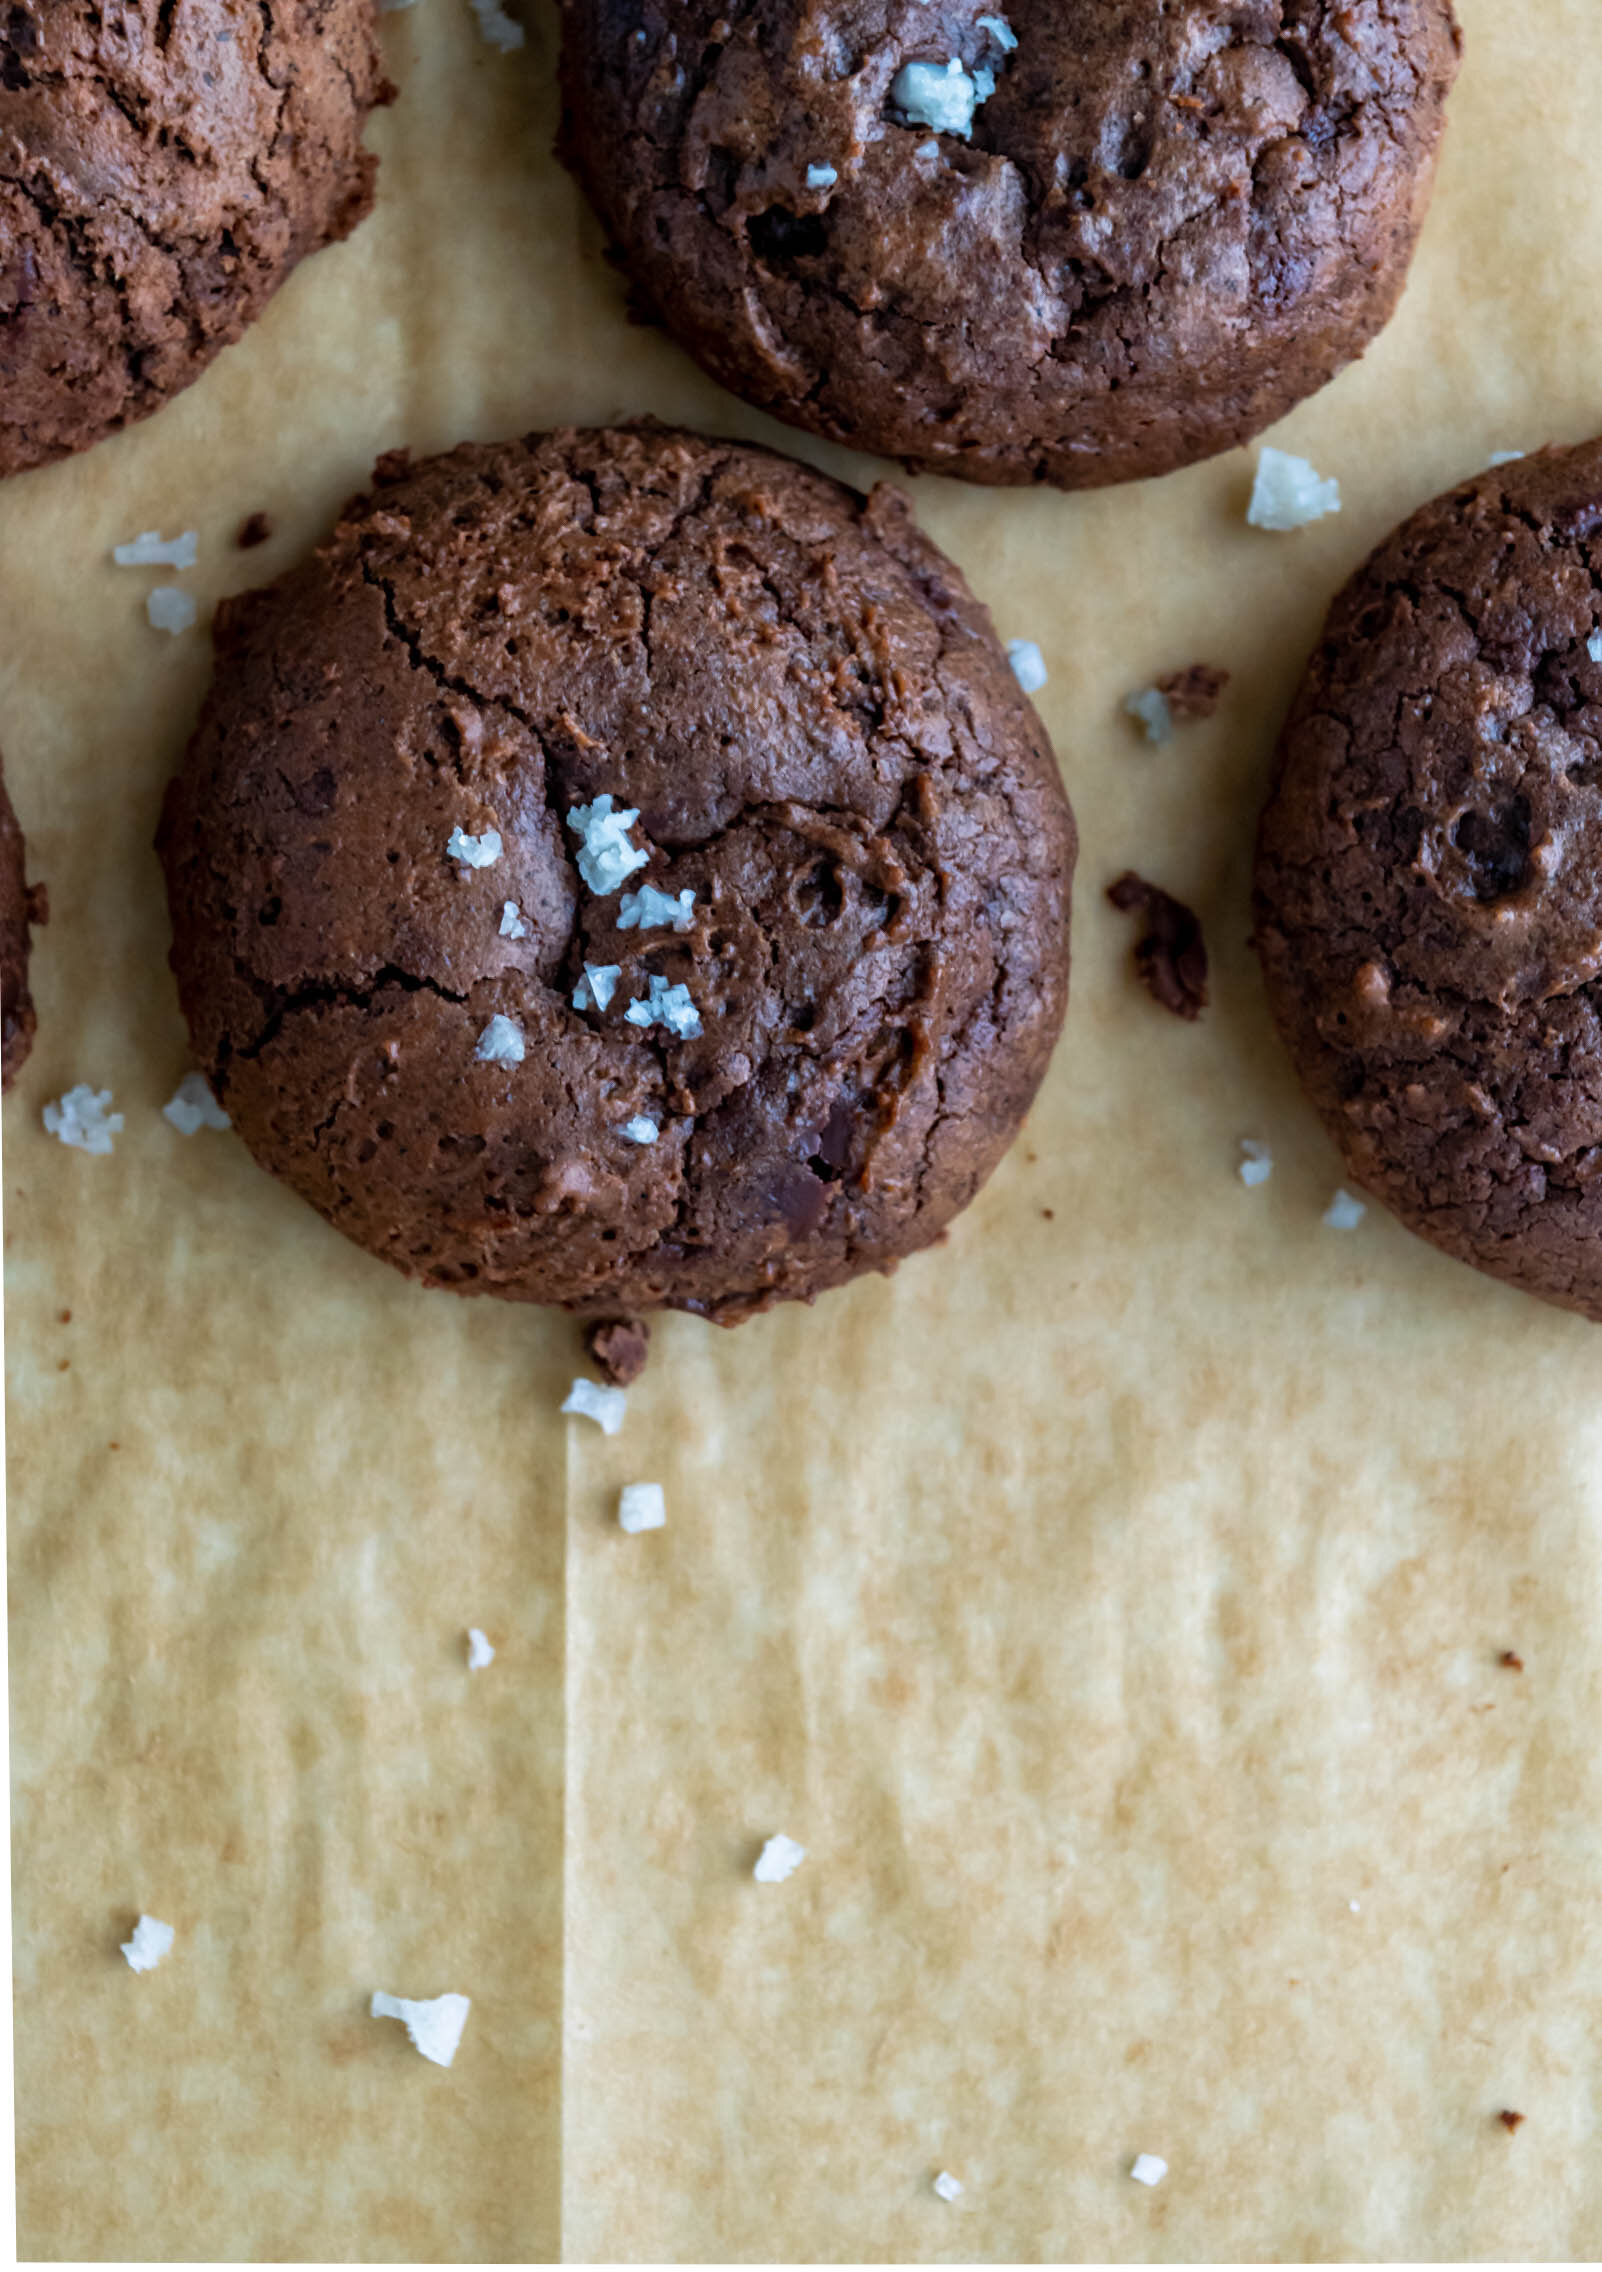
So this French grey salt peaked my interest. They are large, coarse grained crystals that clump together from moisture. The salt has an extra bit of salinity and briny-ness and tastes exactly like the ocean. In order for that sea water taste to really shine, I paired it with super nutty toasted buckwheat flour and bitter dark chocolate, and it is heaven. These cookies are thick and puffy, but with the texture of a fudgey brownie in the center. If you aren’t able to find French grey salt, you can always substitute a flaky salt like Maldon, but I encourage you to check out your local World Market (or buy it here on Amazon because Amazon always has everything) and experiment with something new. You can never have too many salts, and who knows? Collect enough and maybe your partner will build you a special shelf for them too!

buckwheatchocolate2.jpg

Toasted Buckwheat Chocolate Cookies with French Grey Salt

Yield: 40 medium/small sized cookies 

Ingredients: 

16 oz dark chocolate, chopped and divided 

1 stick (113 g; 4 oz) unsalted butter, cubed

1 cup (240 g; 8.4 oz) granulated sugar

1/2 cup (100 g; 3.4 oz ) light brown sugar

2 tsp vanilla extract

4 eggs

1 1/2 cups (218 g) all purpose flour

3/4 cup (115 g) buckwheat flour

2 tbsp (14 g) dark cocoa powder

1 tsp baking powder

1/4 tsp salt

French grey salt, for finishing 

Procedure: 

  1. Preheat oven to 350° F. Spread buckwheat flour in an even layer on a small sheet pan. Toast for 5-8 minutes, until fragrant. Set aside to cool.

  2. In a medium-sized heatproof bowl set over a double boiler, combine 11 oz of the chocolate with the butter. Heat, over medium high heat, until smooth and completely melted. Set aside to cool slightly. 

  3. In the bowl of a stand mixer fitted with the whisk attachment, combine sugar, brown sugar, eggs, and vanilla. Whip on medium-high speed until the mixture is light in color and slightly thickened. (You should be able to pull the whisk out of the bowl and the mixture should leave a ribbon-like mark in the mixture.)

  4. In a small bowl, whisk together flour, buckwheat flour, cocoa powder, salt, and baking powder.

  5. With the mixer on low speed, stream in melted chocolate mixture. Increase speed to medium and mix until just combined (about 30 seconds).

  6. Switch from the whisk attachment to the paddle attachment and gradually add the dry ingredients, with the mixer still on low speed. Add the remaining 5 oz chopped chocolate and mix for another 30 seconds. Be sure to scrape down the sides of the bowl frequently and mix until just combined and no flour streaks remain. You want to be careful not to overmix, but ensure that everything is well-combined and homogenized.

  7. Cover the bowl with plastic wrap and refrigerate for 30-45 minutes. 

  8. Once the dough has set up slightly, use a medium cookie scoop (about 1-1/2 tablespoons), to scoop cookies onto a parchment-lined baking sheet. Cover the tray with plastic wrap, and return to the refrigerator. Chill for another 30 minutes to an hour, or overnight.

  9. When you’re ready to bake, preheat the oven to 350° F and line another baking sheet with parchment paper. Place chilled cookie dough onto the tray, leaving about 2” of space between. Sprinkle each cookie dough ball with a pinch of French grey salt. 

  10. Bake for 8-10 minutes for smaller cookies, 10-12 minutes for larger cookies. Let cookies cool at least 5 minutes on the pan before transferring to a cooling rack. 

Print Friendly and PDF

As an Amazon Associate I earn from qualifying purchases.

Blood Orange and Rosemary Snack Cake

January in Florida is simply the best. Yes, Florida has it’s drawbacks. We have to suffer through 100% humidity and 90°F weather most of the year. We have to deal with hurricanes. We don’t get anything that remotely resembles “fall”. We spend an inordinate amount of time unsticking our thighs from leather seats. But when late winter rolls around, there is no where else I would rather be. The months of January and February are just perfect. While the rest of the country is hunkered down against snow and biting winds, we are sipping our iced beverages on a patio in a perfectly mild, always sunny 75°F. But the real highlight is that Florida citrus. Farmers market stands and grocery stores shelves are lined with citrus of every shape and size and if you drive through an orange grove with your windows down, wafts of that bright, freshly peeled aroma chase you down the highway. It’s a wonderful time to be in the Sunshine State.

[Side note: I wrote this first paragraph a little over a week ago in an effort to be proactive and work ahead a bit. Since I’ve written this, our perfect Florida temperatures dropped into the 30s and frozen iguanas began to fall from the sky. Such is life in Florida. At least our citrus is still really great.]

The fruit bowl on my counter is overflowing with satsumas, grapefruits, and Florida honeybelles, but my absolute favorite is the blood orange. Their deep, vibrant reds are startling when you first slice into them, staining your hands a luscious fuchsia color. They also impart a sharp citrus flavor, without overwhelming your taste buds with tartness and making your lips pucker. Each year, at the first sight of blood oranges, my mind starts racing at all of the possibilities and bag after bag come home for recipe development. This year’s blood orange haul made it into this simple and unassuming snack cake. I love a good snack cake. There is no worry about layering or filling, you don’t have to deal with an enormous birthday cake sized monstrosity taking up space in your fridge, and the cake to frosting ratio is always spot on. This snack cake uses semolina flour for added texture, and subs out some of the sugar for honey, complementing the citrus and rosemary nicely and dialing down the sweetness a bit so you can get away with eating a slice in the morning and calling it breakfast. You’re welcome.

I’ve used blood oranges because they are my favorite, but feel free to substitute another citrus if that is what is fresh where you live. Grapefruit or navel oranges would work really in this cake as well.

marblebackground3.jpg


Blood Orange and Rosemary Snack Cake with Cream Cheese Whipped Cream

Yield: 1 9” round cake

Ingredients:

For the cake

2 cups (265 g) cake flour 

1 cup (160 g) semolina flour

2 1/2 tsp baking powder 

1/2 tsp kosher salt

Zest of 3 blood oranges 

1 1/2 tbsp fresh rosemary, chopped (from about 2 sprigs)

1 cup (225 g) granulated sugar 

1/2 cup (160 g) honey

11 T (160 g) butter, at room temperature 

3 eggs, at room temperature 

1/4 cup blood orange juice (from about 3 blood oranges)

3/4 cup (165 g) plain whole milk yogurt

1 tsp vanilla extract 

for the syrup soak: 

1/3 cup granulated sugar

2/3 cup water

1 sprig fresh rosemary 

3 blood orange halves 

for the cream cheese whipped cream: 

2 oz cream cheese, at room temperature

1 cup heavy cream

1/4 cup confectioner’s sugar

pinch of salt

splash of vanilla extract

Procedure:

to make the cake: 

  1. Preheat oven to 350° F. Grease a 9” springform pan and line the bottom with a parchment paper round. Set aside. 

  2. In a medium bowl, combine cake flour, semolina flour, baking powder, and salt. Set aside. 

  3. In the bowl of a stand mixer fitted with a paddle attachment, combine butter, sugar, and honey. Cream together until thoroughly combined and mixture has the consistency of wet sand. Add orange zest, rosemary, and vanilla and beat for another 20-30 seconds. Scrape down the sides of the bowl. 

  4. Add the eggs to the butter and sugar mixture, one at a time, mixing after each addition. Scrape down the sides of the bowl again. 

  5. Meanwhile, juice the oranges into a glass measuring cup. Add yogurt to orange juice mixture and whisk to combine. (Place 3 halves of your zested, juiced oranges in a small saucepan for your syrup.)

  6. With the mixture on low speed, add one-third of the dry ingredients, mixing until just combined. Then add half of the yogurt/orange juice mixture, followed by another third of the dry ingredients. Continue to mix on low speed, adding the remaining yogurt mixture and ending with the last third of the dry ingredients. Mix for another 30 seconds or so, until no flour streaks remain. 

  7. Remove from mixture and use a rubber spatula to fold the batter a few times to ensure that everything is well mixed and then transfer to your prepared pan. 

  8. Bake for 35-45 minutes, rotating halfway through, until the top of the cake is golden brown and a toothpick comes out clean when inserted. Remove from oven and let cake cool in the pan for at least 30-45 minutes. 

to make the syrup: 

  1. While the cake is baking, combine sugar, water, orange peels, and rosemary in a small saucepan. 

  2. Bring mixture to a boil and then reduce heat to medium and simmer about 10 minutes. 

  3. Remove from heat and let mixture cool before straining out orange peels and rosemary spring. 

  4. Brush syrup over the top of the cake immediately after removing the cake from the oven. 

*Note: You will not use all of the syrup. I like to brush it once or twice, let the syrup absorb and then brush once or twice more. I was left with about 1/4 cup of syrup which conveniently makes a great cocktail base when mixed with sparkling water and gin. Cheers!

to make the cream cheese whipped cream: 

  1. Place the cream cheese in the bowl of a mixer fitted with the whisk attachment. Mix on medium-speed for 30 seconds or so, until cream cheese is soft and broken up. Scrape down the sides of the bowl.

  2. Add heavy cream to the cream cheese and continue to mix on medium-low speed until the mixture begins to thicken slightly. (Make sure to scrape the bottom and sides of the bowl regularly to ensure that all the cream cheese gets combined and isn’t clumpy. If you notice small clumps of cream cheese before the cream begins to thicken, you can transfer to the paddle attachment and beat on high speed for a minute to help break up the cream cheese. Then switch back to the whisk to continue whipping.)

  3. When the cream begins to thicken slightly, add powdered sugar, vanilla, and salt and increase mixer speed to medium-high. Whip until soft peaks form.

Print Friendly and PDF

Thoughts about Blogging and Samin Nosrat's Ligurian Focaccia

Samin Nosrat's Ligurian focaccia recipe from Salt, Fat, Acid, Heat with a smattering of fresh herbs and some instructions for incorporating your sourdough starter into a focaccia recipe.

HerbFoc3.jpg

There are many days (far too many if I’m being completely honest) where I feel silly. Silly for quitting a full-time career —a career that is looked admirably upon by our society, one that comes with benefits and a consistent salary—to become a food blogger. Silly that I spent a year and a half in culinary school and interned in a high-end restaurant to spend my days developing recipes at home. There are so many days when I think to myself, I just need to go get a real job, mostly because I care a lot about what everyone else thinks about me. 

Being a teacher has value in our society. I was doing important work. It didn’t matter that I was so drained emotionally, mentally, and physically that I fell asleep on the couch before 8 p.m. almost every single night or cried on the way to work most mornings. I was changing the world. Or at least that’s what I liked to tell myself. Even working in a restaurant has value. Set time shifts, a menu to follow, guests to serve. It’s a real, viable career. In my mind, there is this hierarchy of important-ness when it comes to choosing a career and testing flourless chocolate cakes and writing detailed posts teaching someone how to start a sourdough culture doesn’t top the list. It’s been really hard for me to reconcile this with that hierarchy in my head.

It’s hard for me to find value in my work in a society that constantly tells you to “hustle” and “be a boss” and elevates “the grind” onto the highest pedestal. Am I still a strong, independent woman if I choose to spend my days following “domestic” passions? Am I a contributing member of society if I don’t receive a regular paycheck? Can I stay home if I’m not a mom? These questions swirl in my head almost every day. 

HerbFoc12.jpg

Just before Christmas, we had some plumbing issues in our house and for an afternoon, our home was a revolving door of repairmen. I was shooting a new recipe for the blog in our office and as our landlord left, he asked if I was a food photographer. I was so proud, and in an effort to appear confident and poised, I replied with a definite yes. And a recipe developer, I added. His immediate follow-up question was “you make money from that?” I felt the confidence seep from me like air out of a balloon. Because, in our culture of busy-ness, that’s what it always comes down to. What are you worth? That question is asked of us everyday in someway or another. When you meet someone new, the first question is always “what do you do?”. We title ourselves teacher, doctor, lawyer, chef…stamping our careers on ourselves like a badge. This is who I am. It’s so easy, and even encouraged, to find our identity in our jobs. 

Last October, I spent a weekend in Knoxville to help out a dinner party. I spent the Monday before I headed back to Orlando with my cousin Meg (who owns her own herbal goods business) and our friend Jordyn (who had the day off from work). We went to lunch and ended up on the front porch at 2 p.m., sharing a bottle of 1995 Vouvray and it was perfect. The afternoon was one I won’t soon forget forget, because slowing down, enjoying simple things like great wine and good weather, being outside, and spending time in community brought me so much joy. But with it came that nagging guilt in the back of my head. It’s a Monday afternoon, what are we doing drinking wine on the porch? We should be out there with the rest of the world, staring at computer screens and answering phone calls, right? 

The work I do now sometimes feels so slow. For every food blogger that is able to create a business for themselves, write a book, or have work published in magazines, there are a hundred who never “make it”. What makes me any different? Recipe ideas scribbled into notebooks don’t feel much like a book proposal. I’ll spend hours developing and shooting a recipe I’m proud of, only to lose Instagram followers. I often find myself glued to my analytics. How many people came to the site today? Did they read anything? Why did my traffic go down? And I’m dragged right back into it— finding my value and worth in my performance or my work, rather than simply finding joy in my privilege to spend my day following my passions.

All of this to say, I’m working on remembering my real identity. I’m so grateful that those voices whispering in my head don’t speak the truth. My value isn’t dependent on the importance of my job, the size of my paycheck, or my success in the eyes of the world. And I’m trying to spend more time remembering the absolute joy I experience when someone reads my work and takes the time to make a sourdough culture. Even if it’s only one person. I’m working on reminding myself that it’s okay if I never publish a book, or make a dime off of the recipes I create or the pictures I take, or reach 10,000 Instagram followers, because at the end of it all, I’m going to be remembering the afternoons spent on the porch with friends anyway. 

Samin Nosrat’s Ligurian Focaccia (lightly adapted)

Over the last few years, I’ve learned that I love making bread. The process is both precise and romantic. It slows me down and helps me take note of the little things—the change as water saturates the flour, the tightness the dough takes on when the salt is added, and the feel of gluten developing in each turn. Something about taking only a few ingredients (flour, water, salt, yeast) and using my hands to transform them into something completely new reminds me of why I love the work I do.

If you’ve ever been interested in making bread, but intimidated by the process of it all, this is the bread for you. It’s the starting line of bread making and the fact that the recipe is very low effort and very high reward makes it ideal for your first foray into bread land. (No stand mixer, no folding every hour, no fancy ingredients.) Bonus, this recipe yields the most delicious focaccia I’ve ever eaten and you feel like a star after making it. 

This is the same recipe that Samin uses, I’ve just added some fresh herbs and included instructions for adding sourdough if you want to get really fancy. I like to mix together my dough the night before, let it rest on the counter and bake it first thing in the morning so that I have warm, crunchy focaccia for the entire day. This makes a pretty big sheet (about a half sheet pan size), so feel free to share some with a friend or freeze half for a rainy day. 

HerbFoc11.jpg
Samin Nosrat's Ligurian-Style Focaccia
Yield
one 12x18" sheet pan
Author
Prep time
20 Min
Cook time
30 Min
Inactive time
16 Hour
Total time
16 H & 50 M

Samin Nosrat's Ligurian-Style Focaccia

Samin Nosrat's Ligurian focaccia recipe from Salt, Fat, Acid, Heat with a smattering of fresh herbs and some instructions for incorporating your sourdough starter into a focaccia recipe.

Ingredients

  • 600g (2 1/2 cups) water
  • 1/2 tsp active dry yeast
  • 15g (2 1/2 tsp) honey
  • 800g (5 1/3 cups) all purpose flour
  • 18g (2 tbsp) kosher salt
  • 50g (1/4 cup) extra virgin olive oil, plus more for pan and drizzling
  • 2-3 tbsp chopped fresh herbs (I used a blend of rosemary, oregano, and thyme)
for the saltwater brine
  • 1/3 cup warm water
  • 1 1/2 tsp kosher salt

Instructions

  1. In a large bowl, stir together water, yeast, olive oil, and honey. Let rest for 5 minutes. Add flour, salt, and herbs and stir with a rubber spatula or wooden spoon until completely combined and no flour streaks remain. Cover bowl with plastic wrap and let rest on your countertop for 12-14 hours, until doubled in volume. (I like to mix this together before bed and let it rest overnight.)
  2. Spread 2-3 tablespoons of olive oil over the surface of a rimmed 12x18” baking sheet. Turn dough out onto the baking sheet and gently stretch the dough towards to the edges of the pan. To do this without tearing the dough, I like to reach my hands underneath and gently pulling it towards the outside. At this point, it will probably shrink back a bit, but that’s okay. Drizzle the whole thing with olive oil and cover with plastic wrap. Let it rest for 30 minutes.
  3. After 30 minutes, use your fingers to dimple the entire surface of the dough. Stir together warm water and salt and then pour brine over the top of the dimpled dough. Cover again and proof for another 45 minutes.
  4. About 30 minutes into your final proof, preheat your oven to 450° F. When the oven is hot and the dough is proofed, remove cover, sprinkle with flaky salt. Bake for 25-30 minutes until golden brown. Make sure to check that the bottom of the dough is crisp and browned.
  5. Remove focaccia from oven and immediately drizzle with more olive oil. Let rest for about 5 minutes and then use a metal spatula to loosen from pan. Enjoy warm with butter or olive oil and more flaky salt.

Notes:

  • Adding a sourdough starter to any bread recipe is really fairly easy! Your sourdough culture is essentially a mixture of equal parts flour and water, so to add some to a recipe that doesn’t call for a culture, first decide how much starter you want to use. I usually start with 50 grams on my first experiment with a new recipe and then increase or decrease based on how the final product turns out. Then, you simply decrease your flour and water amounts to reflect the extra flour and water that you are adding to the dough. If you add 50 grams of starter, that breaks down to 25 grams of flour and 25 grams of water, so you will subtract 25 grams from each of the flour and water amounts that recipe calls for.
  • For this recipe, I added 50 grams of mature starter to my water, yeast, olive oil, and honey mixture and decreased the water to 575g and flour to 775g. 
Did you make this recipe?
Tag @gatheredatmytable on instagram and hashtag it #gatheredatmytable