Lavender Wild Berry Muffins

overheadplate4.jpg

Growing up, some weekday mornings were far more special than the others. My mom is a teacher, and somehow in her mad rush to get my sister and I up, dressed, fed, and out the door, she occasionally found the time to bake muffins for breakfast and those were the very best mornings. You knew it was muffin day right when you opened your eyes because that freshly baked smell wafted through the house, greeting you as you rolled out of the bed. My absolute favorite muffins were these little wild berry muffins, the dry ingredients coming in a little pouch tucked in next to the cornbread mix on the bottom row of the grocery store shelves. I’ve also always wondered how likely it was that a packaged muffin mix actually used wild-grown berries, they probably should have been named mixed berry muffins, but the word wild made them feel even cooler. Regardless, we would split open the warm muffins, slather them with butter, and then wrap them in paper towels to eat in the car on the way to school. What a great way to start the day.

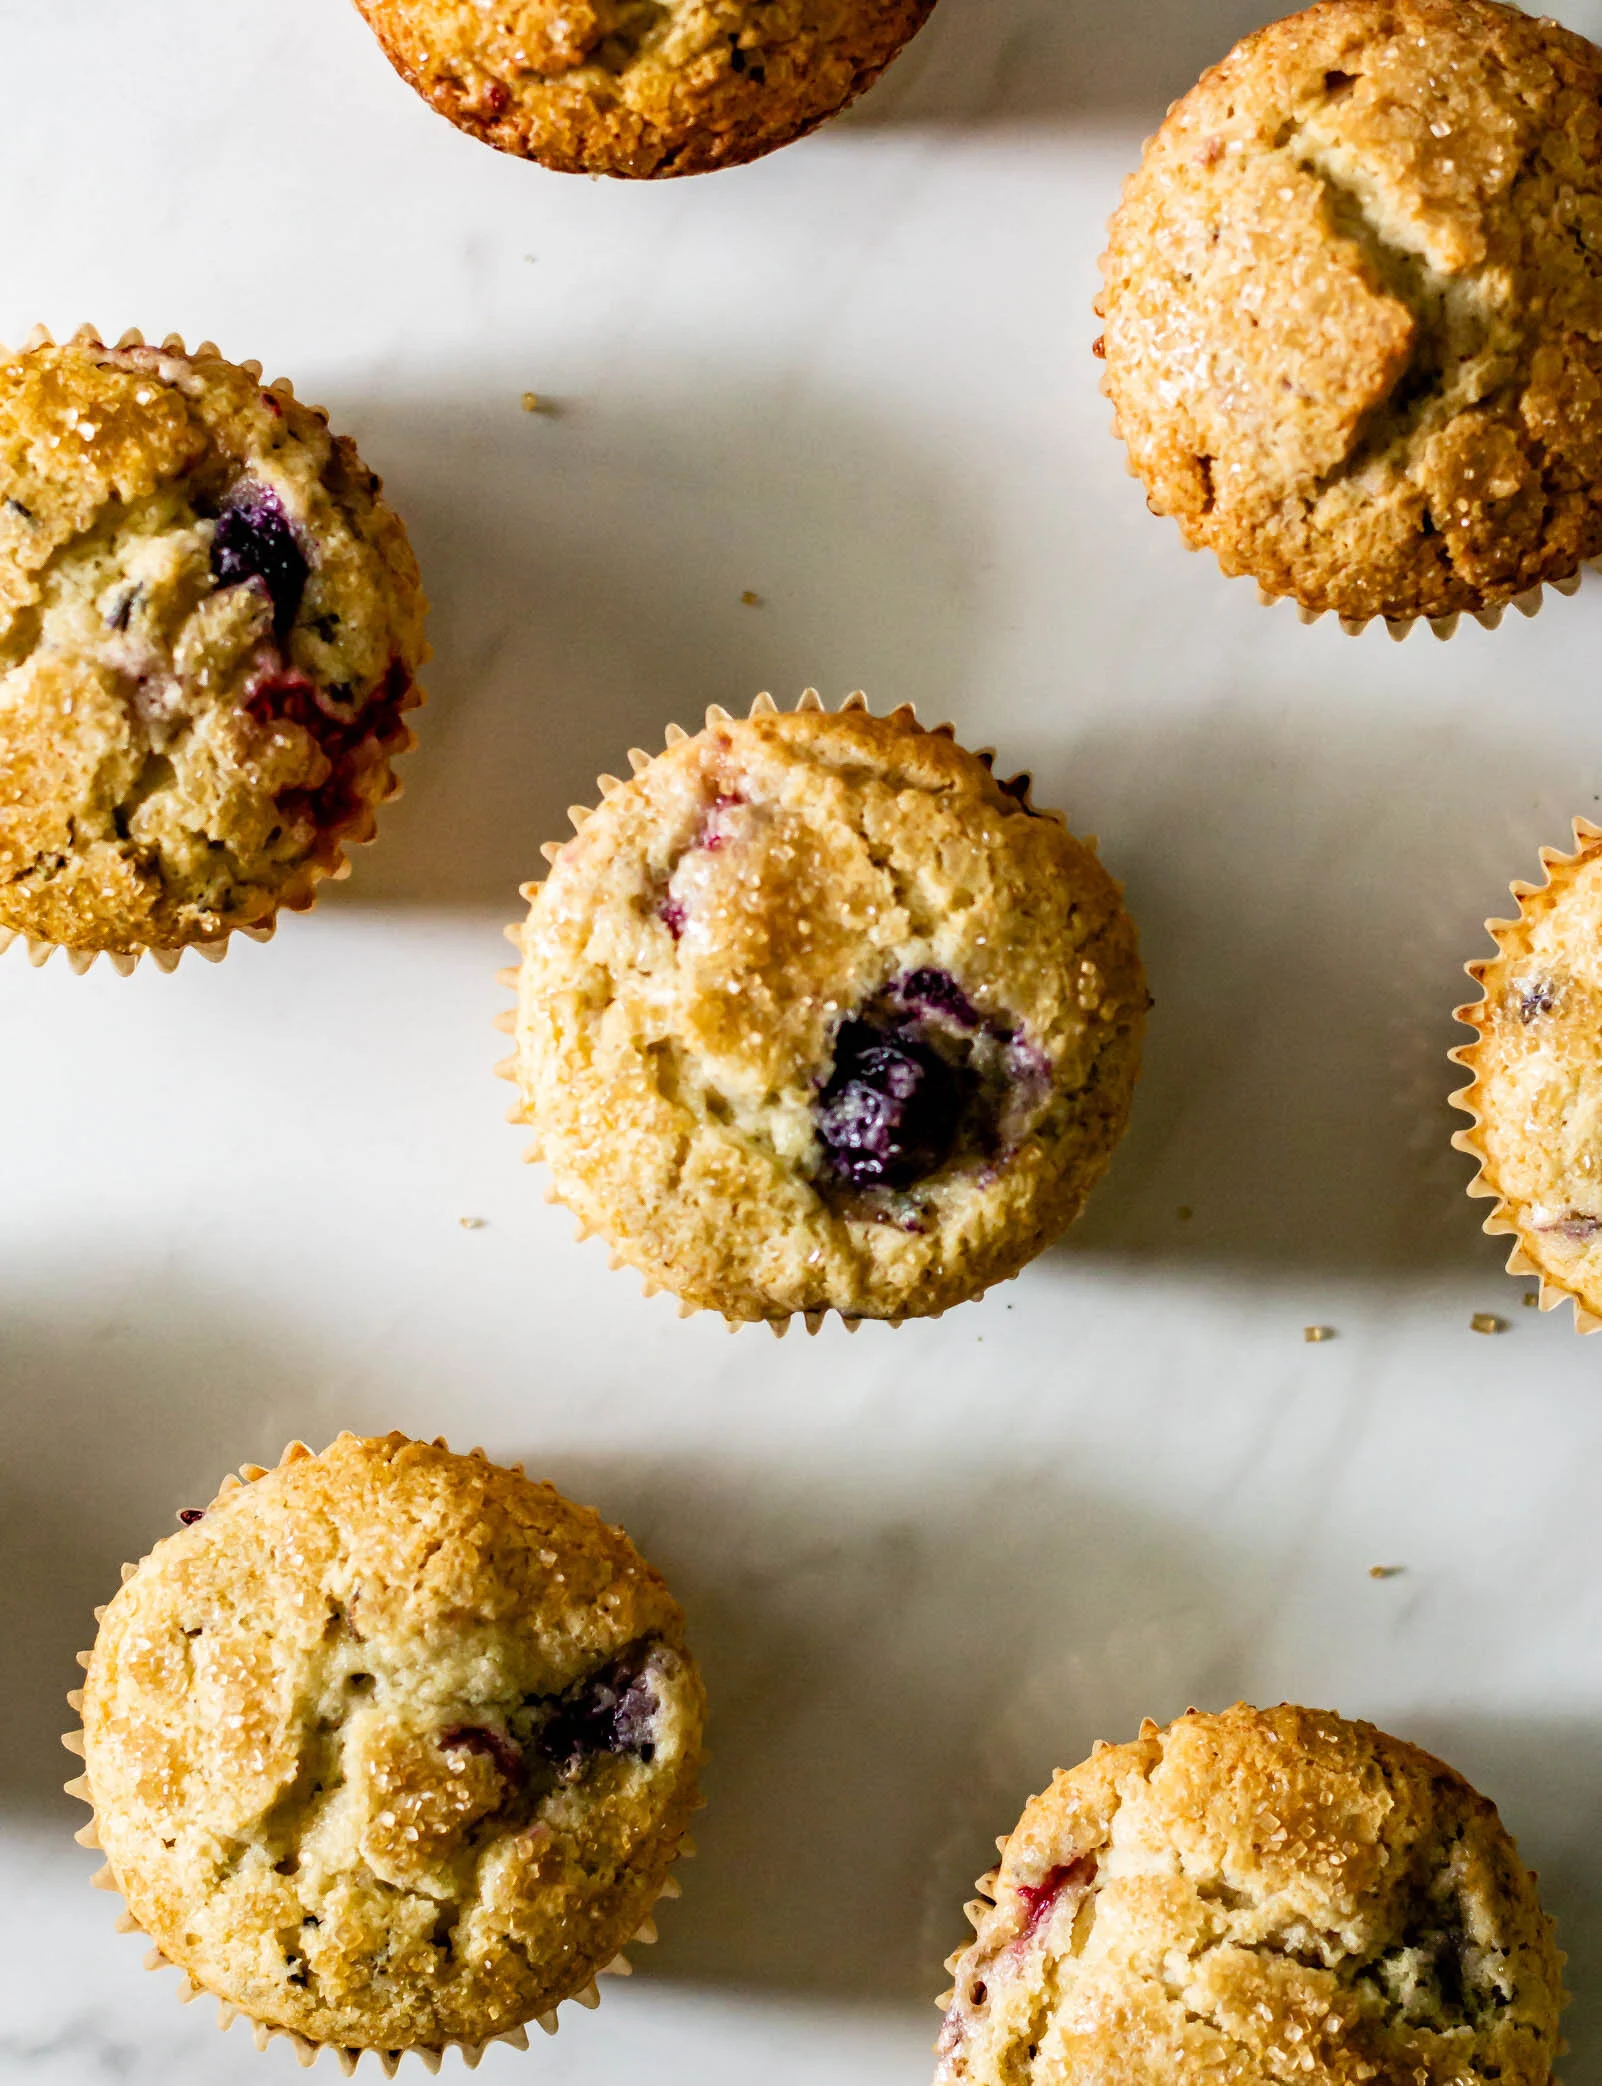
These are the muffins I make when I want to pretend I’m back in elementary school, eating muffins in the backseat. You can mix in any berries you want, wild or otherwise, frozen or fresh, just make sure that you go heavy on the berries. My ideal muffin is just a scoop of berries, barely bound together by batter. Most muffins are made using a liquid fat and the blending method, with the primary focus being moisture and tenderness. These muffins, however, are made using room temperature butter and the creaming method, like a cake, making them a tall and fluffy bakery-style muffin. I like to sprinkle them with just a bit of crunchy demerara sugar, but they would also be great with a crumb topping or even no topping at all. Don’t forget to finish them with a big pat of butter and a sprinkle of flaky salt.

frontlook1.jpg
overheadscatter1.jpg
bite2.jpg

Lavender Wild Berry Muffins 

Yield: 15 muffins

Ingredients

1/2 cup (113 g) unsalted butter, at room temperature 

1/2 cup (110 g) granulated sugar

1/2 cup (95 g) brown sugar

1 tbsp dried lavender

2 eggs

1 tsp vanilla extract

2 tsp baking powder

1 tsp kosher salt

2 cups (240 g) all purpose flour

1/4 cup (60 g) whole milk

2 tbsp whole milk yogurt 

1 1/3 cup (about 200 g) mixed berries, frozen or fresh

demerara sugar for sprinkling, optional

Procedure

  1. Preheat oven to 350° F and line a muffin pan with cupcake liners. 

  2. In a small bowl, combine granulated sugar and lavender and rub with your fingers until fragrant and set aside.

  3. In a medium bowl, whisk together flour, salt, and baking powder. Add a tablespoon of the flour mixture to the berries and toss to coat. In a glass measuring cup, combine milk and yogurt. Set all of this aside for now. 

  4. In the bowl of a stand mixer fitted with the paddle attachment, combine butter, brown sugar, and sugar and lavender mixture. Cream on medium speed until light and fluffy and no chunks of butter remain. Scrape down the sides of the bowl. 

  5. With the mixer on low speed, add eggs one at a time, followed by the vanilla extract and mix until smooth and homogenous. 

  6. With the mixer on low speed, alternate between adding the dry ingredients and the milk/yogurt mixture, starting and ending with dry ingredients (dry-wet-dry-wet-dry). 

  7. When the last of the dry ingredients have been added, remove the bowl from the mixer and scrape down the sides to ensure everything is well-combined. Use a rubber spatula to gently fold in the berries until they are evenly distributed. 

  8. Use a large cookie scoop to portion batter into your prepared muffin cups, sprinkle with demerara sugar and bake for 20-25 minutes until muffins are tall and golden brown, and a knife or toothpick comes out clean when inserted. Cool slightly and then enjoy warm, split open and slathered with lots of butter and flaky salt. 

Print Friendly and PDF

more recipes like this

straightonsliced1.jpg

lemon olive oil loaf with pluot basil jam

BananaMuffin8.jpg

banana muffins with cinnamon oat crumble

ButternutSquashMuffins2.jpg

butternut squash muffins with pecan thyme streusel

Lemon Olive Oil Loaf with Pluot Basil Jam

withjam3.jpg

It’s been a minute since I’ve shared a new recipe on here. I spent the last month taking a little break, pursuing a couple of other projects and taking a much-needed social media breather, but I’m back, baby! And I’m bringing this sweet little lemon olive oil loaf with me. At the restaurant this past month, we’ve been racking our brains to create brunch items that are fairly low-maintenance to make, but delicious and interesting. With sweeter dishes like waffles and French toast on the regular menu, brunch dessert isn’t a huge seller and it’s been kind of a bummer to create something new each week and have it not sell well. But, on the bright side, it’s gotten my little creative recipe development wheels spinning, brainstorming slightly sweet bites that are great in the morning with a cup of a coffee or as an afternoon pick me up—this guy fits the bill.

This lemon olive oil loaf is slightly sweet, very tangy, and super moist. It only needs a bowl and a whisk and uses ingredients you probably already have on hand. You can also sub the lemon zest for pretty much any other flavor you’re in the mood for…orange or lime zest, chamomile tea, chai spices…it’s ultra versatile and ultra delicious. One little note—this cake has a high moisture content (from the olive oil and yogurt) and will take a little longer to bake through. It’s going to be deeply golden on top, but if you feel like your cake is getting a little too dark while the insides still need more time, you can tent it with aluminum foil to help keep some of that browning at bay.

straightonwhole1.jpg

Pluots are the prettiest little purplish fruits, a cross between plums and apricots, and they make for a bright fuchsia jam which I am 100% on board with. If you can’t find pluots, you can totally use plums or peaches or apricots, all would work beautifully with this little loaf.

Lemon Olive Oil Loaf with Pluot Basil Jam

Yield: one 9x5” loaf and about 1 cup of jam

Ingredients

for the jam

1 lb (about 4) pluots, sliced 

4-5 basil leaves

3 tbsp sugar

3 tbsp water

1/4 tsp salt

for the cake

1 cup (130 g) olive oil

2 cups (250 g) all purpose flour

1 tsp kosher salt

1/2 tsp baking powder

1/2 tsp baking soda

2 eggs

1 cup (200 g) granulated sugar

1/4 cup (85 g) honey

3/4 cup whole milk yogurt

1/4 cup heavy cream

1 tsp vanilla 

Zest of one lemon

for the glaze

1/4 cup (30 g) powdered sugar

2 tbsp whole milk yogurt

1 tbsp lemon juice

1 tsp honey

Procedure 

to make the pluot basil jam:

  1. Place sliced pluots, sugar, water, basil and salt in a medium saucepan and stir to combine. Cook over medium heat for 15-20 minutes until pluots are soft and sauce is thickened to syrup consistency. Remove from heat and let cool completely. 

to make the lemon olive oil cake: 

  1. Preheat oven to 350° F and line a loaf pan with parchment paper. Set aside. 

  2. In a medium bowl, stir together flour, salt, baking powder, and baking soda. Set aside. 

  3. In a large bowl, whisk together sugar, honey and eggs until light, fluffy, paste forms, about 2 minutes. 

  4. Add yogurt, heavy cream, vanilla, and lemon zest and whisk to combine. Slowly stream in olive oil, whisking continually. When all of the olive oil has been added, continue whisking for one more minute. 

  5. Add dry ingredients to the liquid mixture and whisk until just combined and no flour streaks remain. 

  6. Pour batter into prepared cake pan and bake for 45-50 minutes, until deeply golden brown and a knife or toothpick inserted in the center comes out clean. Let cool slightly and then remove from pan. 

to make the glaze:

  1. Sift powdered sugar into a small bowl. Add yogurt, lemon juice, and honey and whisk until smooth. Add a splash of heavy cream if the glaze is too thick or a tablespoon of powdered sugar if it is too thin. Pour over cooled cake and serve with pluot basil jam. 

Print Friendly and PDF

more recipes like this

slicedloafcanon2.jpg

dirty chai banana bread

shortcake13.jpg

a fancy strawberry shortcake

sliced2.jpg

blood orange and rosemary snack cake

A Chocolate Chip Cookie Collection

Classic Chocolate Chip Cookies with Walnutsrecipe below

Classic Chocolate Chip Cookies with Walnuts

recipe below

A friend recently mentioned to me that I don’t have any plain chocolate chip cookie recipes on the blog. This is because I rarely make plain chocolate chip cookies. I’m continually steeping flowers into the butter or playing with spelt or einkorn or buckwheat flour. It’s rare that I don’t want to add espresso or browned butter or incorporate discarded sourdough. For me, this is where the fun is and it’s a little of what sets me apart from other recipe developers and food bloggers. 

Back in college, when I first discovered the world of food blogging, I would spend hours sifting through images on Food Gawker and pinning recipe after recipe to my Pinterest boards. As a Summer Camp Counselor, I spent the kid’s computer hour devouring blog posts (yes, the whole thing, not just skipping to the recipe), and scribbling the names of recipes and blogs onto scrap pieces of paper, creating “Things I Want To Make” lists so that I wouldn’t forget when I had a chance to get into the kitchen. As a teacher, any downtime I had after school was spent reading and copying down new chocolate chip cookie recipes. I still have at least 5 splattered pages tucked in old recipe books of chocolate chip cookie recipes I tried in my quest for the perfect one. Some called for half-melted butter, others used cornstarch. There were combinations of cake flour, bread flour, all purpose flour. There were recipes where you chilled the dough for at least 24 hours and those ready to bake right away. 

But over the last ten years, I’ve learned that there is no such thing as the perfect chocolate chip cookie. Everyone’s idea of perfection is different—is it soft and chewy? Thin and crispy? Thin, with crispy edges and chewy insides? Do you prefer milk chocolate or dark chocolate? My perfect chocolate chip cookie even changes with my mood. So instead of only sharing my current favorite chocolate chip cookie iteration (which I guarantee you will change within the week), I’ve decided to compile a collection of some of the best chocolate chip cookie recipes I’ve found. Play around, experiment, and discover one that is perfect for you. And then, add flowers to it. :)

  1. Thalia Ho is an artist through and through. Her layer cakes, piled high with flowers and herbs, are breath-taking, her photographs are detailed and romantic, and her poetry is stunning. Her cookie recipes are some of my favorites and I frequently use them as jumping off points when I’m developing new recipes. Start with her Classic Chocolate Chip Cookies and then play around with her Smoked Tahini Dark Chocolate Chunk Cookies or her Spelt Chocolate Chips

  2. Tara O’Brady is a brilliant cook and writer. Her Everyday Chocolate Chip Cookie Recipe from her book, Seven Spoons, has captured the hearts of people all over. It’s accessible, practical, and an all around great cookie. 

  3. Sarah Kieffer, who wrote The Vanilla Bean Baking Book, is famous for her “pan-banging” technique, which results in elephant ear edges and chocolate puddles. Her cookies are wide and thin, cookies with perfectly wrinkled edges and chewy middles. Pan Banging Chocolate Chip Cookies

  4. It may be controversial to include Alison Roman’s Salted Butter and Chocolate Chunk Shortbread Cookie on this list, but I couldn’t help myself. Though not a traditional chocolate chip cookie, Alison’s salty shortbread coins are studded with chocolate shards and rolled in crunchy sugar. Martin is decidedly against these cookies, apparently you cannot give him a shortbread cookie when he’s expecting a classic chocolate chip, but the rest of the world and I think they’re a really great cookie. 

  5. Below, I’m sharing the most traditionally-minded chocolate chip cookie I have in my collection. This is the one I go to when filling special orders or baking by request. They are thick and fluffy, similar to a Levain bakery cookie, but on a slightly more manageably-sized scale. 

And a few more chocolate chip-esque cookie recipes from the blog: 

SCCCookies7.jpg

sourdough chocolate chip cookies

monstercc7.jpg

monster chocolate chip cookies with molasses and walnuts

RumCookiesEdited.jpg

rum cookies

rosecc2.jpg

really great floral chocolate chip cookies

Classic Chocolate Chip Cookie with Walnuts 

Yield: about 40 small cookies or 20-24 large cookies 

Ingredients: 

3 cups (440 g) all purpose flour

1 tsp baking powder

1/2 tsp baking soda

1 1/2 tsp kosher salt

1 cup (226 g) unsalted butter, melted 

1 cup (190 g) brown sugar

1/2 cup (115 g) granulated sugar

2 eggs, at room temperature 

1 tsp vanilla extract

2 heaping cups (about 400 g) dark chocolate pieces, chopped 

200 g toasted walnuts *optional*

Procedure: 

  1. Preheat oven to 350° F and place roughly chopped walnuts on a baking sheet. Bake for 5-7 minutes, until fragrant and toasted. Let cool completely. 

  2. In a small saucepan set over medium heat, melt butter and then set aside to cool completely while you prepare the rest of the ingredients. 

  3. In a medium bowl, whisk together flour, baking powder, baking soda, and salt. 

  4. In the bowl of a stand mixer fitted with the paddle attachment, combine brown sugar, granulated sugar, and melted butter. Beat for 1-2 minutes, until combined and the mixture turns from the consistency of wet sand to a more homogenous batter. 

  5. With the mixer running on low speed, add the eggs one at a time, making sure each is incorporated before adding the next. Mix in vanilla extract and scrape down the sides of the bowl. 

  6. In two or three additions, add the dry ingredients, mixing on low to medium speed until just combined and no flour streaks remain. Gradually mix in the chocolate chunks and toasted walnuts. Use a rubber spatula or wooden spoon to stir the dough a few times to make sure that everything is evenly distributed, then cover the bowl with plastic wrap and chill for at least 30 minutes. 

  7. After the dough has chilled, use a cookie scoop (whatever size you want, but adjust baking times accordingly) to scoop cookie dough onto a parchment-lined sheet tray. At this point, you have three cookie baking options: 1) Bake right away! This will work and they will be delicious, but the cookies may spread a little more, giving you a slightly thinner cookie. 2) Return cookies to the fridge and chill for anywhere between 2-24 hours. This is my favorite option if time permits, because it allows the dough to hydrate and the flavor to develop. It also keeps the cookies pretty thick when baking. 3) Transfer cookies to a freezer bag and pop in the freezer until you’re ready to bake. I love doing this so that I can bake off one or two when a craving strikes and there I always have cookies on hand. 

  8. When you’re ready to bake: preheat the oven to 350° and line a sheet tray with parchment paper. Place scooped cookie dough about 2” apart on the tray and bake for 10 minutes for smaller cookies. After ten minutes, remove the pan from the oven, bang it on the counter once or twice, and then return to the oven and bake for another 2-3 minutes. You’re looking for golden brown edges and centers of the cookies that are dry to the touch. Remove from the oven and let cool completely on the pan. For larger cookies, start with 12 minutes and then keep an eye on them, adding extra time in 2 minute intervals until they are baked to your liking. 

Print Friendly and PDF